
Hello!
Today’s cards feature the new Circle Sayings bundle, which includes a very versatile stamp set and a circle punch. I’m so happy to see that Stampin’ Up! has been bringing back circle punches – yay! As I was deciding on a layout for the two cards, last week I came across a card sketch that Dawn Griffiths had on her blog. Dawn’s Stamping Thoughts, that I knew would be perfect. You can click here to view the sketch. It was fun using some of our new colors. The Lemon Lolly is such a soft and pretty color-it put a smile on my face as I was making one of the cards! Here is how I made the cards.

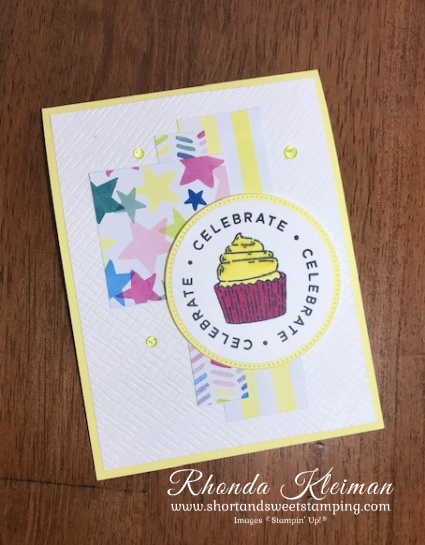
Celebrate Card
- Card base -Cut a piece of Lemon Lolly cardstock at 4 1/4″ x 11″, score at 5 1/2″, fold and crease with a bone folder.
- Cut two pieces of Basic White cardstock at 4″ x 5 1/4″. Emboss one piece with the cross-hatch embossing folder from the Basics 3D Embossing Folder set, which is available as an Online Exclusive Product. Adhere to card front. Use the other piece for the inside of the card.
- Cut three pieces from the Bright and Beautiful Designer Series Paper: 2″ x 2″. 3/4″ x 4″, 1 1/4″ x 4 1/2″ and adhere to card front.
- Cut piece of Basic White cardstock at 3″ x 3″. Stamp “celebrate” image and cupcake image with Memento Black Ink. Color the cupcake with Lemon Lolly and Berry Burst Stampin’ Blends. Punch out with the 2 3/8″ circle punch.

- Cut piece of Lemon Lolly cardstock at 3″ x 3″ and run through die cutting machine with the second largest Stylish Shapes circle die. Adhere to stamped image. Adhere to card front with Stampin’ Dimensionals.
- Embellish with Lemon Lime gems from the Tinsel Gems Four-Pack.
- For the inside of the card, stamp a cupcake in the lower left on the remaining piece of Basic White cardstock. Color with the light Lemon Lolly and Berry Burst Stampin’ Blends and adhere.
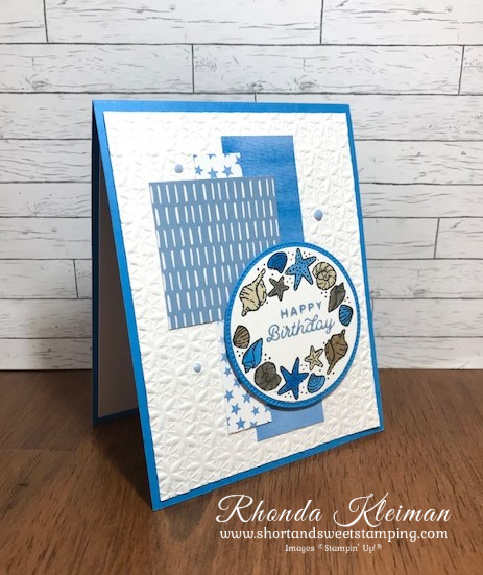
Happy Birthday Card
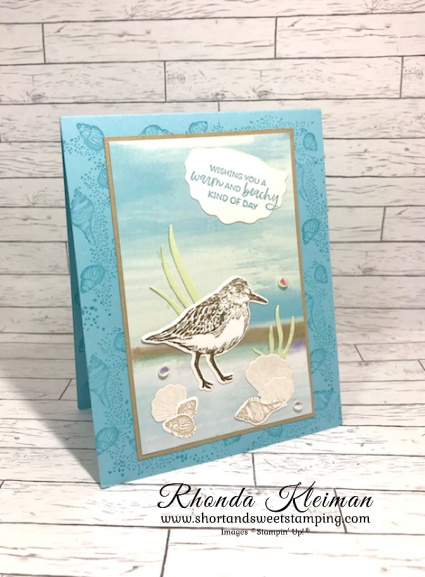
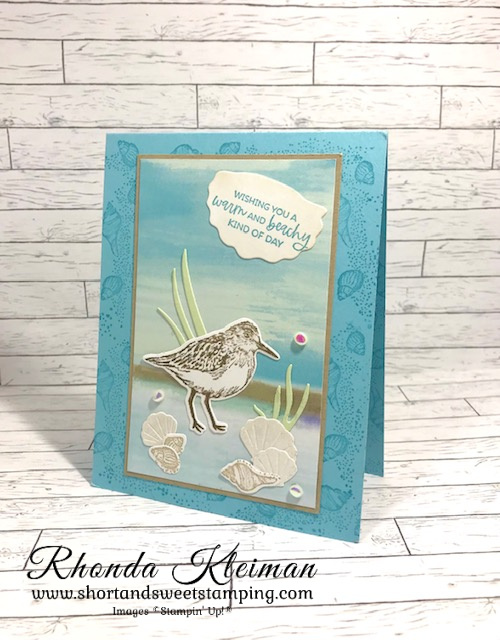
- Card base -Cut a piece of Azure Afternoon cardstock at 4 1/4″ x 11″, score at 5 1/2″, fold and crease with a bone folder.
- Cut two pieces of Basic White cardstock at 4″ x 5 1/4″. Emboss one piece with the flower embossing folder from the Basics 3D Embossing Folder set, which is available as an Online Exclusive Product. Adhere to card front. Use the other piece for the inside of the card.
- Cut two pieces from the Bright and Beautiful Designer Series Paper: 3/4″ x 4″, 1 1/4″ x 4 1/2″. Cut one piece of Boho Blue paper from the 2023-2024 In Color Designer Series Paper at 2″ x 2″. Adhere to card front.
- Cut piece of Basic White cardstock at 3″ x 3″. Punch circle out from the 2 3/8″circle punch. Stamp two seashell images with Memento Black Ink. Color the shells with light and dark Azure Afternoon, Boho Blue, Crumb Cake and Pecan Pie Stampin’ Blends. Stamp birthday greeting with Boho Blue ink.
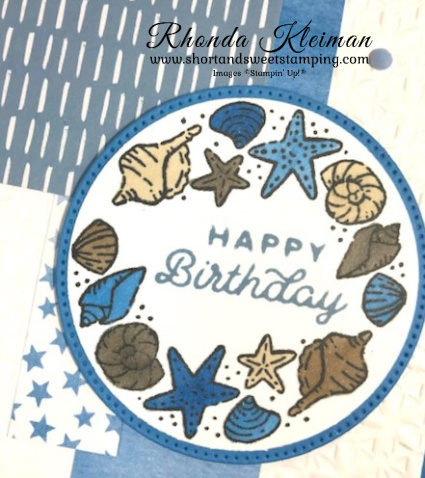
- Cut piece of Azure Afternoon cardstock at 3″ x 3″ and run through die cutting machine with the second largest Stylish Shapes circle die. Adhere to stamped image. Adhere to card front with Stampin’ Dimensionals.
- Embellish with Boho Blue Adhesive-Backed Solid Gems.
- For the inside of the card, stamp the seashell image with Boho Blue ink in the upper right corner on the remaining piece of Basic White cardstock. Adhere.

Thanks for stopping by today!


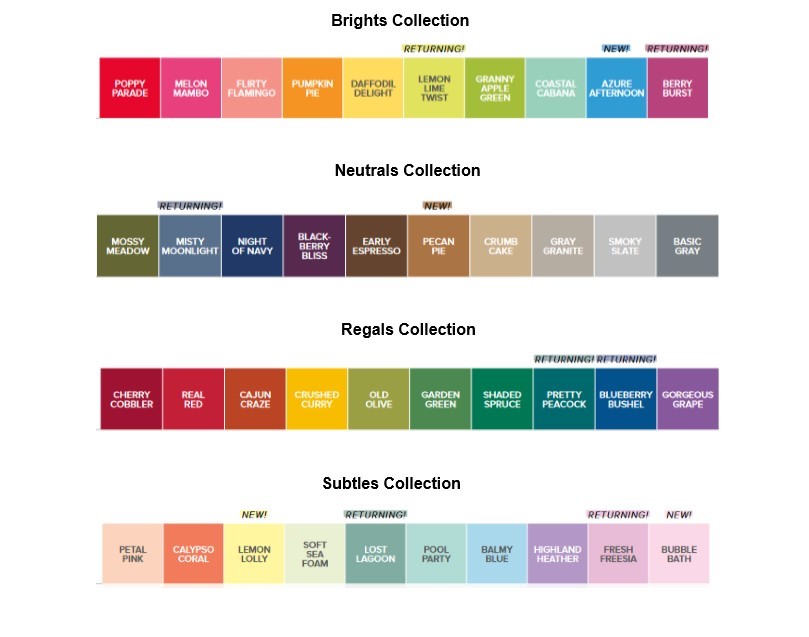
The Confetti Birthday Kit is the newest addition to the Kits Collection. It comes with everything you need to quickly create confetti shaker cards—a total of 9 cards in 3 lively designs. The kit includes: coordinating envelopes; stamp set; Blueberry Bushel ink spot; printed card bases, card fronts, self-adhesive cellophane shaker bags, die cut pieces, holographic foil labels, adhesive, embellishments and a clear block. Coordinating colors are: Blueberry Bushel, Coastal Cabana, Crushed Curry, Flirty Flamingo, Lemon Lime Twist, Poppy Parade. Cost of the kit is $23.00 and the item number is 162390. To purchase the kit, go to my online store by clicking here.

A reminder that Online Exclusive Products are available for purchase. New products will be added to the Online Store three times a year – March, July and November. These products will be available online only and will not appear in any catalog. There will be no end date to the sales period. Some products will be re-ordered when inventory is low and others will only be available while supplies last. To see all of the new Online Exclusive Products, including the Kits Collection and SU branded merchandise you can visit my online store.

Place an online order between $50 and $149 and use this host code for May. You will receive a free gift from me the following month. If your order is $150 or more DO NOT use the host code. You will qualify for Stampin’ Rewards.
Product List ") |  Circle Punch") | |
 |  | |
 |  | |
 |  | |
 | ||
 |  |  |
 |  |  |
")
 Designer Series Paper")
 Designer Series Paper")


")
")
")
")

 Specialty Designer Series Paper")


