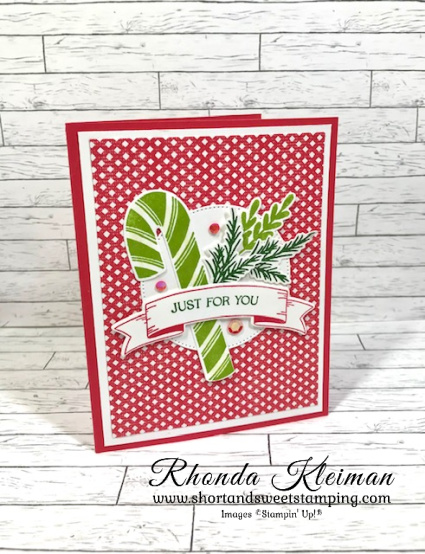
Happy Chanukah Cards

Hello!

Today is the seventh and next-to-last day of Chanukah. Here are two of the cards I designed to send to family and friends. Since Stampin’ Up! hasn’t had a Chanukah stamp set in many years I have had to purchase stamp sets from other companies. This year I purchased a new stamp set and coordinating dies from Honey Bee. I use Stampin’ Up products such as cardstock, Designer Series Paper and Specialty Papers, ink and embellishments. I also use retired products that I’ve kept, knowing that they work well with my limited blue, silver and gold color palette. This year I used Starry Sky, one of the 2022-2024 In Colors in several of the cards. It is such a bright and pretty blue and it worked beautifully. I also used greetings from the Brightest Glow stamp set in the July-December 2022 Mini Catalog. I loved that many of the greetings, while intended for Christmas cards, would be perfect for my cards because Chanukah is also known as the Festival of Lights and some of the greetings include the word “light.”

Here is how I made this card.

  • Card base – cut a piece of Basic White Thick cardstock at 5 1/2″ x 8 1/2″, score at 4 1/4″, fold and crease with a bone folder.
  • Cut a piece of the variegated paper from the Sun Prints Designer Series Paper at 4″ x 5 1/4″ and run through a die cutting machine with the largest Deckled Edge Rectangle die. Adhere to card base.
  • Cut a piece of the silver dot paper from the Silver & Gold Specialty Paper at 3″ x 4 1/4″ and run through die cutting machine with the third largest Deckled Edge Rectangle Die and adhere to card front. This DSP was a free Sale-A-Bration item earlier this year.
  • Cut a piece of Basic White cardstock at 2 3/4″ x 4 1/4″ and run through die cutting machine with the fourth largest Deckled Edge Rectangle Die. Flick Wink of Stella and Night of Navy and Starry Sky ink onto piece with Stampin’ Blends.
  • To make the candles, cut 1/2″ strips of the Starry Sky paper from the 2022-2024 In Color 6″x6″ Glimmer Paper and back with 1/2″ pieces of an adhesive sheet. For the flames, cut a scrap piece of Silver Foil Paper and back with an adhesive sheet. Use scrap pieces of Basic White cardstock for the candle backing pieces. Use the candle and flame dies from the Sentiment Silhouettes Dies. Die cut nine candles and nine backing pieces. Adhere together. Cut nine flames. Arrange candles on the Basic White Deckled Edge Rectangle piece and adhere with liquid glue. Adhere candle flames.
  • Stamp greeting with Starry Sky ink at bottom of the piece. The greeting I used is from the Honey Bee stamp set. Adhere to card front with Stampin’ Dimensionals.
  • Stamp greeting with Starry Sky ink on inside of card.

Here is how I made this card. I got the idea from Pinterest and apologize for not remembering who it came from. I had thought of using DSP strips for the candles and this design shows off the DSP very nicely.

  • Card base – cut a piece of Starry Sky cardstock at 5 1/2″ x 8 1/2″, score at 4 1/4″, fold and crease with a bone folder.
  • Cut a piece of Basic White cardstock at 4 1/8″ x 5 3/8″. Run through embossing machine with the Peacock Embossing Folder (retired) and adhere to card front. I love this folder and it looks like flames!
  • Cut eight strips of Designer Series Paper at 3/8″ x 3″ and one strip at 1/2″ x 3″. I used paper from the Sun Prints DSP and the 2022-2024 In Color 6″x6″ DSP. Arrange the strips on the card front, placing the 1/2″ strip in the middle. Adhere with liquid glue.
  • Make the flames by using any bird punch that has a separate wing. I used a retired punch to do this. Use a scrap piece of Gold Foil paper and punch nine pieces. Adhere with either liquid glue or a glue dot.
  • Stamp greeting with Starry Sky ink on scrap piece of Basic White cardstock. Run through die cutting machine with the smallest label die from the Seasonal Labels die set. Adhere over candles with Stampin’ Dimensionals.
  • Cut a piece of Basic White cardstock at 4″ x 5 1/4″ and stamp a greeting from the Brightest Glow stamp set with Starry Sky ink. Adhere to inside of card.

Thanks for stopping by today!

Place an online order between $50 and $149 and use this host code for December. You will receive a free gift from me the following month.  If your order is $150 or more DO NOT use the host code. You will qualify for Stampin’ Rewards.

Product List

Leaves of Holly Card

Hello!

Today, I’m posting my last Christmas card for the season and it is from the Boughs of Holly Suite. I had big plans to do many more cards with this beautiful suite, but you know what they say about the best laid plans……… I didn’t get around to using much of the Boughs of Holly DSP, however, I think this is an elegant card, even without it. I chose to use Very Vanilla cardstock rather than Basic White to give a richer look. I used the Merry Melody 3D Embossing Folder for the background. This folder is one of my all-time favorites and I will never part with it!!

Here is how I made the card.

  • Card base – Cut a piece of Cherry Cobbler cardstock at 5 1/2″ x 8 1/2″, score at 4 1/4″, fold and crease with a bone folder.
  • Cut a piece of Very Vanilla cardstock at 4″ x 5 1/4″ and run through a die cutting and embossing machine with the Merry Melody 3D Embossing Folder. Adhere to card front.
  • Cut a piece of Very Vanilla cardstock at 3″ x 4″ and using the leaf label die from the Holly Berry Dies, run through die cutting machine. Run a scrap piece of Old Olive cardstock through die cutting machine with the double leaf die. Adhere to the leaves on the label.
  • Run small scraps of Old Olive and Evening Evergreen cardstock through die cutting machine with the sprig die. Adhere behind the leaves on label. Adhere label to card front with Stampin’ Dimensionals.

  • Run a scrap piece of Cherry Cobbler cardstock through die cutting machine with the berry die. Die cut the berry accent piece with a scrap piece of Vanilla Glimmer Paper from the Glimmer Specialty Paper. Adhere to berries. Adhere to label.
  • Die cut the smaller label with a scrap piece of Very Vanilla cardstock and stamp greeting with Cherry Cobbler ink. Adhere to leaf label.
  • Embellish card front with several Cherry Cobbler Festive Pearls.
  • Cut another piece of Very Vanilla cardstock at 4″ x 5 1/4″, stamp greeting and adhere to inside of card.

Thanks for stopping by today!

Save up to 60% on retiring products from the July-December Holiday Mini Catalog starting today.

Click here to view the retiring products list

Click here to view the list of carryover products that will still be available after the Mini Catalog retires

The Clearance Rack has been refreshed and lots of products have been added! Click here to check it out. I just did a quick check and there are still lots of great items available but remember that availability is only while supplies last!

Place an online order between $50 and $149 and use this host code for December. You will receive a free gift from me the following month.  If your order is $150 or more DO NOT use the host code. You will qualify for Stampin’ Rewards.

Product List

Free Shipping Day December 15

Hello!

Stampin’ Up! has announced a free 24-hour shipping day for all orders of $75 or more on December 15th. Ordering begins at 12:00am and ends at 11:59pm Mountain Time. Please be advised that due to increased shipping times and possible shipping delays during the month of December, we can’t guarantee delivery before Christmas.

Thanks for stopping by today!

Place an online order between $50 and $149 and use this host code for December. You will receive a free gift from me the following month.  If your order is $150 or more DO NOT use the host code. You will qualify for Stampin’ Rewards.

Sweet Candy Canes

Hello!

Today’s card features the Sweetest Christmas Suite Collection, which is a mega suite containing two stamp & die bundles, along with coordinating Designer Series Paper and embellishments. I’ve been busy holding in-person holiday card classes for the last several weeks and finally have time to start posting a few of the projects.

Here is how I made the card.

  • Card base – cut a piece of Sweet Sorbet cardstock at 5 1/2″ x 8 1/2″, score at 4 1/4″, fold and crease with a bone folder.
  • Cut a piece of Basic White cardstock at 4″ x 5 1/4″ and adhere to card front. Cut a piece of Sweetest Christmas Designer Series Paper at 3 3/4″ x 5″. I used the sheet with the Sweet Sorbet and white diamond pattern. Adhere to card front.
  • Stamp candy cane from the Sweet Candy Canes stamp set with Granny Apple Green ink on piece of Basic White cardstock. Run through die cutting machine. Add some glimmer with Wink of Stella.
  • Stamp two pine leaves with Garden Green ink and one leaf with Granny Apple Green ink on scrap piece of Basic White cardstock. Run through die cutting machine.
  • Stamp single banner from the Christmas Banners stamp set with Sweet Sorbet ink on scrap piece of Basic White cardstock. Stamp greeting with Garden Green ink. Run through die cutting machine.
  • Cut a 3″ square of Basic White cardstock and run through die cutting machine with the 2nd largest circle from the Stylish Shapes Dies. Adhere to card front.
  • Adhere the three leaves to the circle with Mini Stampin’ Dimensionals. Adhere the candy cane. Adhere the banner with Stampin’ Dimensionals. Add a few Sweet Sorbet sequins from the Adhesive Backed Seasonal Sequins.
  • Cut a piece of Basic White cardstock at 4″ x 5 1/4″. Stamp greeting from the Sweet Candy Cane stamp set with Sweet Sorbet ink. Stamp a pine leaf with Garden Green ink in lower left corner. Adhere to inside of card.

Thanks for stopping by today!

Save up to 60% on retiring products from the July-December Holiday Mini Catalog starting today.

Click here to view the retiring products list

Click here to view the list of carryover products that will still be available after the Mini Catalog retires

The Clearance Rack has been refreshed and lots of products have been added! Click here to check it out. Remember that availability is only while supplies last!

Place an online order between $50 and $149 and use this host code for December. You will receive a free gift from me the following month.  If your order is $150 or more DO NOT use the host code. You will qualify for Stampin’ Rewards.

Product List

Retiring List and Clearance Rack Sale Begin Today

Save up to 60% on retiring products from the July-December Holiday Mini Catalog starting today.

Click here to view the retiring products list

Click here to view the list of carryover products that will still be available after the Mini Catalog retires

The Clearance Rack has been refreshed and lots of products have been added! Click here to check it out. Remember that availability is only while supplies last!

Place an online order between $50 and $149 and use this host code for December. You will receive a free gift from me the following month.  If your order is $150 or more DO NOT use the host code. You will qualify for Stampin’ Rewards.

Peaceful Deer Card

Hello!

Today’s card features the Peaceful Deer stamp set and coordinating Deer Builder Punch. The stamp set and punch were introduced as a bundle in the 2021 Holiday Mini Catalog and I didn’t purchase it at the time. I was happy to see that it carried over into the current Annual Catalog so I was able to purchase it this year. It is such a nice stamp set, filled with lovely images, and yes, you can create many peaceful scenes with these stamps. We made this card in the Christmas card classes I held last week.

Here is how I made the card.

  • Card base – cut a piece of Evening Evergreen cardstock at 5 1/2″ x 8 1/2″, score at 4 1/4″, fold and crease with a bone folder.
  • Cut one piece of Mossy Meadow cardstock and one piece of Old Olive cardstock at 2 1/2″. Cut strips from two different pieces of the Boughs of Holly Designer Series Paper at 2 1/4″ x 3 1/4″ and adhere to the cardstock pieces. Adhere to card front.
  • Stamp deer with Crumb Cake ink on a scrap piece of Basic White cardstock. Punch out with Deer Builder punch.
  • Cut a 3″ square piece of Basic White cardstock and run through die cutting machine with the third largest circle from the Layering Circles Dies. Stamp ground with Soft Suede ink. Stamp two of the smallest trees with Mossy Meadow ink, stamping off before stamping onto the cardstock. Stamp the stars with Smoky Slate ink. Cut a 3 1/4″ square of Evening Evergreen cardstock and run through die cutting machine with the second largest circle from the Layering Circles Dies and adhere to stamped piece.
  • Adhere circle to card front. Adhere deer to the top of the circle with Mini Stampin’ Dimensionals. Add a few gold Festive Pearls for a bit of bling. Add shine to the deer, trees and stars with Wink of Stella.
  • Cut a piece of Basic White cardstock at 4″ x 5 1/4″. Stamp ground twice with Soft Suede ink. Stamp the second largest tree at bottom left with Mossy Meadow ink, stamping off before stamping onto the cardstock. Stamp greeting from the Brightest Glow stamp set with Evening Evergreen ink. Adhere to inside of card.

Here are a few pictures from the three classes I held. several people were MIA when I took the photos!

Thanks for stopping by today!

This month, we celebrate the people in your life who mean the world to you with Timeless Greetings—an all-occasion card kit you can use year-round! This unique kit features an elegant pocket watch and globe design in neutral colors, along with heartfelt sentiments that are sure to inspire lasting memories. These cards are perfect for wishing happy birthday, saying thank you or sending a friendship note in style, so make sure to let family and friends know just how special they are! The kit contains enough supplies to create eight cards, two each of four different designs; envelopes; printed card bases, die cuts, embellishments; stamp set and clear block; coordinating colors: Basic Black, Basic Gray, Cajun Craze, Crumb Cake, Evening Evergreen, Soft Suede. Cost of the kit is $21USD, Item #161062. Click here to purchase the kit from my online store.

Create fun gift card holders to help you celebrate your special occasions all year long! Personalize each gift with these reversible boxes and paper bands for a unique design every time. This kit comes with enough supplies for you to make 16 different gift card holders—2 each of 8 designs. It also has an all-occasion stamp set and enough paper pieces to make your craft really pop! Coordinating Stampin’ Up! colors: Balmy Blue, Basic Gray, Blushing Bride, Calypso Coral, Crushed Curry, Garden Green, Tahitian Tide. No matter what the occasion or who the recipient is, this is a coordinated paper craft that everyone will love and appreciate! 

Plus, this month you can take your crafting even further with a special add-on! Give a gift card and a personalized card with the Good Things Cards & Envelopes add-on. You get 20 cards (5 each of 4 designs) and 20 coordinating envelopes. Add-ons are live during the subscription period but will only be available while supplies last, so don’t wait! 

Place an online order between $50 and $149 and use this host code for November. You will receive a free gift from me the following month.  If your order is $150 or more DO NOT use the host code. You will qualify for Stampin’ Rewards.

Product List