Forever Fern-Kylie’s International Blog Highlights

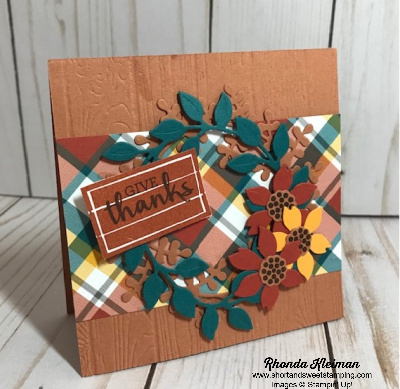
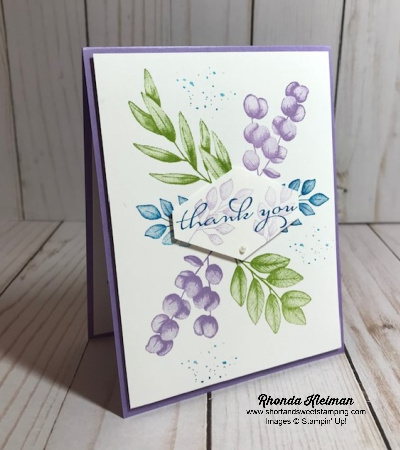
Hello! Today I’m participating in Kylie Bertucci’s International Blog Highlights. Readers get to vote on their top five favorites in the gallery and the top 10 winners will get to participate in an International Blog Hop later this month. The thank you theme is a way for us to show our appreciation to someone that has inspired, helped or supported us in some way. Today’s card features Forever Fern, one of my favorite stamp sets from the annual catalog.

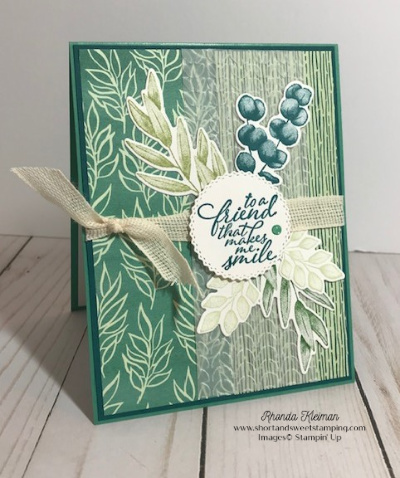
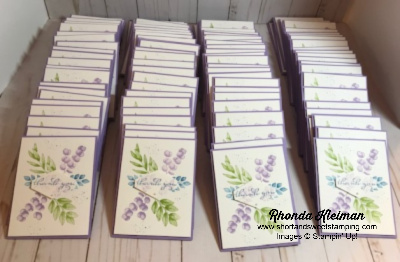
I was asked by a women’s organization I belong to, to make cards to go into 110 goodie bags that were hand-delivered to our members two weeks ago. Normally we have an annual membership dinner at a restaurant, however, due to Covid, we were unable to meet in person. We hosted a Zoom event and everyone opened up their bags at the same time. While we couldn’t be together in person, this was the next best option and it was a fun evening! Since I had to do so many cards I stuck to stamps, ink, paper and threw in a punch. Highland Heather and Pacific Point matched our logo perfectly and I added in Granny Apple Green.

Here is how I made the card.

  • Card base – cut Highland Heather cardstock at 4 1/4″ x 11″, score at 5 1/2″ and crease with a bone folder.
  • Cut piece of Whisper White cardstock at 4″ x 5 1/4″. Stamp the floral images from the Forever Fern stamp set with Highland Heather, Pacific Point and Granny Apple Green ink. Since I had to make multiple cards, I used the Stamparatus, which was a great time saver! Stamp the splatter image around the leaves with Pacific Point ink, stamping off once before stamping onto the cardstock.
  • On a scrap piece of Whisper White cardstock, stamp the thank you greeting from the Borders Abound stamp set. Punch out with the Tailored Tag punch. Overstamp the small leaf image twice with Highland Heather ink, first stamping off each time. I added a small pearl at the bottom of the tag.
  • Adhere the stamped floral piece to the card base with Stampin’ Dimensionals and then adhere the tag to the center of the floral spray with Mini Stampin’ Dimensionals.

We wanted to put a special message into the card so I ended up creating the inside of the card by using my computer printer. I selected a font that came close to matching the font on the tag and then used the RGB numbers for Pacific Point to print the messages, which I did four to a page and then cut apart with the Stampin’ Trimmer.

I’d be so appreciative if you would vote for my card by clicking on the vote image below. To give a vote, once you are in the gallery, click on the heart at the top right hand side of the picture as the hearts appear.

Thanks for stopping by today!

 Product List  
Stamparatus
[146276]
$49.00
November 5-7

Festive Post for Halloween

Hello and Happy Halloween! Today’s card features the Festive Post stamp set. This is a versatile set because it has images for Halloween, Christmas and Valentines Day and they can be punched out with either the Rectangular Postage Stamp punch or other punches and dies you might have in your collection. Here is how I made the card.

  • Card base – cut piece of Basic Black cardstock at 5 1/2″ x 8 1/2″, score at 4 1/4″ and crease with a bone folder.
  • Cut piece of Cajun Craze cardstock at 4 1/8″ x 5 3/8″.
  • Select two different pieces of Magic in the Night Designer Series Paper. Cut one piece at 2 1/2″ x 5 1/4″ and another at 1 1/2″ x 5 1/4″. Adhere both pieces to the Cajun Craze piece.
  • Cut three pieces of Whisper White cardstock at 1 1/4″ x 1 7/8″. Stamp the three images from the Festive Post stamp set. Stamp the October 31 image with Tuxedo Black Memento ink. Stamp the brooms with Cajun Craze ink. Stamp the greeting with Blackberry Bliss ink. Stamp the small spider from the Hallows Night Magic stamp set under the greeting.
  • Punch three of the Rectangular Postage Stamps from scrap pieces of Basic Black cardstock. Adhere to the stamped images.
  • Wrap a piece of Metallic Mesh Ribbon twice around the Cajun Craze/DSP piece and tape on the back. Adhere this piece to the card front. Use Tear and Tape or Stampin’ Seal+ to adhere the postage stamp pieces to the card front so that they stick well to the ribbon
  • Adhere five rhinestone basic jewels all around the card for some extra bling.
  • Cut piece of Whisper White cardstock at 4″ x 5 1/4″ and stamp a greeting from the Hallows Night Magic stamp set with Tuxedo Black Memento ink. Stamp large and small spider images from the set with Blackberry Bliss ink. Adhere to inside of card.

Thanks for stopping by today!

 Product List  
November 5-7

Hallows Night Magic – Another Card Idea

Hello! Here’s another card I created with the Hallows Night Magic Bundle. It was fun and easy to put it together. Here is how I made the card.

  • Card base – cut piece of Basic Black cardstock at 5 1/2″ x 8 1/2″, score at 4 1/4″ and crease with a bone folder.
  • Cut piece of Whisper White cardstock at 3 1/4″ x 5″.
  • Select three different papers from the Magic in this Night Designer Series Paper and cut at 1 1/2″ x 3″. Adhere to Whisper White cardstock and adhere piece to card front.
  • Stamp label image from the Hallows Night Magic stamp set on scrap piece of Whisper White cardstock with Tuxedo Black Memento ink. Color the flowers with Pumpkin Pie and Cajun Craze Stampin’ Blends and color the leaves with Old Olive Stampin’ Blends. Stamp greeting with black ink. Run through die cutting machine with the smaller label die from the Halloween Magic dies.
  • Die cut larger label from scrap piece of Basic Black cardstock and adhere to stamped label piece.
  • Cut piece of Glittered Organdy Ribbon at 6″, trim ends at an angle and adhere across the center of the card front. I used Scotch Tape to hold it down in the center. Adhere label over the ribbon.
  • Cut piece of Whisper White cardstock at 4″ x 5 1/4″. Stamp greeting with black ink. Cut strip of Basic Black cardstock at 1 1/2″ x 4 3/4″ and run it through the die cutting machine using the filigree edge die. Adhere to bottom of the cardstock. Adhere piece to inside of card.

Thanks for stopping by today!

There are just a few days left for the 15% discount on Designer Series Paper!

 Product List  
 

Arrange a Wreath Christmas Card

Hello! Today I’m sharing a fun fold Christmas card that features the Arrange a Wreath bundle. This is one of my favorite bundles in the annual catalog. It is so versatile because there are endless possibilities for you to make seasonal as well as all-occasion cards. This is one of the projects we made in my August class to go.

Here is how I made the card:

  • Card base – cut piece of Shaded Spruce cardstock at 4 1/4″ x 11″, score at 2 ¾” and 8 ¼”, fold and crease sharply with bone folder.  This is a fun fold so the sharper the crease the better the folds will lay flat.
  • Cut four pieces of one of the lighter wood image papers from the In Good Taste Designer Series Paper at 2 1/2″ x 4″. Run all four pieces of the DSP through the Tasteful Textile embossing folder.  Adhere to front and inside card flaps.
  • Stamp leaf wreath from the Arrange a Wreath stamp set with Shaded Spruce ink on 3 5/8” x 3 7/8” piece of Very Vanilla. 
  • Cut piece of gold metallic brushed foil at 3 3/4″ square and die cut with the leaf wreath from the Wreath Builder dies.  Adhere over the stamped wreath image.
  • Cut piece of Cherry Cobbler cardstock at 3 3/4″ x 4″. Adhere the wreath image to this piece.
  • Stamp pheasant with Soft Suede ink and three pears with Crushed Curry ink on scrap piece of Very Vanilla cardstock.  You will notice that there are two pear images on both the one stamp and coordinating die.  It makes stamping and cutting the same pieces multiple times faster. Die cut images, arrange around wreath and adhere to card.  For added dimension you can use Stampin’ Dimensionals.
  • Die cut the full bow and bow loops from a scrap piece of Cherry Cobbler cardstock.  Adhere the centers together with small dot of liquid glue and adhere to top of wreath.
  • Stamp greeting with Cherry Cobbler ink on scrap piece of Very Vanilla cardstock.  Die cut with smallest oval in the Stitched Shapes dies set.  Adhere to wreath with Stampin’ Dimensionals.
  • Adhere the wreath piece to the left front flap.  Be sure to only apply adhesive to the left side of the piece, leaving the right side unattached so that the can card open.
  • Stamp pheasant with Soft Suede ink in bottom left corner of the 4” x 5 ¼” piece of Very Vanilla cardstock. Stamp a greeting if you choose.  I used a greeting from the Toile Christmas stamp set and stamped it with Cherry Cobbler ink.

Thanks for stopping by today!

November 5-7, 2020
 Product List  

Hallows Night Magic

Today’s card features products from the Magic in this Night suite. When I saw this suite in the August-December 2020 mini catalog I knew right away that I would purchase some of the products because as much as I enjoy the more traditional Halloween stamps and papers, the ones this year are more sophisticated or elegant and it is a nice change of pace! I decided to showcase the die cut labels by making a gatefold card. It is one of the cards we made in my stamping club this month.

Here is how I made the card.

  • Card base – cut piece of Basic Black cardstock at 5 1/2″ x 8 1/2″. Score at 2 1/8″ on both ends, fold and crease sharply with a bone folder.
  • Cut four strips of Magic in the Night Designer Series Paper at 1 7/8″ x 5 1/4″. Adhere two of the strips to the front flaps and the remaining two strips to the inside flaps.
  • Stamp “Happy Halloween” greeting from the Hallows Night Magic stamp set with Cajun Craze ink on scrap piece of Whisper White cardstock. Run through die cutting machine with the smaller label die from the Halloween Magic dies.
  • Cut piece of Black Glitter paper with the larger die from the Halloween Magic dies. Adhere the stamped greeting to this piece with either Tear and Tape or Stampin’ Seal+. Adhere entire label piece to the left flap on the card front. Make sure that you only apply glue to the left part of the label so that the card can be opened!
  • From the sheet of Magic in the Night DSP with the bats, cut out both the large and small bats with the coordinating die from the Halloween Magic dies. Both shapes are included on the one die. Adhere bats to label.
  • Cut piece of Whisper White cardstock at 4″ x 5 1/4″. Stamp another greeting from the Hallows Night Magic stamp set with Cajun Craze ink. Stamp small bat images with Memento Tuxedo Black ink in opposite corners. Adhere to inside of card.
  • Cut length of Metallic Mesh ribbon, tie into a bow and adhere to corner of label with a glue dot.

Thanks for stopping by today!

 Product List  

Celebrate Sunflowers-Kylie’s Training Blog Hop

Hello! I’m excited to once again be a part of Kylie Bertucci’s Demonstrator Support Program for the 2020-2021 year! I’m part of a group of Stampin’ Up! demonstrators from around the world that participate in Kylie’s program for building our businesses. Welcome to our Demonstrator Training Blog Hop for October. Please be sure to click on the names in the list at the end of this post to hop around and view the beautiful projects posted by so many talented stampers.

Today’s card features the Celebrate Sunflowers bundle, which is part of the beautiful Flowers for Every Season Suite.

Here is how I made the card.

  • Card base – cut piece of Just Jade cardstock at 5 1/2″ x 8 1/2″, score at 4 1/4″, fold and crease with a bone folder.
  • Cut piece of Whisper White cardstock at 4 1/4″ x 5 1/2″ and run through die cutting machine using the largest Stitched Rectangles die.
  • Stamp greeting with Just Jade ink at bottom of the rectangle piece and adhere to card front.
  • Cut piece of Flowers for Every Season DSP at 3 1/2″ x 4″ and adhere to stitched rectangle piece.
  • Select one of the pieces of Bumble Bee papers from the Flowers for Every Season DSP and stamp the large sunflower image from the Celebrate Sunflowers stamp set with Early Espresso ink. Run through die cutting machine with coordinating die from the Sunflowers Dies.
  • Cut piece of Copper Foil at 3 1/2″ square, cut a piece of an adhesive sheet at 3 1/2″ square and adhere to foil piece. Run through die cutting machine with large sunflower die from the Sunflower Dies set. Remove adhesive backing and adhere to the stamped sunflower.
  • Stamp three of the large leaves with Just Jade ink on scrap piece of Just Jade cardstock. Die cut with coordinating leaf die.
  • Cut a 12″ length of Just Jade ribbon and make a loop. Adhere on angle to the DSP. Adhere leaves and then adhere sunflower.
  • Cut piece of Whisper White cardstock at 4″ x 5 1/4″, stamp greeting and adhere to inside of card. I used one of the greetings from the So Sentimental stamp set.

Thanks for stopping by today!


 Product List  

15% Off Designer Series Paper

Stampin’ Up! is offering a 15% discount on fifteen gorgeous sets of Designer Series Papers from both the annual catalog and the August-December mini catalog for the entire month of October. Now is a great time to stock up! There are no limits to the number of packages you may purchase.

Click here to shop my online store

Here are a few cards I previously made with some of these papers.

Plaid Tidings
Whale of a Time
In Good Taste
Peony Garden
Artistry Blooms
Forever Greenery
Toile Tidings

Thanks for stopping by today!