Butterfly Beauty-Kylie’s International Blog Highlights

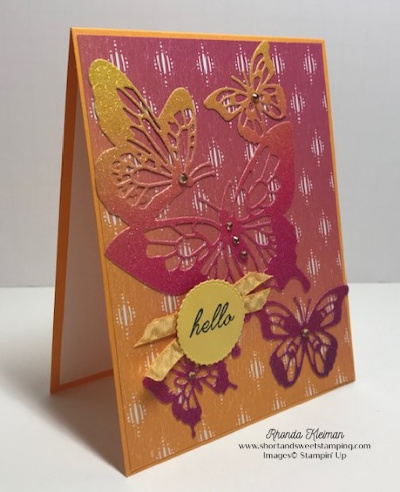
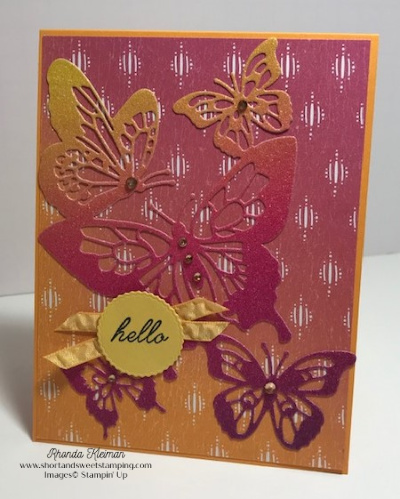
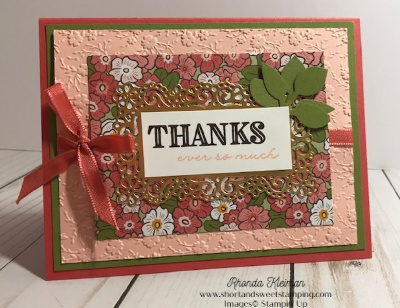
Hello! Today I’m participating in Kylie Bertucci’s International Blog Highlights. Readers get to vote on their top five favorites in the gallery and the top 10 winners will get to participate in an International Blog Hop later this month. The thank you theme is a way for us to show our appreciation to someone that has inspired, helped or supported us in some way. When I saw the Rainbow Glimmer Paper in the new annual catalog I immediately thought that it would work beautifully with the Butterfly Beauty dies and it did not disappoint! I combined it with the Artistry Blooms Designer Series Paper, which I knew I had to have the minute I laid eyes on it!

Here is how I made the card.

  • Card base – cut a piece of Mango Melody cardstock at 4 1/4″ x 11″, score at 5 1/2″ and fold in half.
  • Cut piece of Artistry Blooms DSP at 4 1/8″ x 5 3/8″ and adhere to card base. I knew I wanted to work with the orange & pink color palette so I cut the strip of DSP at the full 12″ length and then cut the piece down to show the portion of the strip that had the most Mango Melody in the gradation.
  • Cut strip of Rainbow Glimmer Paper at 4 1/2″ x 12″ and again, decide what gradation you want to use and make the final cut at 4 1’2″ x 6″. Run piece through a die cutting machine with one of the two large Butterfly Beauty dies. I chose the one that had the solid outside wings. Adhere to DSP.
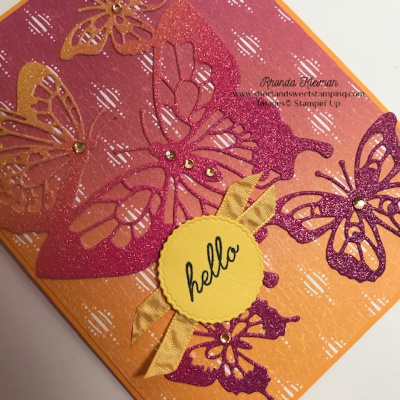
  • Stamp hello greeting from the Beauty Abounds stamp set with Tuxedo Black Memento black ink on scrap of Daffodil Delight cardstock. Cut out with the small circle die from the Tasteful Touches die set.
  • Cut two pieces of Daffodil Delight Ruched ribbon, trim ends and adhere, criss-cross to butterfly. I found that either the Tear & Tape or Stampin’ Seal+ worked best when adhering to the glimmer paper surface. Adhere stamped greeting over the center of the ribbon.
  • Adhere Champagne Rhinestones on the butterfly for some extra bling.
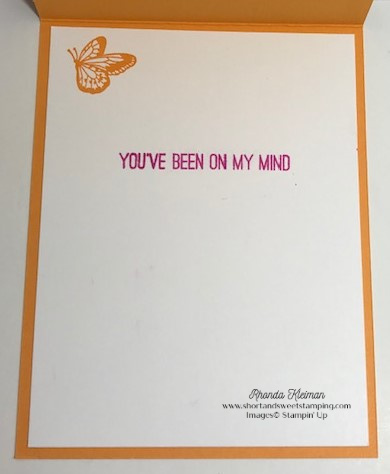
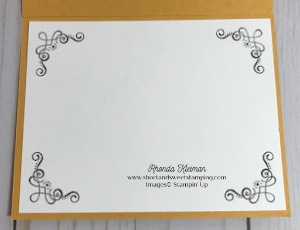
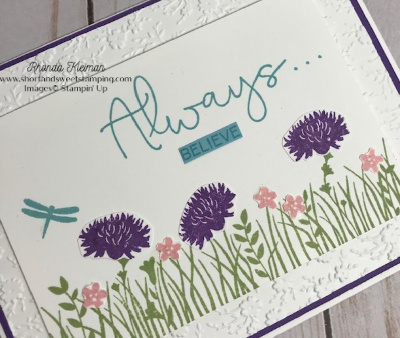
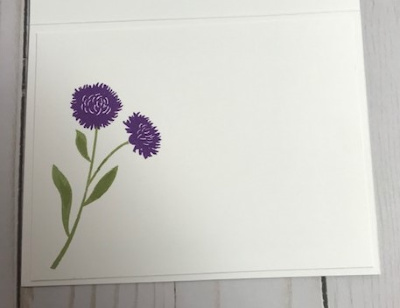
  • For the inside of the card, cut a piece of Whisper White cardstock at 4″ x 5 1/4″. Stamp greeting from Butterfly Gala stamp set with Magenta Madness ink. Stamp butterfly from Beauty Abounds stamp set with Mango Melody ink. Adhere to card.

I had so much fun making this card and it turned out exactly as I had pictured it. I’d be so appreciative if you would vote for my card by clicking on the vote image below. To give a vote, once you are in the gallery, click on the heart at the top right hand side of the picture as the hearts appear.

Thanks for stopping by today!

Bonus Days are back once again! From July 1 through August 3rd, for every $50 you spend (before shipping & tax) you will receive a $5 Bonus Day coupon code that can be used from August 4th – 31st.

  • You must have an email address in order to participate because the codes can only be delivered electronically.
  • If you earn multiple coupons in a single order, all of the codes will be sent in one email. If you earn multiple coupons for multiple orders they will be sent in separate emails for each code earned.
  • There is no limit on the number of coupon codes you can earn during this promotion.
 Product List  
Paper Snips
[103579]
$10.00

Field of Flowers

Hello! Today I’m sharing another card I recently made with the Field of Flowers stamp set. I combined it with the Ornate Floral embossing folder that is part of the Ornate Gardens Suite and love how it compliments the stamped images.

Here is how I made the card:

  • Card base – cut a piece of Whisper White Thick cardstock at 5 1/2″ x 8 1/2″, score at 4 1/4″ and fold in half.
  • Cut piece of Gorgeous Grape cardstock at 4 1/8″ x 5 3/8″ and adhere to card base.
  • Cut piece of Whisper White cardstock at 4″ x 5 1/4″ and run through an embossing machine with the Ornate Floral embossing folder. Adhere to Gorgeous Grape layer.
  • Cut piece of Whisper White cardstock at 3″ x 4 3/8″. Stamp large grass image with Pear Pizzazz ink. Stamp “always” greeting with Balmy Blue ink. Stamp “believe” with Balmy Blue ink on scrap piece of Balmy Blue cardstock and trim with paper snips. Adhere underneath greeting . Stamp dragonfly with Balmy Blue ink and brush with clear Wink of Stella.
  • Stamp the flower image three times with Gorgeous Grape ink on scrap piece of Whisper White cardstock and fussy cut with paper snips. Stamp the smallest flowers with Blushing Bride ink and fussy cut. You can also punch these flowers out with the coordinating Confetti Flowers Border Punch. Adhere to grass image with liquid glue. Brush with Wink of Stella.
  • Adhere stamped image to embossed layer with Stampin’ Dimensionals.
  • Cut piece of Whisper White cardstock at 4″ x 5 1/4″. Stamp large single leaf image with Pear Pizzazz ink in lower left corner. Stamp flowers with Gorgeous Grape ink. Adhere piece to inside of card.

Bonus Days are Here!

Bonus Days are back once again! From July 1 through August 3rd, for every $50 you spend (before shipping & tax) you will receive a $5 Bonus Day coupon code that can be used from August 4th – 31st.

  • You must have an email address in order to participate because the codes can only be delivered electronically.
  • If you earn multiple coupons in a single order, all of the codes will be sent in one email. If you earn multiple coupons for multiple orders they will be sent in separate emails for each code earned.
  • There is no limit on the number of coupon codes you can earn during this promotion.

Thanks for stopping by today!

 Product List  
Paper Snips
[103579]
$10.00

Tasteful Touches

Today I’m featuring a card made with products from the In Good Taste Suite in the new annual catalog. The stamp set, Tasteful Touches has beautiful images that can be used in so many different ways, and the In Good Taste Designer Series Paper is amazing!

Here is how I made the card.

  • Card base – cut a piece of Rococo Rose cardstock at 5 1/2″ x 11″, score at 4 1/4″ and fold in half.
  • Cut a piece of Petal Pink cardstock at 4 1/8″ x 5 3/8″ and adhere to card base.
  • Cut piece of Designer Series Paper at 4″ x 5 1/4″.
  • Stamp floral image with Tuxedo Black Memento ink on scrap piece of Whisper White cardstock. Color with Rococo Rose, Flirty Flamingo, Petal Pink and Soft Suede Stampin’ Blends. Fussy cut image.
  • Stamp greeting with Early Espresso ink on scrap piece of Whisper White cardstock. Cut out with largest die in the Tasteful Labels Dies set. Stamp feather image onto label with Rococo Rose ink.
  • Cut piece of two-toned gold and Rococo Rose gathered ribbon at 5 3/4″, wrap each end to back of DSP and adhere. Adhere this piece on top of the Petal Pink cardstock layer.
  • Place label in the middle of the card front, but don’t adhere it yet. Select several leaves from the Forever Gold Laser-Cut Specialty Paper and arrange them underneath the label. Once you like how it looks, adhere them onto the DSP and then adhere the label. Adhere flower to upper part of label.
  • Adhere a few Champagne Rhinestones for some extra bling.
  • Cut piece of Whisper White cardstock at 4″ x 5 1/4″. Stamp feather with Rococo Rose ink along left side. Adhere to inside of card.

Bonus Days are back once again! From July 1 through August 3rd, for every $50 you spend (before shipping & tax) you will receive a $5 Bonus Day coupon code that can be used from August 4th – 31st.

  • You must have an email address in order to participate because the codes can only be delivered electronically.
  • If you earn multiple coupons in a single order, all of the codes will be sent in one email. If you earn multiple coupons for multiple orders they will be sent in separate emails for each code earned.
  • There is no limit on the number of coupon codes you can earn during this promotion.

Thanks for stopping by today!

 Product List  
Paper Snips
[103579]
$10.00

Posted for You

Today’s card features the Posted for You bundle. When I first saw it in the new catalog I thought that both the stamp set and punch would be versatile. The stamp set has sweet images that can be colored with Stampin’ Write Markers or Stampin’ Blends, watercolored, stamped outlines with different ink colors and no coloring, or heat embossed for a variety of different looks. I also like the greetings and type font.

There are a number of layouts in the catalog that I thought would work well with this set so I cased the layout on page 70. I haven’t done much watercoloring lately so I decided try out the Fluid 100 watercolor paper introduced by Stampin’ Up! last year. This paper is smoother and is also a brighter white than our previous watercolor paper and it worked beautifully!

Here is how I made the card.

  • Card base – cut a piece of Pear Pizzazz cardstock at 5 1/2″ x 8 1/2″, score and fold in half.
  • Cut another piece of Pear Pizzazz cardstock at 3″ x 4 1/4″and run through an embossing machine with the Pinewood Planks 3D embossing folder. Adhere to center of card base.
  • Cut piece of Seaside Spray cardstock at 2 1/2″ x 4″ and adhere to card.
  • Stamp floral image twice on piece of Fluid 100 watercolor paper with black Stazon ink. Use Seaside Spray, Flirty Flamingo, Pear Pizzazz and Soft Suede inks and color in the images with a Water Painter. Note that Stampin’ Up! retired the Aqua Painters and replaced them with these new Water Painters, which come in a package with three different brush in sizes.
  • Stamp bird image once and color with So Saffron and Pear Pizzazz ink.
  • Punch out all three images with the Rectangular Postage Stamp. Adhere to Seaside Spray piece.
  • Stamp birthday greeting with Tuxedo Black Memento ink on 1/2″ x 4″ strip of So Saffron cardstock. Using the Lovely Labels Pick a Punch, center the strip in the 1/2″ track with the rounded top design and punch both ends. Adhere over stamped images with Mini Stampin’ Dimensionals.
  • Cut piece of Whisper White cardstock at 4″ x 5 1/4″ and adhere to inside of card.

Thanks for stopping by today!

There are only four days left to take advantage of this promotion. Place an individual or group order of $250 or more now through June 30th and receive an additional $25 in Stampin’ Rewards! This is in addition to the standard host rewards that you get with an order of $150 or more.

There are only four days remaining to take advantage of the best deal in the new catalog! Now is a great time to join Stampin’ Up! as either a demonstrator or a “happy discount shopper!” You get to pick $125 worth of products for only $99, plus you get free shipping. You will also get to pick any bundle of your choice for free! Choose either a stamp set with coordinating punch or set of dies, There are some fabulous bundles to choose from. I would love to have you as part of my team. Click here to learn how.

 Product List  

Ornate Thanks

Today I’m sharing another card I made with products from the Ornate Garden suite. I cased a card by Anne Marie Hile that was part of an Ornate Garden Suite Mega Tutorial.

Here is how I made the card.

  • Card base – cut piece of Terracotta Tile cardstock at 5 1/2″ x 8 1/2″, score and fold in half.
  • Cut piece of Old Olive cardstock at 4″ x 5 1/4″ and adhere to card base.
  • Cut piece of Petal Pink cardstock at 3 3/4″ x 5″ and run through embossing machine with the Ornate Floral 3D Embossing Folder. Cut piece of Terracotta Tile ribbon from the Ornate Garden Ribbon Combo Pack and tie in bow around this piece. Adhere to Old Olive mat.
  • Cut piece of paper from the Ornate Garden Specialty Designer Series Papers at 3″ x 4″.
  • Cut scrap piece of Whisper White cardstock at 1 1/8″ x 2 1/2″. Stamp thanks greeting from the Ornate Thanks stamp set with Early Espresso ink. Stamp “ever so much” or other greeting of your choice from this set with Petal Pink ink.
  • Cut piece of Gold Foil paper at 2 1/2″ x 3 1/2″ and cut with the third smallest of the wider labels from the Ornate Layers die set. I punched two sets of Old Olive leaves with the Leaf Punch, which is now retired, so you can substitute it with any of the leaves that are included in die sets in your collection.
  • Adhere leaves in upper right corner of the foil piece. Adhere greeting piece to foil piece. Adhere the decorated foil piece to the DSP.
  • Cut piece of Whisper White cardstock at 4″ x 5 1/4″. Stamp filigree image with Early Espresso ink in each of the four corners and adhere piece to inside of card.

Thanks for stopping by today!

Place an individual or group order of $250 or more now through June 30th and receive an additional $25 in Stampin’ Rewards! This is on top of the standard host rewards that you get with an order of $150 or more.

Now is a great time to join Stampin’ Up! as either a demonstrator or a “happy discount shopper!” You get to pick $125 worth of products for only $99, plus you get free shipping. Now through June 30th you will also get to pick any bundle of your choice for free! Choose either a stamp set with coordinating punch or set of dies. There are some fabulous bundles to choose from in the new catalog. I would love to have you be part of my team. Click here to learn how.

 Product List  

Field of Flowers-Kylie’s Training Blog Hop

Hello! Welcome to Kylie Bertucci’s Demonstrator Training Blog Hop for June. I’m part of a group of Stampin’ Up! demonstrators from around the world that participate in Kylie’s program for building our businesses. Please be sure to click on the names in the list at the end of this post to hop around and view the beautiful cards posted by so many talented stampers.

Today’s fun-fold card features a sweet stamp set, Field of Flowers, from the new annual catalog. It immediately said spring and summer to me and who could resist the cute little dragonflies!

Here is how I made the card.

  • Card base – Cut piece of Magenta Madness cardstock at 4 1/4″ x 11″. Score at 3″ and 8 3/4″, fold along score lines and use bone folder to sharply crease the folds.
  • Use the Magenta Madness papers from the 2020-2022 InColor Designer Series Paper pack and cut one of each of the papers at 3″ x 4″ and one each of the papers at 2″ x 4″. Adhere one set to the outside flaps and the other set on the inside flaps.
  • Cut piece of Whisper White cardstock at 3″ x 4 3/8″. Stamp grass image with Granny Apple Green ink along bottom of the piece. Stamp the large flowers with Magenta Madness. Stamp the smaller flower image with Mango Melody ink. Stamp greeting and two dragonflies with Coastal Cabana ink. Add a bit of shimmer to the dragonflies with Wink of Stella.
  • Cut piece of Mango Melody cardstock with the next-to-largest die in the Stitched Rectangles die set.
  • Cut piece of Magenta Madness 1/4″ ribbon and tie in bow around Mango Melody piece. Adhere stamped piece to Mango Melody piece. Adhere to flap on left side of card front. Only apply adhesive to one half of the stamped piece in order for the card to open.
  • Cut piece of Whisper White cardstock at 4″ x 5 1/4″. Stamp leaf image with Granny Apple Ink. Stamp flowers with Magenta Madness ink. Stamp greeting with Coastal Cabana ink. Adhere to inside of card.

I love this bright, cheerful color combination – it made me smile as I was making the card and I hope you like it!

Thanks for stopping by today!


 Product List  

Ornate Garden-Daisies

Hello! Today’s card features the Ornate Garden Suite. This suite includes two bundles: Ornate Thanks is a photopolymer stamp set with greetings that can be mixed and matched and coordinates with the Ornate Borders die set; Ornate Style stamp set is red rubber and has floral images that can be colored and coordinates with the Ornate Layers dies. For this card I chose to showcase the daisy image.

Here is how I made the card.

  • Card base – cut piece of Bumblebee cardstock at 5 1/2″ x 8 1/2″, score at 4 1/4″ and fold in half.
  • Cut piece of daisy print paper from the Ornate Garden Specialty Designer Series Papers at 4 1/4″ x 5 1/2″ and cut out using the largest frame from the dies with the wider widths. Adhere to card base.
  • Cut piece of Old Olive cardstock at 2 1/4″ x 5 1/4″ and cut out using the next to largest die from the dies with the narrower widths. Adhere to center of DSP piece.
  • Cut two pieces of Whisper White cardstock at 2″ x 3 1/4″. Stamp daisy image with Black Memento Ink on both pieces. Color images with light and dark Daffodil Delight, light and dark Old Olive and dark Soft Suede Stampin’ Blends. Leave some white areas on the tips of the flower petals. Cut with the third smallest rectangle die from the Stitched So Sweetly die set.
  • Adhere to Old Olive panel with Stampin’ Dimensionals, staggering them so that one is higher than the other.
  • Finish off by adding a Gilded Gem to each of the daisy pieces.
  • Cut piece of Whisper White cardstock at 4″ x 5 1/4″. Stamp the filigree design with Early Espresso ink in all four corners. Adhere to inside of the card.

Thanks for stopping by today!

 Product List