

Hello! Welcome to Kylie Bertucci’s Demonstrator Training Blog Hop for September. I’m part of a group of Stampin’ Up! demonstrators from around the world that participate in Kylie’s program for building our businesses. Please be sure to click on the names in the list at the end of this post to hop around and view the beautiful projects posted by so many talented stampers.
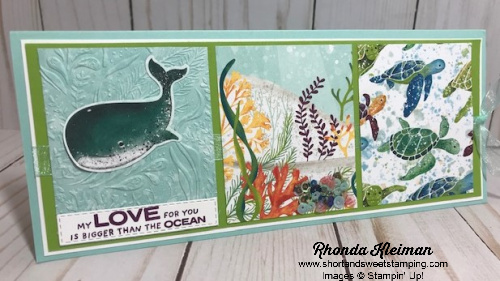
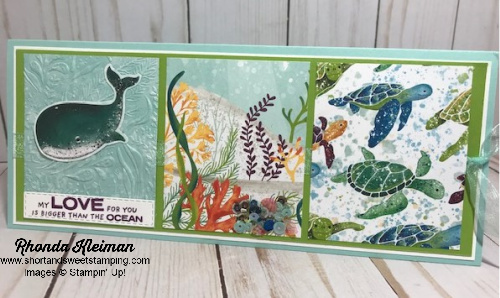
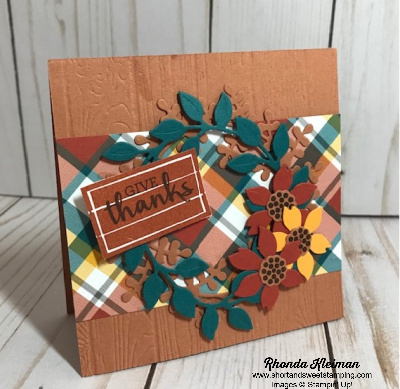
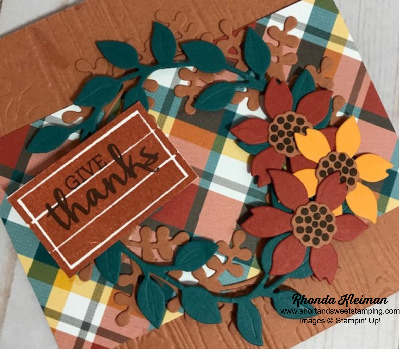
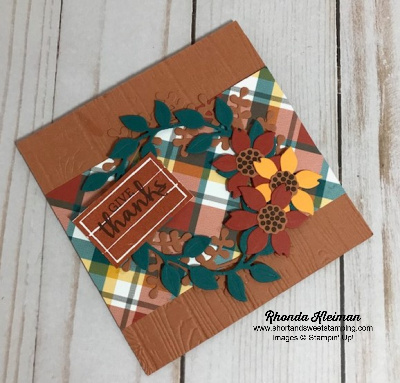
Today’s card features products from the Whale of a Time suite. This is one of the cards we will be making in my September Class to Go. As a Pisces, I was immediately attracted to the beautiful ocean life in the DSP and the bright color palette! Slimline cards are all the rage these days, so I decided to give it a go.
Here’s how I made the card.
- Card base – cut piece of Pool Party cardstock at 7″ x 8 1/2″, score at 3 1/2″, fold and crease with a bone folder.
- Cut piece of Whisper White cardstock at 3 1/2″ x 8 1/4″ and adhere to card front.
- Cut piece of Granny Apple Green cardstock at 3 1/8″ x 8 1/8″. Cut piece of Pool Party Sheer ribbon and tie in a knot at right side of cardstock. Adhere to card front.
- Cut out three different prints from the DSP at 2 1/2″ x 3″.
- Stamp greeting with Blackberry Bliss ink on scrap piece of Whisper White cardstock. Die cut with the smallest of the narrower dies from the Stitched Rectangular dies.
- Select a sheet of DSP with whale images and punch out one of the larger images that fits the Whale Builder Punch.
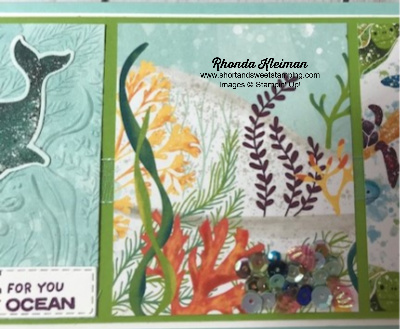
- I wanted to use papers that all had Pool Party in them in order to tie everything together and thought the the top portion of the DSP I used for the middle piece would work well for the piece on the left. I added texture to the piece by running it through the Seabed 3D embossing folder.
- Assemble the card front by adhering each of the three pieces of DSP, spacing them evenly across the Granny Apple cardstock layer.
- Adhere die cut greeting at bottom of the embossed piece. Adhere whale. You can pop it up with dimensionals if you wish. On the center piece of DSP I added two small strips of tear and tape and dumped a bunch of the Whale of a Time sequins on top of them until I had enough sequins sticking to the paper. I used the Pick it Tool to help move the sequins around. I got this great tip from one of Patty Bennett’s blog posts.
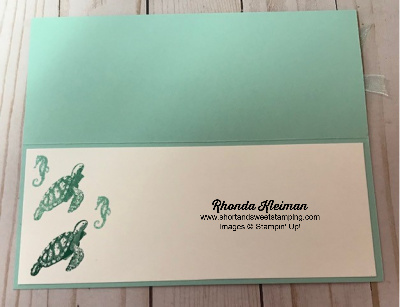
- Cut piece of Whisper White cardstock at 3 1/2″ x 8 1/4″. Stamp the turtle and sea horse images with Just Jade ink. I stamped off a few of the images. Adhere to inside of card.
Thanks for stopping by today!


Stampin’ Up! has a great offer to join this September! You pay $99 for the starter kit and get to pick out $125 in products (and you can opt to select the new Stampin’ Cut and Emboss Machine!). In addition, you will also receive the Queen Anne’s Lace and So Much Love stamp sets for free, plus cardstock pieces to make 16 cards, 16 envelopes, and a pack of Basic Rhinestone Jewels. One pack of cardstock is Coastal Cabana and the other pack is Granny Apple Green – such fun colors! I’d love to have you as part of my team. There is NO obligation to be a business builder – happy discount shoppers are welcome! Click here to join. Please contact me if you’d like more information.
Product List
") | |
 | |
 | |
 |  |
 | |
 |  |
 |  |
 |  |
")
")
 Designer Series Paper")
 Sheer Ribbon")


")
")


 Designer Series Paper")


 Designer Series Paper")


")
")


