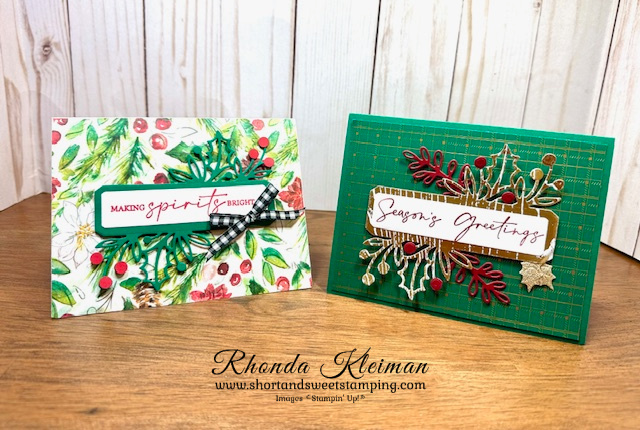
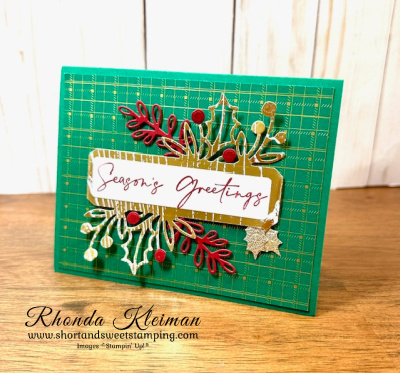
Wishing you a very Merry Christmas and all the joys of the season! Today I have two different versions of a card design made with products from the Joy of Christmas Suite.
I used both packs of Designer Series Paper, Joyful Specialty DSP and Joy of Christmas DSP, and dies from the Christmas Classics Bundle. I used Gold Holly Leaves, which are retired, on the green card. I thought it would be nice to accent some of the berries on the die cuts and adhered them with tiny drops of liquid glue. I punched small circles with scraps of Real Red and Cherry Cobbler cardstock with an old SU 1/4″ circle punch that I will never part with! I also used the black & white 1/4″ gingham ribbon on the one card. Here are the cutting measurements for each card.
Card base – Thick Basic White cardstock – 5 1/2″ x 8 1/2″
Joy of Christmas DSP – 4 1/2″ x 5 1/2″ (cover the entire card front)
Shaded Spruce cardstock for die cut – 4 1/2″ x 4
Basic White -greeting die cut – 1 1/2″ x 4 1/2; inside greeting – 4″ x 5 1/4″
Real Red cardstock for berries – small scrap
Card base – Shaded Spruce cardstock – 5 1/2″ x 8 1/2″
Joyful DSP Green & Gold Plaid – 4″ x 5 1/4″
Joyful Gold & White DSP for die cut – 4 1/2″ x 4″
Basic White – greeting die cut – 1 1/2″ x 4 1/2; inside greeting – 4″ x 5 1/4″
Cherry Cobbler cardstock for leaf die cuts and berries – 3 1/2″ square
Thanks for stopping by today!
Place an online order between $50 and $149 and use this host code for December. You will receive a free gift from me the following month. If your order is $150 or more DO NOT use the host code. You will qualify for Stampin’ Rewards.
I’m back again after another long break. Wishing my Jewish friends and customers a very belated Happy Chanukah! I’ve been busy making cards for the last two months but haven’t had time to do any blogging. I recently finished a major renovation project in my living room and dining room which affected my annual holiday card workshops due to the chaos going on around me. I usually begin my workshops in early November but had to push them back a few weeks. My last workshop was yesterday and now I can finally start getting back into more normal routines. I will be blogging my holiday cards for the next two weeks.
Here are photos of my living room and dining room. My home is over 100 years old and the downstairs floors, steps going upstairs and upstairs hallway were covered with old white carpet that was here when I bought the home 18 years ago. I had the carpet removed and wood floors were refinished to their original state. Paint job, all new furniture in both rooms and new light fixtures. I can’t believe it is my house! I’m looking forward to the fun part, shopping around for accessories, after the new year!
I held one Chanukah card workshop using the beautiful new and very long-awaited Stampin’ Up! stamp set, Celebrate the Miracle, and even managed to get my cards mailed out on time. I did three different cards. No instructions for how I made the card, however I have listed the cutting measurements for each. Supplies used are at the end of this post.
Cutting measurements
Night of Navy cardstock – cut one piece at 5 1/2″ x 6 1/2″ and score at 2 1/4″; cut one piece at 4 1/4″ x 6″ and score at 3″.
Very Vanilla cardstock- cut one piece at 3″ x 4″ and one piece at 2 3/4″ x 4 1/4″
Shining Brightly DSP- cut two pieces at 2″ x 5 1/4″
Cutting measurements
Night of Navy cardstock – cut one piece at 5 1/2″ x 8 1/2″ and score at 4 1/4″; cut one piece at 3 3/4″ x 4 1/4″; cut one piece at 2 5/8″ x 3 3/8″
Very Vanilla cardstock – cut one piece at 4″ x 5 1/4″; cut one piece at 2 1/2″ x 3 1/4″
Shining Brightly DSP – Cut one piece at 4″ x 5 1/4″; cut one piece at 3 1/2″ x 4″
Cutting Measurements
Cut one piece of Pebbled Path cardstock at 4 1/4″ x 11″and score at 4 1/4″ and 5 1/2″
Cut one piece of Basic White cardstock at 4″ x 4″ and 4 pieces at 1 1/2″ x 1 1/2″
Cut four pieces of Boho Blue cardstock at 1 5/8″
Cut one piece of Pebbled Path Tartan Foil Specialty DSP at 4″ x 4″ and one piece at 1″ x 4″
Place an online order between $50 and $149 and use this host code for December. You will receive a free gift from me the following month. If your order is $150 or more DO NOT use the host code. You will qualify for Stampin’ Rewards.
Free shipping is coming tomorrow, Thursday, December 14. Place an order of $75 or more and it will show up in your online shopping cart. The ordering deadline ends at 11:59pm (MT).
It’s time to say goodbye to the September-December 2023 Mini Catalog. Now is the time to purchase products you might have on your wish list that are being retired. Save up to 60% on selected items. Products are available while supplies last.
Stampin’ Up! has added new items to the Clearance Rack in the online store. Shop and save up to 60% off select products. These items are only available while supplies last! Click here to shop.
Thanks for stopping by today!
Place an online order between $50 and $149 and use this host code for December. You will receive a free gift from me the following month. If your order is $150 or more DO NOT use the host code. You will qualify for Stampin’ Rewards.
Stampin’ Up! has announced a seasonal sale starting tomorrow, November 14 and running through
November 16. Stock up on basics from the Annual Catalog (does not include mini catalog or online exclusives) with discounted prices as follows:
Ribbons & Trims – 10% off
Inks – 15% off – this includes ink pads, refills, markers and Stampin’ Blends. Bundles are not included
Papers – 20% off – includes cardstock, specialty paper and Designer Series Paper
Now is a great time to purchase some of the new colors from this year’s color refresh!
Click on this icon to see the full selection of discounted products. Discounts will be applied during checkout.
Thanks for stopping by today!
A new group of Online Exclusives is available as of November 7. New products are released three times a year online and are not available in any catalog. There is no end to the sales period – some products will be reordered when inventory is low and others will only be available while supplies last. This way Stampin’ Up! can offer more new products throughout the year, You can shop for these products in my online store. Click here to view the latest product offerings.
Today’s card features the cute Pick of the Patch bundle. Halloween has always been one of my favorite holidays since I was a small child. Alas, this year, this is the only card I got to make! After many months, my dining room and living room renovation is mostly finished as of yesterday, with the delivery of new furniture and electricians hanging brand new light fixtures, I’m now in the final inning! I still have to purchase a rug and window coverings and some new accessories, so I will hold off posting pictures of my new space for now. No more contractors and days and days having to leave the house for hours at a time, which greatly cut into my business. I held my first in-person classes last week since July and it was great to get back to stamping with my wonderful customers! This is one of the cards we made.
Here is how I made the card.
Card base – cut a piece of Pumpkin Pie cardstock at 4 1/4″ x 11″, score at 5 1/2″, fold and crease with a bone folder.
Cut a piece of DSP at 4″ x 5 1/4″ and adhere to card front. Since I knew I wouldn’t have time to make many Halloween cards this year, I used paper from the retired Gingham Cottage pack. Them Bones DSP from this year’s holiday mini catalog is what I would have used!
Cut a piece of Basic Black cardstock at 3 3/4″ x 5″ and run through Stampin’ Cut & Emboss Machine with the third largest Deckled Rectangle die. Cut a length of Black & White 1/4″ Gingham Ribbon and tie into a bow around the cardstock. Adhere at an angle to card front.
Cut a piece of Basic White cardstock at 2 5/8″ x 4 1/4 to use for the focal piece. Cut a strip of Basic White cardstock to use to stamp and punch out some of the images. Stamp the large, medium and small pumpkins with Pumpkin Pie ink. Stamp the pumpkin face onto the medium pumpkin. Punch out the large and medium pumpkin and fussy cut the small pumpkin.
Stamp three stems with Early Espresso ink and one leaf with Old Olive ink. Adhere to pumpkins with mini glue dots.
Stamp greeting with Early Espresso ink in the upper right corner of the Basic White focal piece. Stamp the elongated pumpkin below it with Cajun Craze ink and stamp the stem onto the piece with Early Espresso ink.
On the left side of the focal piece, stamp the branch with Pecan Pie ink. Stamp the dot image with Old Olive ink onto the branch limbs. Stamp the bird with Memento Black Ink at the top of the branch.
Adhere the focal piece over the Basic Black piece with Stampin’ Dimensionals. Add a few Copper Clay dots from the 2023-2025 In Color Dots for a bit of bling.
Cut a piece of Basic White cardstock at 4″ x 5 1/4″ and stamp a pumpkin in one of the lower corners. Adhere to inside of card.
Thanks for stopping by today!
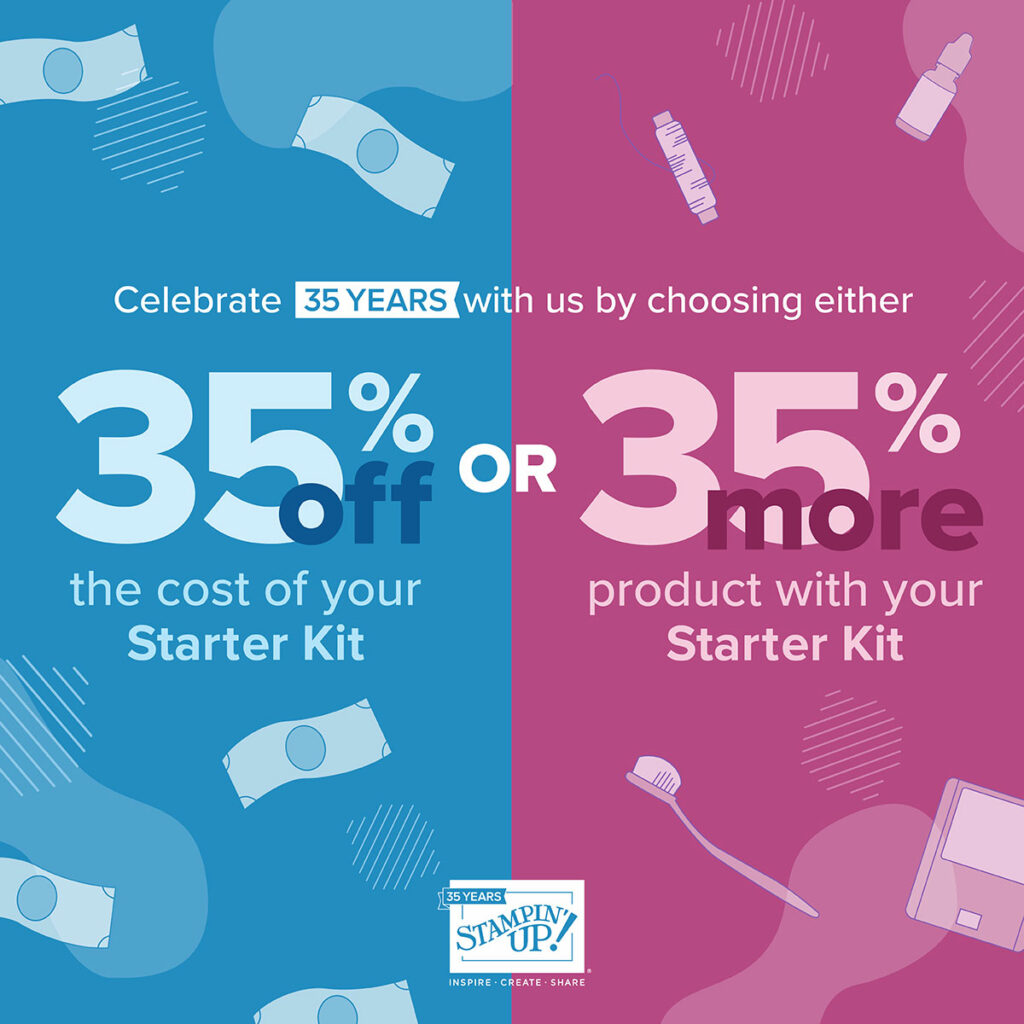
Today is the last day to take advantage of this great deal to join Stampin’ Up!
If you choose to the 35% off the cost of the Starter Kit you will only pay $64.35 and will receive $125 in merchandise. If you choose the 35% more product with your Starter Kit you will receive $168.75 worth of product by spending $99.
You do not have to do Stampin’ Up! as a business! You can join as a happy discount shopper! Either way, you get perks such as: minimum of 20% off on all orders view new catalogs one month in advance of release placing pre-orders attending virtual and in-person events exclusively for demonstrators When you join, your monthly minimum doesn’t take effect until three months after your join date, so you actually have six months to meet your quarterly minimum. If you decide at any time that you would like to drop as a demonstrator, there is absolutely no penalty – you will go back to being a customer. I’d love to have you on my team and am happy to answer any questions you might have. Click here for further information about joining or feel free to contact me directly.
Make a 25 day paper advent calendar with the new Rustic Christmas Countdown Kit. It includes 25 individual envelopes, printed die cuts, printed labels, adhesives, embellishments, clothespins and twine. The folded envelope size is 4″ x 3″. Coordinating colors are Cherry Cobbler, Crumb Cake, Mossy Meadow, Old Olive. You can order the kit in my online store. Item #163114, Price $19.00.
Place an online order between $50 and $149 and use this host code for October. You will receive a free gift from me the following month. If your order is $150 or more DO NOT use the host code. You will qualify for Stampin’ Rewards.
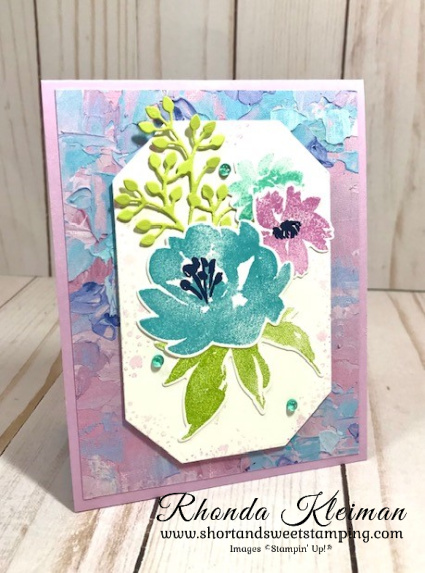
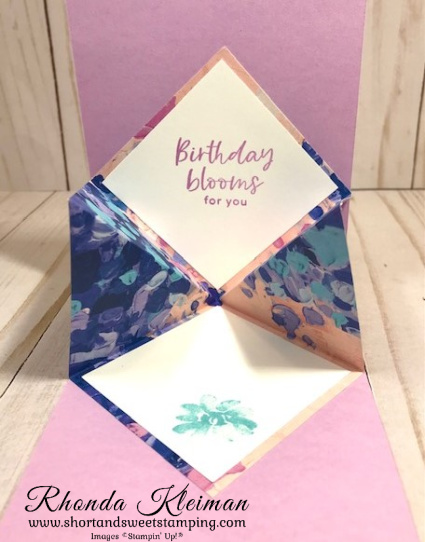
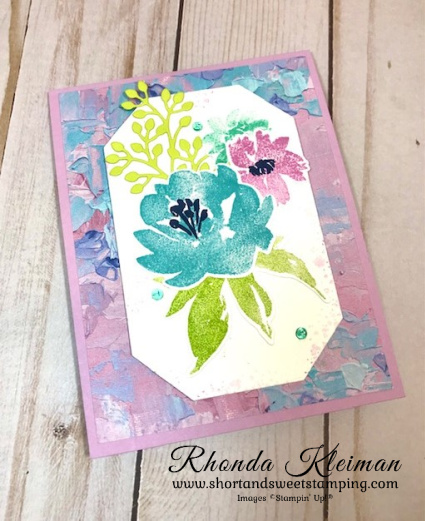
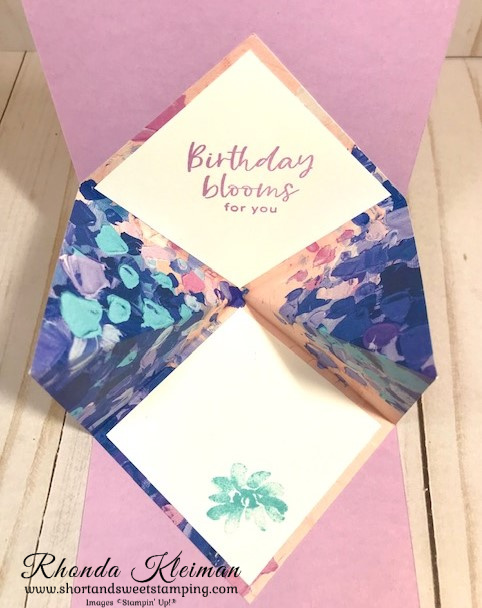
Today’s card features the Textured Floral Bundle. I’ve been wanting to make an explosion card for quite some time and decided to give it a go with this project. I used the Fancy Flora Designer Series Paper which was in the January-April Mini Catalog and is now retired. I try not to use many retired products in my projects, however I thought it would make a pretty background for the flowers as well as the explosion piece inside the card.
Here is how I made the card.
Card base – cut a piece of Fresh Freesia cardstock at 4 1/4″ x 11″, score at 5 1/2″, fold and crease with a bone folder.
Cut a piece of the Fancy Flora DSP at 4″ x 5 1/4″ and adhere to card front.
Cut a piece of Basic White cardstock at 3 1/2″ x 5″ and run through the Stampin’ Cut & Emboss Machine with the 2nd largest Countryside Corners die. Use the stamp with splotches to stamp around the edges with Fresh Freesia ink. Stamp off each time before stamping onto the cardstock.
Stamp flowers and leaves on piece of Basic White cardstock with Fresh Freesia, Balmy Blue, Pool Party and Lemon Lime Twist inks. Stamp stamens with Orchid Oasis ink. Run through Stampin’ Cut & Emboss Machine with coordinating Textured Florals Dies. Cut a scrap piece of Lemon Lime Twist cardstock and run through machine with the leaf die. Adhere all die cut pieces to the Countryside Corners piece.
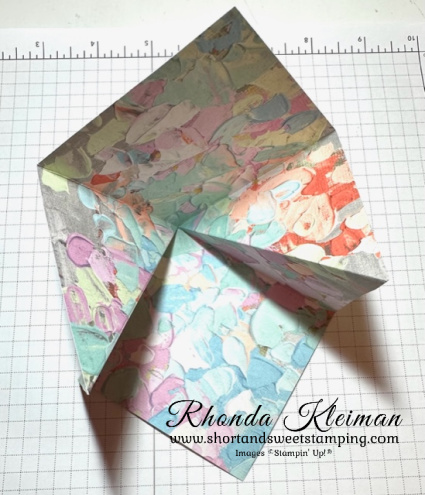
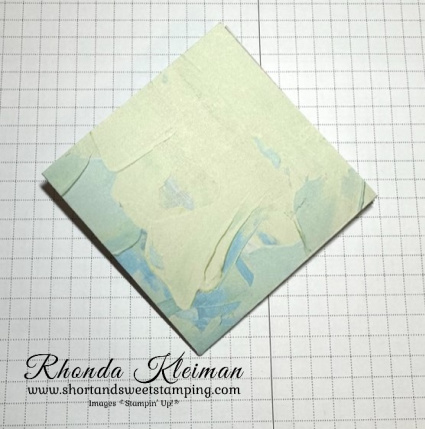
To make the inside explosion piece, either cut a 6″x6″ piece from a 12″x12″ piece of DSP or use a piece from a 6″x6″ pack of DSP. Score at 3″ horizontally and vertically. Score diagonally from the upper right corner to the lower left corner. Fold along score lines, creasing with a bone folder. Fold the diagonal creases out (mountain) and then fold the entire piece into a square, as shown in the photos.
Adhere the explosion piece to the inside of the card. The square should have the folds at the top and the open edges at the bottom. Add adhesive to the top and bottom square. Center the top of the folded piece up against the inside of the card score line. The left and right corners of the square should be touching the edges of the card base. Close the card to adhere the piece to the inside panels.
Cut two Basic White squares at 2 3/4″ square. Stamp greeting on one of the squares and stamp small flower image on the other square. Adhere to the DSP.
Adhere Countryside Corners collage piece to card front with Stampin’ Dimensionals.
Add a few gems from the Tinsel Gems Three Pack for a bit of bling.
Thanks for stopping by today!
In honor of SU’s 35th anniversary, this month there are two amazing options for joining!
Option 1- Get 35% off the regular cost of the Starter Kit. Receive $125 in merchandise for only $64.35.
Option 2 – Get 35% more product with the Starter Kit. You will receive $168.75 worth of product by spending only $99.
Both kits include free business supplies and free shipping.
In addition, if you sign up by the October 31st deadline, you will also be automatically registered for FREE to our virtual OnStage event on November 11th, a $77 value!
Place an online order between $50 and $149 and use this host code for October. You will receive a free gift from me the following month. If your order is $150 or more DO NOT use the host code. You will qualify for Stampin’ Rewards.
I’m back again after more than a month long absence. I’ve been undergoing renovations in my home and things have been beyond hectic! I’ve been sitting on lots of new products from the holiday mini catalog that have yet to be touched, so my next few posts will be for cards that I’ve made in the last two months as I play catch up. There will probably be weeks here and there where I will be missing again, as I finish up with contractors and furniture deliveries, but these will be minor interruptions.
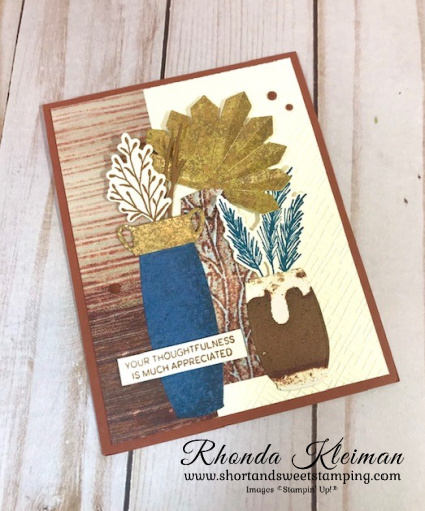
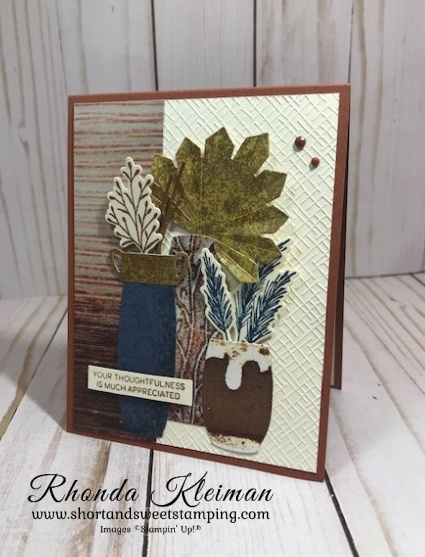
Today’s card is another one I made using the Earthen Elegance Suite, which was the first thing I purchased when the new annual catalog came out.
Here is how I made the card.
Card base – cut a piece of Copper Clay cardstock at 4 1/4″ x 11″, score at 5 1/2″, fold and crease with a bone folder.
Cut a piece of Very Vanilla cardstock at 4″ x 5 1/4″. Run through the Stampin’ Cut & Emboss Machine with the cross hatch embossing folder from the Basics 3D Embossing Folder set. Adhere to card front.
Cut a strip of Earthen Elegance Designer Series Paper at 1 1/2″ x 5 1/4″ and adhere to left side of embossed piece. Adhere to card front.
Use the long vase die from the Earthen Textures Dies to run two different DSP scrap pieces through the Stampin’ Cut & Emboss Machine. Cut a small piece of the brown and white DSP with the drip design and run through machine with smaller vase die.
Run large leaf and vase handles through machine with Distressed Gold Specialty Paper and coordinating dies. Adhere vase handle piece to one of the large vases.
Stamp two different leaf images on Very Vanilla cardstock with Pecan Pie and Misty Moonlight ink. run through die cutting machine with coordinating dies.
Run a scrap piece of Pecan Pie cardstock through die cutting machine with the twig die.
To assemble the card, adhere the large Distressed Gold leaf to the back of one of the large vase pieces with mini glue dots. Adhere to card front. Adhere the Pecan Pie leaf and twig to the back of the other large vase with mini glue dots. Adhere the Misty Moonlight leaf to the smaller vase with mini glue dots. Adhere both vases to card front, overlapping the center vase.
Stamp greeting with Pecan Pie ink on scrap piece of Very Vanilla cardstock, trim the cardstock and adhere to card front with Mini Stampin Dimensionals.
Add a bit of bling with a few Copper Clay Adhesive-Backed Gems.
For the inside of the card, cut a piece of Very Vanilla cardstock at 4″ x 5 1/4″. Stamp a leaf image with Pecan Pie ink in the bottom left corner and adhere.
Thanks for stopping by today!
Place an online order between $50 and $149 and use this host code for October. You will receive a free gift from me the following month. If your order is $150 or more DO NOT use the host code. You will qualify for Stampin’ Rewards.
In honor of SU’s 35th anniversary, this month there are two amazing options for joining!
Option 1- Get 35% off the regular cost of the Starter Kit. Receive $125 in merchandise for only $64.35.
Option 2 – Get 35% more product with the Starter Kit. You will receive $168.75 worth of product by spending only $99.
Both kits include free business supplies and free shipping.
In addition, if you sign up by the October 31st deadline, you will also be automatically registered for FREE to our virtual OnStage event on November 11th, a $77 value!


")
")
")
")
 Specialty Designer Series Paper")
 Designer Series Paper")


 Gingham Ribbon")


")


 Specialty Designer Series Paper")
 Specialty Designer Series Paper")


 Glittered Ribbon")
 Textured Ribbon")


")


")
")

 Designer Series Paper")


")


")
")

 Designer Series Paper")
 Specialty Paper")


