Bonus Days, New Online Exclusives, Paper Pumpkin Sale, Clearance Rack

Hello!

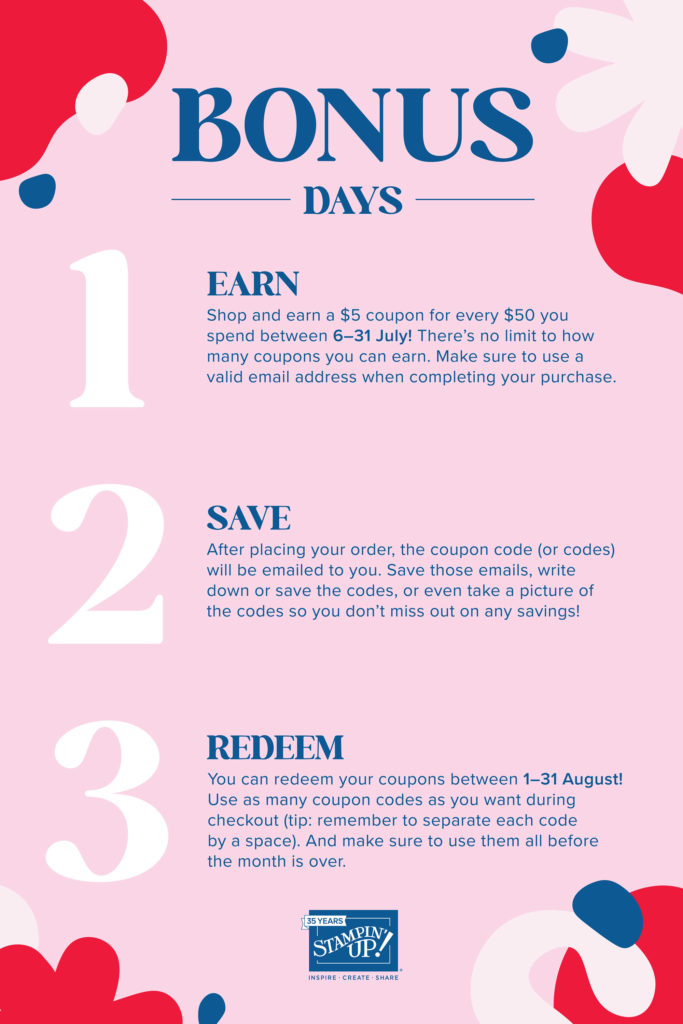
Bonus Days are back! Starting tomorrow, July 6 and running through July 31, earn a $5 coupon for every $50 you spend. There is no limit on how many coupons you can earn. You will be able to redeem your coupons in August. The instructions above explain how to redeem them. Make sure that your email address is correct because coupon codes will be sent to you via email.

A brand new collection of Online Exclusive products will be available starting on July 6. These products are only available online – they do not appear in any of our print catalogs. And there’s no end date for the sales period! Some products will be reordered when inventory is low, and others will only be available while supplies last. This way we can offer even more new products throughout the year. Click here to visit my online store beginning on July 6 to view the new products and to place your orders. Please note that past Online Exclusives and kits that are still available for sale are included.

Current Paper Pumpkin subscribers can take advantage of a 48 hour sale of up to 50% off on past kits, kit refills and kit add-ons from July 6-7 only. These sales don’t happen often, so if there are kits that you previously passed up on or loved kits you purchased so much that you would like to make more projects with them, now is your chance! A few past Paper Pumpkin kits also had add-ons, such as mini die sets, which are included in the sale. Visit my Paper Pumpkin site to learn more. Click here. There is still time to order the current kit, Fun in the Sun, until July 10th.

A Clearance Rack refresh begins tomorrow, July 6th, and as always, items are available while supplies last. Click here to check out all of the discounted products.

Place an online order between $50 and $149 and use this host code for July. You will receive a free gift from me the following month.  If your order is $150 or more DO NOT use the host code. You will qualify for Stampin’ Rewards.

Thanks for stopping by today!

Beauty of the Deep

Hello!

Today’s card features the Beauty of the Deep stamp set and dies. This is a fun and easy set to play with. I’m a Pisces and anytime Stampin’ Up! comes up with sets that have beach and ocean themes I always find myself gravitating towards them! I was eager to use the pretty new color, Azure Afternoon, as the main color and also used a few other new colors.

Here is how I made the card.

  • Card base: Cut a piece of Azure Afternoon cardstock at 5 1/2″ x 8 1/2″, score at 4 1/4″, fold and crease with a bone folder.
  • Cut a piece of Basic White cardstock at 4 1/8″ x 5 3/8″ and adhere to card front.
  • Cut another piece at 4″ x 5 1/4″ and use a blending brush to create the background. Lightly blend Azure Afternoon ink at the top half and apply more heavily on the bottom half.
  • Stamp the large seaweed image in the lower left corner with Pecan Pie ink.
  • Stamp the long leaf image with Azure Afternoon ink three or four times on the right side, stamping off each time before stamping. Vary the height of the leaves.
  • Cut a 3″ square piece of Calypso Coral cardstock and run through die cutting machine using the coral die. Adhere as shown with small dots of liquid glue. You can also use an adhesive sheet as another option by backing a piece onto the cardstock before running through the die cutting machine, peeling off the paper and adhering to the piece.
  • Stamp the sea anemones several times with Moody Mauve ink around the images at the bottom of the card.
  • Stamp two of the small fish with Copper Clay ink. Stamp striped fish with Blueberry Bushel ink. Randomly stamp the sand/speckle image with Azure Afternoon ink all around the piece.
  • Stamp greeting from the Charming Sentiments stamp with Azure Afternoon ink on scrap piece of Basic White cardstock and run through die cutting machine with coordinating die from the Sentiment Silhouettes dies. Adhere with Mini Stampin’ Dimensionals.
  • Adhere stamped piece to card front with Stampin’ Dimensionals. Cut another piece of Basic White cardstock at 4″ x 5 1/4″ and adhere to inside of card.

Thanks for stopping by today!

Tomorrow, June 30th is the last day that you can purchase a select group of Designer Series Papers that are on sale at 15% off. Stock up on your favorites or purchase a few from your wish list. There is no limit on how many packages you can purchase. Click here to download a flyer that shows all of the papers.

Tomorrow, June 30th is the last day for you to take advantage of this Starter Kit deal. Purchase the Starter Kit for $99 and get $155 worth of the products of your of your choice. This is $56 in free product, which $30 more than usual. The kit ships for free. You will get a discount of 20%-25% on all future orders as long as you remain active as a demonstrator. As a demonstrator you get to see the annual and mini catalogs one month before they to live to customers and to place pre-orders in advance of the catalogs going live. You also get the opportunity to attend virtual and in-person events just for demonstrators. Become a happy discount shopper – you do not have to do this as a business! Enjoy your discount and as long as you meet the $300 quarterly minimum in sales, you will remain active. If you miss the quarterly minimum or decide you no longer wish to be a demonstrator, there is absolutely no penalty for dropping and you can go back to being a customer! To join, click here. I’d love to have you on my team!

Place an online order between $50 and $149 and use this host code for June. You will receive a free gift from me the following month.  If your order is $150 or more DO NOT use the host code. You will qualify for Stampin’ Rewards.

Product List

International Highlights Winners Blog Hop-Layering Leaves

I’m very excited to be participating in Kylie Bertucci’s International Highlights Top 10 Winners Blog Hop this month! Thanks so much to everyone that voted for my card in the International Blog Highlights. It is an honor to be included in this group of talented designers from around the world! This Cheerful Daisies card won me a spot in this Blog Hop. Click here to see full directions on how to make the card.

Today’s card features the Layering Leaves stamp set. It is one of the first sets I purchased from the new annual catalog because of its versatility and the fabulous greetings and font. The color palette was inspired by one of my favorite Talbots spring sweaters! The pink flowers were calling out Bubble Bath and I also selected Blueberry Bushel, Boho Blue and Orchid Oasis.

Here is how I made the card.

  • Card base – cut piece of Blueberry Bushel cardstock at 4 1/4″ x 11″, score at 5 1/2″, fold and crease with a bone folder.
  • Cut piece of Bubble Bath cardstock at 4 1/8″ x 5 3/8″ and adhere to card front.
  • Stamp seven large leaves as follows: two Boho Blue tone on tone; two Orchid Oasis tone on tone, two Boho Blue stamped with Boho Blue ink on Basic White cardstock; one Orchid Oasis stamped with Orchid Oasis ink on Basic White cardstock. Punch out with the Boughs Punch.
  • Stamp five of the smaller leaves with Bubble Bath tone on tone and punch them out.
  • Punch out three large vellum leaves and three small vellum leaves.
  • Punch Blueberry Bushel circle with the Decorative Circle punch. Stamp greeting with Versamark ink and heat emboss with white embossing powder. The embossing powder is one in a set of three basic Stampin’ Emboss Powders.
  • Arrange the leaves on a piece of Basic White cardstock cut at 4″ x 5 1/4″. Adhere the vellum leaves first with either a few dots of liquid glue or glue dots. I placed two large leaves at the top and one at the bottom, two small leaves at the middle left side and one at the middle right side. Adhere four large stamped leaves at the top and three at the bottom. Adhere two pink leaves at the top and three at the bottom.
  • Using the speckles stamp, fill in some of the white space around the leaves by lightly stamping with Bubble Bath ink . Adhere piece to the card front.
  • Adhere the embossed greeting with Stampin’ Dimensionals in the middle of the leaf arrangement. Embellish with a few Blueberry Bushel gems from the Tinsel Gem Four-Pack.

Please click on the links below to check out all of the projects from this month’s winners!

Thanks for stopping by today!

Product List
Bough Punch
[157711]
$22.00

Place an online order between $50 and $149 and use this host code for June. You will receive a free gift from me the following month.  If your order is $150 or more DO NOT use the host code. You will qualify for Stampin’ Rewards.

Layering Leaves Quick & Easy Card

Hello!

Today’s card features the Layering Leaves stamp set and coordinating Bough Punch. This is the customer thank you card I sent out in May. It was also one of the class projects I recently did for a group of women that had never stamped before. Layering Leaves is one of the first stamp sets I purchased when the new annual catalog went live. The lovely images and greetings are so versatile! I used the Hello, Irresistible Designer Series Paper, which is an Online Exclusive product.

Here is how I made the cards.

  • Card base: Cut a piece of Lost Lagoon cardstock at 5 1/2″ x 8 1/2″, score at 4 1/4″, fold and crease with a bone folder.
  • Cut a piece of Basic White cardstock at 4 1/8″ x 5 3/8″ and adhere to card front. Cut piece of Hello Irresistible Designer Series Paper at 4″ x 5 1/4″.
  • Stamp one of the large leaf designs with Lost Lagoon ink and one of the small leaf designs with Soft Sea Foam ink on a scrap piece of Basic White cardstock and punch out with the Boughs punch.
  • Cut a piece of Soft Sea Foam cardstock at 2″ x 3 1/2″. Stamp greeting with Lost Lagoon ink. Run through die cutting machine with the smaller oblong shaped die from the Something Fancy dies.
  • Cut a piece of Lost Lagoon 1/4″ Bordered Ribbon at 5″ and wrap sides around the DSP piece. This ribbon is so pretty when you see it in person and it is very easy to work with!
  • Adhere the leaves to the card front with mini glue dots. Slide the leaves under the ribbon. Adhere the greeting with Stampin’ Dimensionals.
  • Cut a piece of Basic White cardstock at 4″ x 5 1/4″. With the 3/4″ leftover strip of DSP, cut the width to 4″ and adhere to cardstock as a way to decorate the inside of the card. Stamp greeting of your choice and adhere to card.

Thanks for stopping by today!

There is still one week left to join Stampin’ Up! Purchase the Starter Kit for $99 and get $155 worth of the products of your of your choice. This is $56 in free product, which $30 more than usual. The kit ships for free. You will get a discount of 20%-25% on all future orders as long as you remain active as a demonstrator. As a demonstrator you get to see the annual and mini catalogs one month before they to live to customers and youget to place pre-orders in advance of the catalogs going live. You also get the opportunity to attend virtual and in-person events just for demonstrators. Become a happy discount shopper – you do not have to do this as a business! Enjoy your discount and as long as you meet the $300 quarterly minimum in sales, you will remain active. If you miss the quarterly minimum or decide you no longer wish to be a demonstrator, there is absolutely no penalty for dropping and you can go back to being a customer! To join, click here. I’d love to have you on my team!

Place an online order between $50 and $149 and use this host code for June. You will receive a free gift from me the following month.  If your order is $150 or more DO NOT use the host code. You will qualify for Stampin’ Rewards.

Product List
Bough Punch
[157711]
$22.00

Free Shipping on June 21

Stampin’ Up! has announced a FREE SHIPPING day tomorrow only, June 21st, on orders of $75 or more (before tax). You can place orders up until 11:59PM Mountain Time.

Don’t forget that the 15% discount on selected Designer Series Papers runs through June 30th, so you get a double bonus with the free shipping!

To place an order through my online store, click here or feel free to contact me directly and I would be happy to help you place your order.

When placing your order, use my June host code if your purchase is between $50-$149. If it is $150 or more, DO NOT use the host code. You will receive Stampin’ Rewards from Stampin’ Up!

Thanks for stopping by today!

Cheerful Daisies-Kylie’s International Blog Highlights

Hello! It’s been a long time since I last participated in Kylie Bertucci’s International Blog Highlights. Readers get to vote on their top five favorites in the gallery and the top 10 winners will get to participate in an International Blog Hop later this month. The theme is “thank you”. This card uses products from the the Fresh as a Daisy Suite. I stumbled onto the Flying Seagull fun fold on Susan Campfield’s blog and couldn’t wait to try it out and this is what I came up with. It looks hard to do but is actually not that difficult!

Here is how I made the card.

  • Card base – cut two pieces of Pebbled Path cardstock at 8 1/4″ x 4 1/4″ and score them at 2 1/4″, 4″, 6 1/4″.
  • Pop-up piece – cut one 4 1/4″ square Pebbled Path cardstock, one 4″ square of Crushed Curry cardstock and one 3 3/4″ square of Basic White cardstock. Adhere the Pebbled Path and Crushed Curry squares together.
  • Stamp daisy images on the 3 3/4″ Basic white square. Stamp the stems and leaves with Garden Green ink. Stamp the daisy outline images with Crushed Curry ink. Stamp the flower centers with Wild Wheat ink. Adhere to the larger square piece.
  • Stamp greeting from the Go to Greetings stamp set with Peppled Path ink on scrap piece of Basic White cardstock and cut out with the label die from the Something Fancy Dies. Adhere to stamped image with Mini Stampin’ Dimensionals. Embellish with a few 2023-2025 In Color Dots.
  • Fresh as a Daisy DSP – cut two pieces of the daisy print at 2″ x 4″ for the outer side panels and cut two pieces of the Pebbled Path woodgrain print at 1 1/2″ x 4. Cut two pieces of Basic White cardstock at 2″ x 4″ to write a message or stamp a greeting on the inside panels.
  • With the widest portion of the card bases on the left, fold it up, mountain fold. Fold the two other score lines down, valley folds. Be sure to give a good sharp crease to each of the folds.
  • Adhere the two card bases to the stamped image. Place it down and with the second valley fold, right side of base, adhere to the back of the stamped image, leaving a scant 1/4″ border. Repeat with second card base. The folds should be butting up to each other on the back.
  • Adhere DSP and Basic White cardstock strips to the wings. Tuck the outer wings under the stamped image.

I’d be so appreciative if you would vote for my card! Click on the vote image below. Once you are in the gallery, click on the heart at the top right hand side of the picture as the hearts appear.

Thanks for stopping by today!

Aa select group of Designer Series Papers are on sale at 15% off from June 1-30th. Stock up on your favorites or purchase a few from your wish list. There is no limit on how many packages you can purchase. Click here to download a flyer that shows all of the papers.

Place an online order between $50 and $149 and use this host code for June. You will receive a free gift from me the following month.  If your order is $150 or more DO NOT use the host code. You will qualify for Stampin’ Rewards.

Product List

Designer Series Paper Sale – 15% Off!

Hello!

If you are like me and you can’t get enough of Stampin’ Up! Designer Series Papers, a select group of papers are on sale at 15% off from June 1-30th. Stock up on your favorites or purchase a few from your wish list. There is no limit on how many packages you can purchase. Here is a flyer that shows all of the sale papers. You can also download the flyer by clicking here. Scroll down to the end of this post to view a product list. Click on the image of the paper you would like to purchase and it will take you directly to my online store.

Join Stampin’ Up! now through June 30th. Purchase the Starter Kit for $99 and get $155 worth of the products of your of your choice. This is $56 in free product, which $30 more than usual. The kit ships for free. You will get a discount of 20%-25% on all future orders as long as you remain active as a demonstrator. As a demonstrator you get to see the annual and mini catalogs one month before they to live to customers and you can also place pre-orders in advance of the catalogs going live. You also get to attend virtual and in-person events just for demonstrators. Become a happy discount shopper – you do not have to do this as a business! Enjoy your discount and as long as you meet the $300 quarterly minimum in sales, you will remain active. If you miss the quarterly minimum or decide you no longer wish to be a demonstrator, there is absolutely no penalty for dropping and you can go back to being a customer! To join, click here. I’d love to have you on my team!

Thanks for stopping by today!

Place an online order between $50 and $149 and use this host code for June. You will receive a free gift from me the following month.  If your order is $150 or more DO NOT use the host code. You will qualify for Stampin’ Rewards.

Product List