
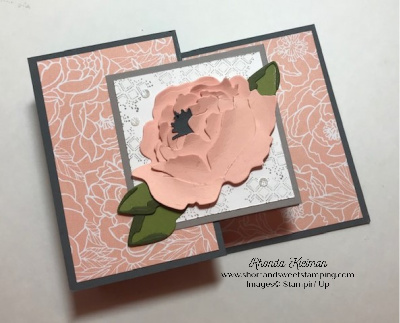
Hello! Today I have a fun fold card for you that features products from the gorgeous Peony Garden Suite. This is a soft and elegant suite of products and it reminds me a bit of the shabby chic look. The die cut flower is amazing and while it looks complicated, it is actually designed in such a clever way that it is easy to put it together! I also like the assortment of greetings in the stamp set.

Here is how I made the card.
- Card base – cut a piece of Basic Gray cardstock at 4 1/4″ x 11″. Score at 5 1/2″ and 2 3/4″ and crease with a bone folder.
- For the smaller base cut a piece of Gray Granite cardstock at 3″ x 9″. Score at 3″ and 6″ and crease with a bone folder.
- Cut two pieces from one of the Petal Pink papers from the Peony Garden Designer Series Papers, one at 2 1/2″ x 4″ and the other at 4″ x 5 1/4″. Adhere large piece to inside of card and the other to the front flap.

- Cut three pieces of Whisper White cardstock at 2 3/4″ square.
- On the first square, stamp greeting of your choice from the Prized Peony stamp set with Gray Granite ink. Adhere to inside of smaller card base.
- On the second square, stamp medium sized peony image with Tuxedo Black Memento ink. Color center of flower with the light Gray Granite Stampin’ Blend. Color the rest of the flower with the light and dark Petal Pink Stampin’ Blends. Adhere to center of smaller card base.

- On the third square stamp the small diamond image multiple times all around the piece with Gray Granite ink, stamping off before stamping onto the cardstock. Adhere to front flap of smaller card base. Adhere smaller card base to larger card base.
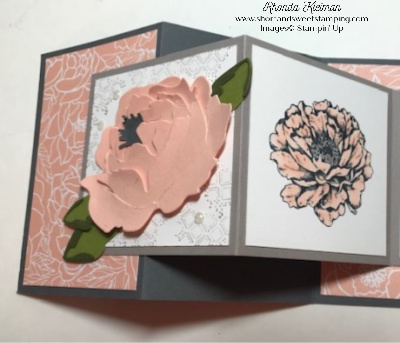
- To make the three-dimensional peony, there are five dies in the Peony Dies set that are made to nest together, from smallest to largest. Using Petal Pink cardstock, run them through a die cutting machine. Die cut the flower center from a scrap piece of Basic Gray cardstock. Assemble flower pieces. Curl the petals with your fingers or with a bone folder to give the flower some extra dimension.
- For the leaves, cut two of the larger ones and one smaller one from a scrap piece of Old Olive cardstock. For the leaf accent pieces cut two large and one small from a scrap piece of Mossy Meadow cardstock. Adhere pieces together.
- Adhere leaves to smaller card front and then adhere flower over the leaves. Finish it off with a few Elegant Faceted Gems.

Bonus Days are back once again! From July 1 through August 3rd, for every $50 you spend (before shipping & tax) you will receive a $5 Bonus Day coupon code that can be used from August 4th – 31st.
- You must have an email address in order to participate because the codes can only be delivered electronically.
- If you earn multiple coupons in a single order, all of the codes will be sent in one email. If you earn multiple coupons for multiple orders they will be sent in separate emails for each code earned.
- There is no limit on the number of coupon codes you can earn during this promotion.
Thanks for stopping by today!

Product List
") | |
 |  |
 | |
 |  |
 |  |
 |
")


")
")


")


 Ruched Ribbon")


")
")


 Gathered Ribbon")


