Cup of Tea Book Fold Card

Hello!

Today’s card features products from the Tea Boutique Suite in the new annual catalog. I’ve been a tea drinker for years so every time Stampin’ Up! has a new tea-related set I always purchase it. I’m really enjoying working with all of the fun images in this set, along with the beautiful Designer Series Papers and the new In Colors.

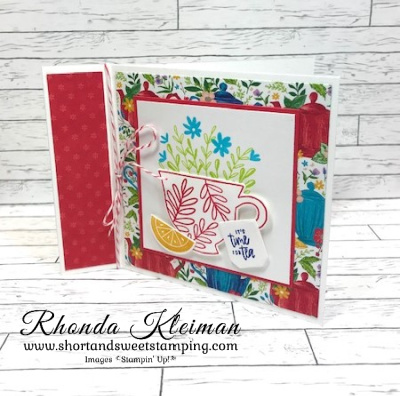
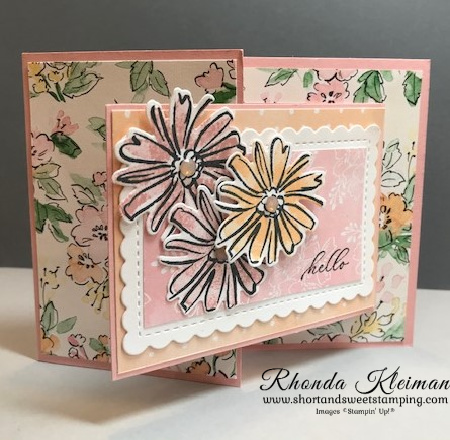
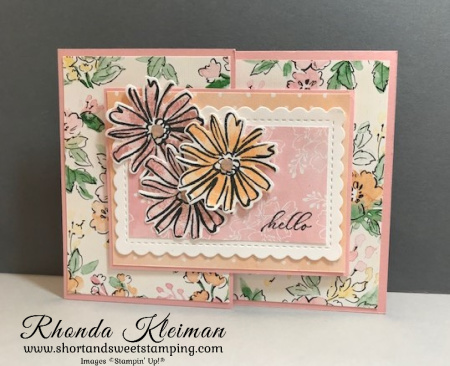
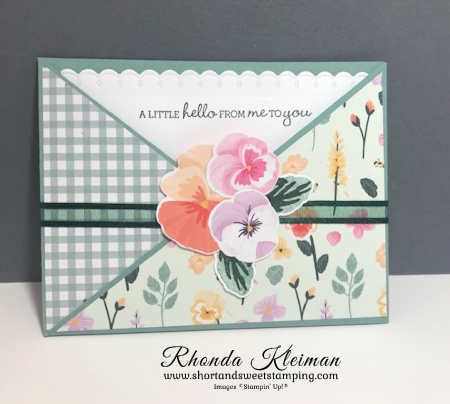
This is one of the projects we made in my quarterly stamping club this past weekend. Here is how to make the card.

  • Card base – cut a piece of Basic White Thick cardstock at 4 1/4″ x 11″. Score at 4 1/4 and 5 1/2″. Fold and sharply crease score lines with a bone folder. Adhere the 1 1/4″ fold section to the card base so that it opens up like a book.
  • Cut a piece of Tea Boutique Designer Series Paper at 4″ square. Cut another piece of DSP at 1″ x 4″. Adhere both pieces to card front.
  • Cut a piece of Sweet Sorbet cardstock at 3 1/8″ square.
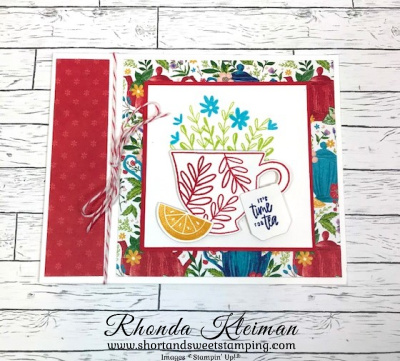
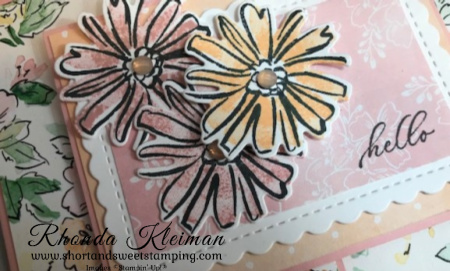
  • Cut a piece of Basic White cardstock at 3″ square. Stamp leaf image with Parakeet Party ink. Stamp the flowers with Tahitian Tide ink. Adhere to Sweet Sorbet square and adhere to front of card.
  • Cut another piece of Basic White cardstock at 2″ x 4″. Stamp teacup with leaf design with Sweet Sorbet ink. Stamp “It’s time for tea” greeting for the large tea bag with Starry Sky ink. Stamp lemon image with Daffodil Delight ink. Run through the Stampin’ Cut & Emboss Machine with the coordinating dies.
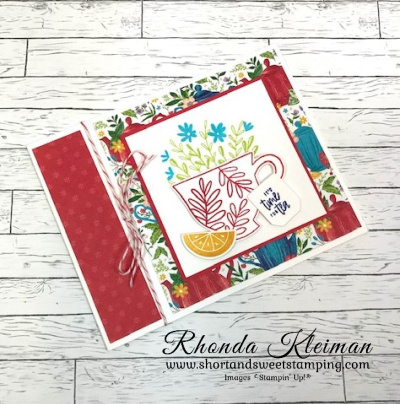
  • Adhere the tea cup with Stampin’ Dimensionals. Adhere the tea bag and lemon with glue dots.
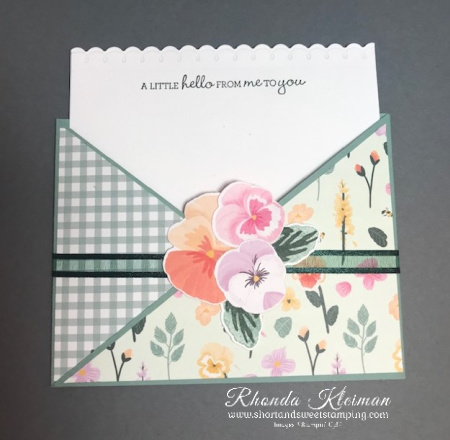
  • Cut a length of Sweet Sorbet bakers twine and tie in a bow around the front of the card.
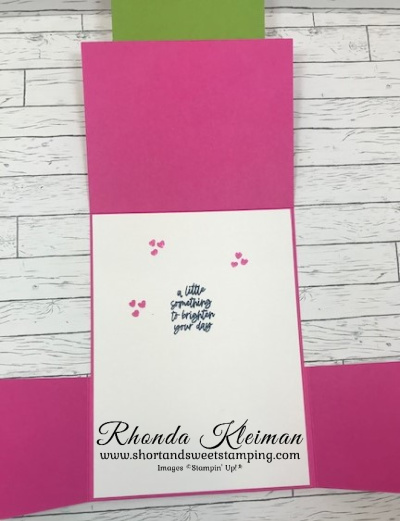
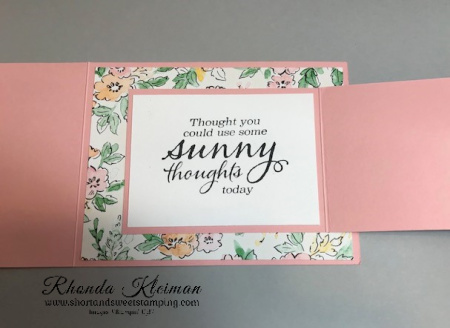
  • Stamp greeting with Sweet Sorbet ink on inside of card. Stamp lemon image with Daffodil Delight ink in bottom left corner of card.

Thanks for stopping by today!

If you love the new In Colors, now is the time to take advantage of this great In Color Starter Kit Promotion!

Join Stampin’ Up! now through May 31. Choose $125 worth of products for $99 plus get $66.50 in bonus 2022-2024 In Color Products for free! Here are the free items that will be added to your starter kit.

  • 2022-2024 In Color Grid Paper – Item number 160009
  • 2022-2024 In Color Ink Pad Collection – Item number 161108
  • 2022-2024 In Color Cardstock Collection – 159204
  • 2022 In Color 6″ x 6″ Designer Series Paper Assortment – Item number 159253

In addition, you will receive a free Paper Pumpkin Kit and free shipping. You do not have to build a business! Become a happy discount shopper and enjoy a minimum 20% discount on all future orders. Click here to learn more about the benefits of joining Stampin’ Up! For further information about joining my team, click here.

Place an online order between $50 and $149 and use this host code for May. You will receive a free gift from me the following month.  If your order is $150 or more DO NOT use the host code. You will qualify for Stampin’ Rewards.

Make nine cards, 3 each of 3 different designs, with the June Paper Pumpkin Kit. This kit’s stamp set is perfect for expressing your love, gratitude, and style. With sentiments that say “Love you a whole bunch”, “You’re the pick of the crop”, “You are the sweetest,” and so many more, you’ll be able to use this photopolymer stamp set for all of your summer projects. Included in the kit are a Calypso Coral Stampin’ Spot, specialty vellum accent pieces, and Mini Shopping Bag (5-3/8″ x 6″) which can be used to hold a couple cards for a unique craft element. (Additional bags available to purchase separately.) Coordinating colors: Blackberry Bliss, Cajun Craze, Calypso Coral, Crushed Curry, Garden Green, Night of Navy, Soft Succulent. To purchase the kit visit my Paper Pumpkin website here.

Product List
Teacup Dies
[160186]
$27.00
Paper Snips
[103579]
$11.00

Rainbow of Happiness Double Dutch Door Fold

Hello! I haven’t been posting much lately. Sadly, my father, who turned 100 years old in January, unexpectedly passed away three weeks ago so I’ve had to put my projects on the back burner. My father was a kind and wonderful man, and everyone that knew him described him as a gentleman. He was an educator, teaching industrial arts for many years. His carpentry work was beautiful and he spent hours making exquisite model ships with thousands of pieces of wood and thread. He wasn’t only my father – he was also my mentor and friend and I will miss him more than I can say. I’d like to think that my artistic sensibilities and creativity came from him. So, for now, while I am back making cards and have started my in-person classes up again, I will probably be posting sporadically for the next month or two as I tend to my consulting business and taking care of my father’s business as well.

Today’s card is one of four projects we made at my stamping club yesterday and it features the Rainbows of Happiness Bundle and the coordinating Sunshine & Rainbows Designer Series Paper that you can get for free with a $50 purchase during Sale-A-Bration. The Sale-A-Bration promotion ends tomorrow, February 28th, so you have just two days left to get this DSP! I’ve been wanting to make a card using the Double Dutch Door fold for quite some time and thought these products would lend themselves perfectly to this fun fold. It is a super easy fold and a great way to show off Designer Series Papers you have in your stash.

Here is how I made the card.

  • Card base – Cut one piece of Magenta Madness cardstock at 8 3/4″ x 4 1/2″, score at 5 1/2″, fold and crease with a bone folder. Cut another piece of Magenta Madness cardstock at 8 1/2″ x 2 1/4″ and score at 2 1/8″ from each end. Fold and crease sharply with a bone folder.
  • For the top flap, cut piece of striped paper from the Sunshine and Rainbows Designer series paper at 4″ x 3 1/8″. The stripes are directional so keep it in mind when cutting so that they are vertical and not horizontal. Adhere to flap.
  • Cut two pieces of the polka dot DSP at 2″ x 2 1/8″ and adhere to each of the side flaps.
  • Adhere the front panel to the side panel.
  • Cut a piece of Basic White cardstock at 2 7/8″ square. Stamp three rainbow arcs with Magenta Madness, Granny Apple Green and Bermuda Bay ink. I started by using the next to largest stamp for the Magenta Madness arc. When stamping, leave enough room to stamp the greeting at the bottom of the piece. Stamp the greeting with Misty Moonlight ink. Cut three clouds from a scrap piece of Mango Melody cardstock with the dies from the Brilliant Rainbow Dies. Adhere to both sides at the bottom of the rainbow image.
  • Cut a piece of Granny Apple Green cardstock at 3″ square. Adhere it to the stamped image. Adhere piece to the top flap with Stampin’ Dimensionals.
  • Cut a piece of Basic White cardstock at 4″ x 5 1/4″. Stamp greeting with Misty Moonlight ink. Stamp small hearts with Magenta Madness ink. Adhere to inside of card.

I was cheered up as I was making this card. I love the fun images and bright colors!

Thanks for stopping by today!

There are only two days remaining for Sale-A-Bration! View the Sale-A-Bration brochure by clicking on the image on the right side-bar. This is a great time to join Stampin’ Up!  Select $125 worth of products for only $99 and you will also get two FREE stamp sets (excluding host sets and SAB sets) of your choice! The kit ships for free. As a demonstrator you will enjoy a 20% discount on all future orders. Become a happy discount shopper or build a business – the choice is yours. I’d love to have you join my team! Click here to learn more about the benefits of joining Stampin’ Up! 

The Beyond the Horizon Paper Pumpkin Kit includes watercolor prints and designs inspired by the beautiful nature around us to create nine cards and coordinating envelopes. And paper pieces that perfectly coordinate with the New Horizons Suite Collection in the January–June 2022 Mini Catalog. And if you thought one stamp set was great just wait—this month’s kit comes with a BONUS stamp set for FREE! That’s two stamp sets in one kit! It’s our way of saying THANK YOU to you our Paper Pumpkin subscribers. Create 3 each of 3 different designs. Coordinating colors: Bumblebee, Calypso Coral, Evening Evergreen, Misty Moonlight, Night of Navy, Old Olive, Pale Papaya. For further information and to subscribe, click here to visit my Paper Pumpkin website.

Place an online order between $50 and $149 and use this host code for February. You will receive a free gift from me the following month.  If your order is $150 or more DO NOT use the host code. You will qualify for Stampin’ Rewards.

Product List

Happy Hanukkah

Hello and Happy Hanukkah! I kicked off the holiday by attending a menorah lighting ceremony in Lancaster City last evening and then lit the first candle when I got home. Last week I had a Hanukkah cardmaking class and these are the four cards we made. Stampin’ Up! hasn’t had a new Hanukkah stamp set in many years so I pulled out my favorite retired set, Jewish Celebrations, and also used stamps and dies that I’ve purchased over the years from a few other companies. All of the cardstock, inks, Designer Series Paper and embellishments are Stampin’ Up! products. It is always a challenge to come up with creative ways to make cards for Jewish holidays so I always keep retired products that I think will work well for future holiday projects – so glad for my stash!

I got this fun card layout from LeeAnn Greff’s blog, Flowerbugs Inkspot. The menorah image is from the Jewish Celebrations stamp set. I stamped it on Very Vanilla cardstock and cut it out with one of the Tasteful Label dies. The Happy Hanukkah greeting is from a current SU stamp set, Snowflake Wishes. The embossing folder I used for the side panel is Stylish Scroll. The DSP and blue frayed ribbon are from the Boho Indigo Product Medley, which was in the 2020-2021 Annual Catalog. The inside greeting is from Altenew’s Love and Light Stamp set. The cardstock and ink are Misty Moonlight.

This is a fun fold card. I purchased Rubber Cafe’s Celebrating the Festival of Lights stamp set several years ago at a scrapbooking show and it is no longer available. I used Night of Navy cardstock and ink. The DSP is from You’re A Peach, which is currently available in the 2021-2022 Annual Catalog. I colored in the dreidels with Smoky Slate, Balmy Blue, Misty Moonlight and Night of Navy Stampin’ Blends. The inside greeting is from Altenew’s Love and Light stamp set. The bling is from Holiday Rhinestone Basic Jewels.

This card features the beautiful menorah from Altenew’s Love and Light stamp set, which is still available. I stamped the image with Memento Tuxedo Black ink on Shimmery White cardstock and colored it with Smoky Slate, Night of Navy, Balmy Blue, Granny Apple Green and Highland Heather Stampin’ Blends and used the coordinating die to cut it out. I die cut a piece of silver foil with a Stitched Rectangles die and popped the menorah up on it with regular and mini Stampin’ Dimensionals. The card base is Smoky Slate. The DSP is Springtime Foils Specialty DSP, which was a Sale-A-Bration offering a few years ago. The silver ribbon came in a combo pack with gold ribbon and is retired.

This is another fun fold card that uses the Celebrating the Festival of Lights stamp set. I heat embossed the dreidel and greeting with gold embossing powder on a piece of Basic White cardstock that I cut with one of the scalloped dies from the Stitched so Sweetly dies. I cut a piece of NIght of Navy cardstock with a larger scalloped die and adhered them together. Card base is Night of Navy and the gold striped paper is from the Expressions in Ink Specialty Designer Series Paper from the current 2021-2022 Annual Catalog. I added a few Champagne Rhinestone Jewels for a bit of bling.

Thanks for stopping by today!

The November Paper Pumpkin kit is cute and quirky! The kit includes elements to make nine cards, 3 each of 3 designs, and coordinating envelopes. Finished card size is 4 1/4″ x 5 1/2″. The Lots of Pun Stamp Set is a builder stamp set! This means the included images can be mixed and matched to build a variety of unique characters with different looks and features. Coordinating colors: Crumb Cake, Daffodil Delight, Early Espresso, Granny Apple Green, Pool Party, Poppy Parade. Subscribe by December 10th and it will appear in your mailbox around the 20th of the month. Visit my Paper Pumpkin website to subscribe.

Place an online order between $50 and $149 and use this host code for November. You will receive a free gift from me the following month.  If your order is $150 or more DO NOT use the host code. You will qualify for Stampin’ Rewards.

Product List

Pretty Pumpkins Fun Fold Card

Hello! Today’s project is a fun fold card using the Pretty Pumpkins bundle. The stamp set has great images and sentiments and the coordinating dies are beautiful. It isn’t often that we get Designer Series Papers to match the browns in the Stampin’ Up! color range, so while the colors in the Blackberry Beauty Specialty DSP are predominantly purples, I was excited to see that a few sides of the papers have some wonderful designs in Early Espresso and Cinnamon Cider.

Here is how I made the card.

  • Main card base – Cut a piece of Early Espresso cardstock at 4 1/4″ x 8 1/2″, score at 3″, fold and crease with bone folder. 
  • Smaller card base – Cut a piece of Cinnamon Cider cardstock at 3″ x 8″, score at 4″, fold and crease with bone folder.
  • Cut one piece of the Blackberry Beauty DSP at 4″ x 5 1/4″ and one at 2 3/4″ x 4″. Adhere the smaller piece of DSP to front fold and the larger piece to the inside.
  • Cut a piece of Pumpkin Pie cardstock at 2 1/4″ x 2 1/2″. Cut an adhesive sheet to the size of the cardstock.  Run through die cutting machine using the pumpkin die from the Detailed Pumpkins dies.
  • Cut piece of Very Vanilla cardstock at 2 1/2″ x 3″. Stamp large pumpkin line image with Tuxedo Black Memento ink. Color with a variety of Stampin’ Blends.  I used Stampin’ Blends and colored the stems with light Cinnamon Cider and light and dark Old Olive for the leaves.  For the smallest pumpkin I used dark Pale Papaya and light Pumpkin Pie, for the medium pumpkin I used dark Pumpkin Pie and light Cajun Craze, and for the largest pumpkin I used light and Dark Cajun Craze.  You can also color the image with Stampin’ Write Markers, colored pencils, or use ink pads with blender pens. Run through die cutting machine with coordinating die from the Detailed Pumpkins dies.
  • Cut two pieces of Very Vanilla cardstock at 2 7/8″ x 3 7/8″. Stamp greeting from Pretty Pumpkins stamp set with Early Espresso ink in upper right corner of one the pieces.  Adhere die cut Pumpkin Pie pumpkin and then adhere the colored pumpkin piece, overlapping the die cut pumpkin.  You can adhere with or without Stampin’ Dimensionals.  Adhere to front flap of the smaller Cinnamon Cider card base.
  • Stamp the small pumpkin vine and leaf image with Memento ink on the other piece of the 2 7/8” x 3 7/8” Very Vanilla cardstock and color the leaves with the Old Olive and Cinnamon Cider Stampin’ Blends.  Adhere to inside of the smaller card base.
  • Adhere smaller card to larger card, making sure that the card opening faces to the left.  Adhere a Brushed Metallic Adhesive-Backed Dot to the card front.

Thanks for stopping by today!

The Gifts Galore Paper Pumpkin Kit is available now through November 10. With classic Christmas sentiments, bright and festive colors, a sweet snowman, a tree with all the trimmings, or a playful pile of presents, you’ll have everything you need to make eye-catching treat packages that are sure to spread Christmas cheer. Each Gifts Galore box contains enough supplies to create nine treat packages—three each of three designs—and nine food-safe bags that are adorably styled for easy Christmas gifting. Coordinating colors: Evening Evergreen, Flirty Flamingo, Old Olive, Pool Party, Poppy Parade. There’s plenty of joy to share with Gifts Galore! Visit my Paper Pumpkin website to subscribe to this kit.

Place an online order between $50 and $149 and use this host code for October. You will receive a free gift from me the following month.  If your order is $150 or more DO NOT use the host code. You will qualify for Stampin’ Rewards.

Product List
Paper Snips
[103579]
$10.00

Slice of Happiness Rosh Hashanah Card

Hello! I made today’s card to send to my friends and relatives for the Jewish New Year, Rosh Hashanah. Stampin’ Up! hasn’t had a Jewish holiday stamp set for many years so every year I take on the challenge of using SU products to create my holiday cards. It is amazing what you can come up with! I can usually adapt one of our packages of Designer Series Papers from the holiday catalog, or sometimes there are stamp sets that contain images that are symbols of the Jewish New Year. When I saw the gorgeous Blackberry Beauty Specialty Designer Series Paper in the July-December 2021 Mini Catalog, the rich purples made me think of grapes, which is one of the symbols. I thought immediately of the retired stamp set, Slice of Life from the 2019-2020 Annual Catalog, because one of the images is grapes. I used this stamp set to make my holiday card in 2019 and used the pomegranate image on that card. You can see it in this blog post. I used a set of Jewish holiday greetings from a retired Papertrey Ink stamp set. I also used one of my favorite fun-folds, which is a great way to showcase a stamped image.

Here is how I made the card.

  • Card base – cut a piece of Rich Razzleberry cardstock at 5 1/2″ x 6 1/2″. Score at 2 1/4″. Fold and crease sharply with a bone folder.
  • Cut two strips of Blackberry Beauty DSP at 2″ x 5 1/4″. I used two different papers, one for the front fold and one for the inside fold. Adhere to both sides of the fold.
  • Smaller card base – cut a piece of Cinnamon Cider cardstock at 6 1/2″ x 4 1/4″ and score at 3 1/4″. Fold and crease sharply with a bone folder. Cut a piece of Very Vanilla cardstsock at 3″ x 4″, stamp greeting with Cinnamon Cider ink and adhere to the inside left side of the card base. Cut a scrap piece of Gold Foil and run it through your die cutting machine with one of the small leaf dies from the Beautiful Leaves Dies. Adhere with small dots of liquid glue to bottom left of the greeting piece.
  • Cut piece of Very Vanilla cardstock at 3 1/2″ x 4 1/2″ and run through your die cutting machine with the largest rectangle from the Stitched so Sweetly dies.
  • Use the direct-to-rubber coloring technique to color the grape image with Stampin’ Write Markers. I used Old Olive for the leaves, Cinnamon Cider for the branches and Rich Razzleberry for the grapes. Stamp onto the Very Vanilla cardstock, leaving room to stamp the greeting at the bottom. Stamp the greeting with Cinnamon Cider ink. Add some sparkle to the grapes with Wink of Stella.
  • Adhere the piece to the front of the Cinnamon Cider card base. Note that the folded base will open from left to right so make sure the opening is in the right direction before you adhere the stamped image!
  • Adhere the smaller card to the Rich Razzleberry card base so that the front of the smaller card overlaps the front fold of the larger card.

Thanks for stopping by today!

Place an online order between $50 and $149 and use this host code for September. You will receive a free gift from me the following month.  If your order is $150 or more DO NOT use the host code. You will qualify for Stampin’ Rewards.

Christmas Kit Now Avaliable!

Christmas Whimsy is an adorably festive card kit with a modern design! In this all-inclusive kit, the hard work is done for you! All pieces are printed, die cut, and ready for you to craft. The simple steps of this kit are perfect for beginner crafters and kids, too! Grab a kit or two and gather around for a simple Christmas activity that everyone will enjoy. The kit contains everything you need to create eight elf-centric Christmas cards including printed card bases, die cuts, embellishments, an exclusive stamp set, a Night of Navy Classic Stampin’ Spot, and more! Create two each of four designs, finished size of cards is 5 1/2″ x 4 1/4″. Coordinating colors: Balmy Blue, Basic Gray, Crumb Cake, Evening Evergreen, Gray Granite, Misty Moonlight, Poppy Parade, Real Red, So Saffron, Soft Succulent, Soft Suede. You can order this kit, Item # 158155, in my online store. Cost of the kit is $19.00.

Product List
Paper Snips
[103579]
$10.00

Color & Contour-Kylie’s International Blog Highlights

Hello! Today I’m participating in Kylie Bertucci’s International Blog Highlights. Readers get to vote on their top five favorites in the gallery and the top 10 winners will get to participate in an International Blog Hop later this month. The theme is “thank you”. This is one of the cards we made in one of my classes last month, where the projects featured the Hand-Penned Suite and the Color & Contours bundle. While the greeting doesn’t say “thank you,” I’m using this card to send out a special thanks to a friend.

Here’s how I made the card.

  • Card base – cut a piece of Blushing Bride cardstock at 4 1/4″ x 8 1/2″, score at 3″, fold and crease with a bone folder.
  • Smaller card base – cut a piece of Blushing Bride cardstock at 3″ x 8″, score at 4″, fold and crease with a bone folder.
  • Cut one piece of Hand-Penned Designer Series Paper at 4″ x 5 1/4″ and adhere to inside of card base, cut another piece at 2 3/4″ x 4″ and adhere to front fold of card base.
  • Using the third largest scalloped rectangle from the Scalloped Contours dies, cut a piece from Basic White cardstock.
  • Cut coordinating piece of DSP at 2 3/8″ x 3 7/8″ and adhere to front of smaller card base. Adhere the Basic White scalloped rectangle . Cut another piece of DSP at 1 7/8″ x 3 1/4″. Stamp hello greeting from Timeless Tropical stamp set with Tuxedo Black Memento Ink in lower right corner. Adhere to scalloped rectangle.
  • Stamp three flower outlines from the Color & Contour stamp set on scrap piece of Basic White cardstock with Memento ink. Use the fill stamp to stamp two of the flowers with Blushing Bride ink and one flower with Pale Papaya ink. Cut out with the coordinating die from the Scalloped Contoured dies. Adhere the two Blushing Bride flowers with liquid glue and adhere the Pale Papaya flower with a Stampin’ Dimensional.
  • Adhere the smaller card to the inside card base, making sure that the opening of the smaller card base is to the left and the fold is to the right.
  • Cut a piece of Basic White cardstock at 2 3/4″ x 3 3/4″. Stamp greeting from the Sunny Sentiments stamp set with Memento ink and adhere to inside of smaller card.
  • Adhere Petal Pink gems from the Elegant Faceted Gems to the center of each flower.

I’d be so appreciative if you would vote for my card! Click on the vote image below. Once you are in the gallery, click on the heart at the top right hand side of the picture as the hearts appear.

Thanks for stopping by today!

Delayed products are now available!

  • 156326 – Gingerbread & Peppermint Memories & More Card Pack
  • 156327 – Gingerbread & Peppermint Memories & More Cards & Envelopes
  • 156275 – Gingerbread & Peppermint Suite Collection
  • 156458 – Blackberry Beauty Specialty Designer Series Paper
  • 156278 – Blackberry Beauty Suite Collection

It’s Sale-A-Bration time! This is the first time ever that Stampin’ Up! is running a second SAB in the same year! Earn FREE products at the $50 or $100 level. There are no limits on how many items you can earn with every $50 you spend on products from the Annual Catalog or Holiday Mini Catalog. Among the products are some fun holiday Designer Series Papers for you to choose from. Click here to view the brochure.

Place an online order between $50 and $149 and use this host code for July. You will receive a free gift from me the following month.  If your order is $150 or more DO NOT use the host code. You will qualify for Stampin’ Rewards.

Product List
Paper Snips
[103579]
$10.00

Pansy Patch Envelope Fold Card

Hello! Today I’m sharing an envelope fold card that features the pretty Pansy Patch Suite. Pansies are one of my favorite flowers so I was happy to see this sweet set of products in the annual catalog. I didn’t do much stamping on this card – just the leaves and the greeting. The little pansy collage was done by die cutting the pansies from one of the sheets of the Pansy Petal Designer Series Paper that coordinates with the pansy dies.

Here is how I made the card. There are lots of steps, however, it wasn’t difficult!

  • Cut two pieces of Soft Succulent cardstock at 4 1/4″ x 11″. Score at 5 1/2″.
  • Place one piece in your paper trimmer and cut from the score line diagonally down to the opposite bottom corner. Repeat with other piece. You can put both pieces together and cut both at the same time if you prefer but you will have to add a little more pressure to make sure you cut evenly through both pieces. Fold on the score line and sharply crease with a bone folder. Adhere the two pieces together to form the card base. Use either Stampin’ Seal+ or Tear & Tape.
  • Cut a piece of Pansy Petal DSP at 4″ x 5 1/4″ and cut on the diagonal. If you don’t want to use the reverse side of the paper you can cut two different pieces. Note: if using paper with a directional pattern, make sure you are cutting it on the diagonal in the right direction!
  • Adhere DSP to the diagonal folds.
  • Adhere the diagonal sides to the bottom of the card base. Decide which DSP you would like to show more of and adhere the other flap first, placing a line of Tear & Tape at the bottom inside flap. Then place a piece of Tear & Tape along the bottom of the other flap and fold over the first flap to make the pocket.
  • Cut a piece of Evening Evergreen Open Weave Ribbon at 12 1/2″ and wrap around card front, with the two ends of the ribbon meeting in the front of the card. Secure with a piece of tape.
  • Make the pansy collage. I punched out a circle from a scrap piece of Whisper White cardstock to use as a base to build the collage. You can also use one of the Layering Circles dies.
  • Stamp two leaves from the Pansy Patch stamp set. This is a two-step set so first stamp the base with Evening Evergreen ink, stamping off once before stamping onto scrap piece of Basic White cardstock. Stamp the second leaf piece with the veins over the first leaf image with Evening Evergreen ink. Cut with coordinating die.
  • Using the piece of DSP with the different sizes and colors of pansies, select three pansies, one of the large images and two of the smaller images, and cut with coordinating dies.
  • Arrange the flowers and leaves on the circle base. Adhere the leaves first using Mini Glue Dots. Then adhere the large pansy. Adhere the two smaller pansies. Adhere the collage to the center of the envelope by adhering glue only to the bottom part of the collage so that the pocket is open in order to slide the note card into it.
  • To make the note card, cut a piece of Basic White cardstock at 4″ x 5 1/2″. I used the scalloped border die from the Penned Flowers die set to create the scalloped edge. You can use any other scalloped border die you might have in your collection. Stamp the greeting from the Pansy Patch stamp set with Evening Evergreen ink. Slide note card into envelope pocket.

Thanks for stopping by today!

Place an online order between $50 and $149 and use this host code for August. You will receive a free gift from me the following month.  If your order is $150 or more DO NOT use the host code. You will qualify for Stampin’ Rewards.

Product List
Pansy Dies
[155680]
$32.00
Paper Snips
[103579]
$10.00