

Hello and Happy New Year! I hope that 2021 will be brighter for everyone. Today I’m participating in Kylie Bertucci’s International Blog Highlights. Readers get to vote on their top five favorites in the gallery and the top 10 winners will get to participate in an International Blog Hop later this month. The theme is “thank you” and is a way for us to show our appreciation to someone that has inspired, helped or supported us in some way.
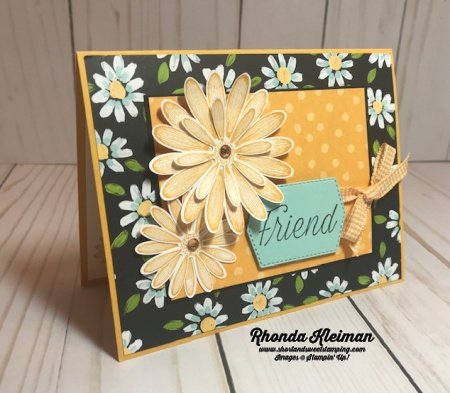
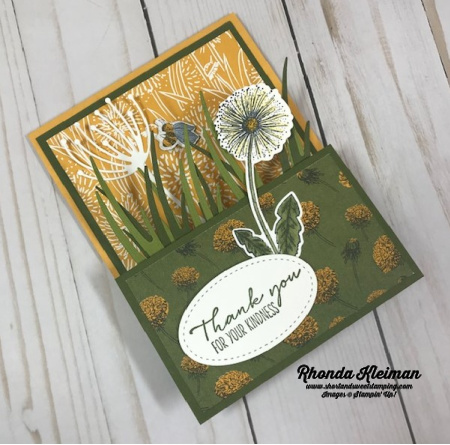
This card uses the Flowers and Field Designer Series Paper, one of the free products you will be able to earn with a $50 purchase during Sale-A-Bration, which begins tomorrow, January 5th. I paired it with the Daisy Lane stamp set and coordinating daisy punches. The second I laid eyes on this paper in the SAB brochure it immediately brought me back to the first dress I made in my Junior High School sewing class back in the mid-1960’s! I grew up in Brooklyn, New York so my mother and I took the subway to 34th Street in Manhattan to go to Macy’s department store. At the time they had an entire floor devoted to sewing and fabrics, now long gone. After perusing thousands of bolts of fabrics, many which had flowers on black backgrounds, I selected one with a daisy print. The dress was a simple shift with a tie belt, which was very in-style at the time. I saved the dress and went up to my attic this weekend to take a few pictures. The yellow in the fabric is an exact match to the Bumblebee In Color. Everything old is new again!


Here is how I made the card.
- Card base – Cut a piece of Bumblebee cardstock at 5 1/2″ x 8 1/2″, score at 4 1/4″, fold and crease with a bone folder.
- Cut piece of daisy print from the Flower & Field DSP at 4 1/8″ x 5 3/8″ and adhere to card front.
- Cut piece of Basic Black cardstock at 3″ x 4″. Cut piece of Bumblebee polka dot print DSP at 2 7/8″ x 3 7/8″ and adhere to cardstock.

- Stamp the daisy images from the Daisy Lane stamp set. On scrap piece of Whisper White cardstock, use Bumblebee ink to stamp the large daisy image twice and stamp the small daisy image three times. Punch out with the large and medium daisy punches. For the large flower, adhere two of the large daisies together and then adhere one small daisy. For the small flower adhere the two remaining small daisies together. Adhere with either glue dots or a small amount of liquid glue on the flower centers. Curl the tips of the large daisy with a bone folder. Add a champagne rhinestone to the center of each flower.
- Stamp the greeting with Memento Tuxedo Black ink on scrap piece of Pool Party cardstock. Cut out with one of the dies from the Tasteful Labels die set. This is one of my “go to” sets for cutting out greetings.
- Cut an 18″ piece of Bumblebee gingham ribbon and tie into a bow around the polka dot piece. Adhere piece to center of card front. Adhere large daisy with Stampin’ Dimensionals in upper left corner and adhere smaller daisy under the larger flower. Adhere greeting with Stampin’ Dimensionals.

I’d be so appreciative if you would vote for my card! Click on the vote image below. Once you are in the gallery, click on the heart at the top right hand side of the picture as the hearts appear.

Thanks for stopping by today!


This is the last day you will be able to place orders for items in the August-December 2020 Mini Catalog. The new January-June Mini Catalog goes live tomorrow!
Product List
 |  |
 | |
 |  |
 |  |
 | |
 |  |
 |  |
 |  |


")


