Sending Birthday Wishes

Hello!

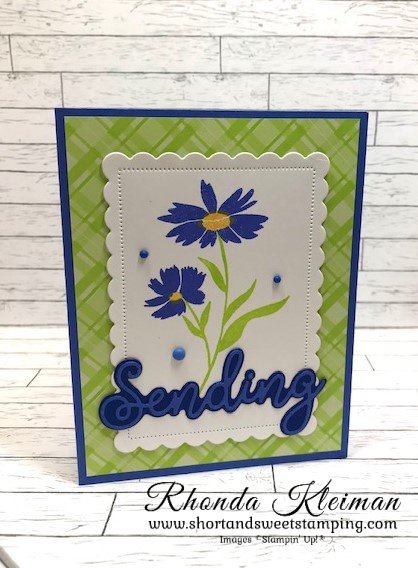
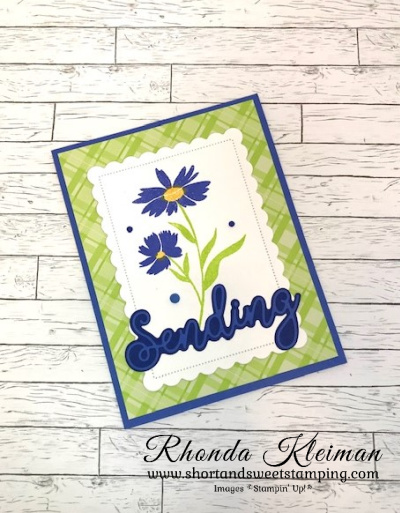
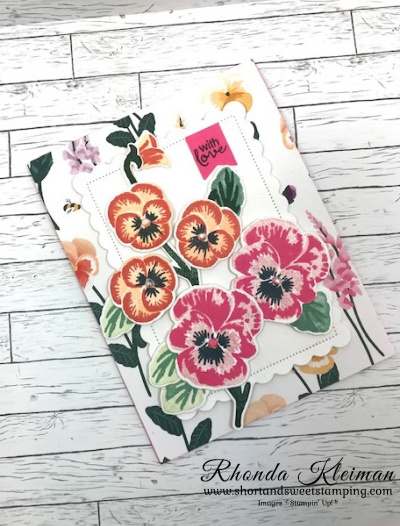
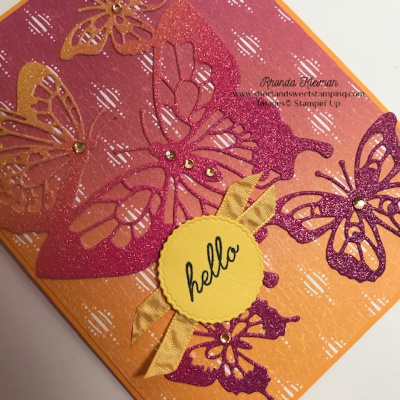
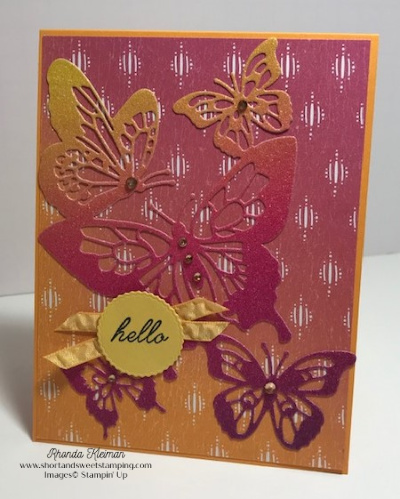
Today’s card features the Sending Smiles Bundle from the new 2022-2023 Annual Catalog. This is a very versatile stamp set because it includes so many of what I would consider to be basic and most commonly used types of greetings. The floral images are easy to stamp and are sure to bring cheer! I couldn’t wait to start playing with the new In Colors and love the combination of Parakeet Party and Orchid Oasis.

Here is how I made the card.

  • Card base – cut a piece of Orchid Oasis cardstock at 5 1/2″ x 8 1/2″, score at 4 1/4″, fold and crease with a bone folder.
  • Cut a piece of the Parakeet Party plaid print from the 2022-2024 In Color Designer Series Paper at 4″ x 5 1/4″ and adhere to card front.
  • Cut a piece of Basic White cardstock at 3 1/2″ x 4 3/4″ and run through the Stampin’ Cut & Emboss Machine with the next-to-largest rectangle die from the Scalloped Contours Dies.
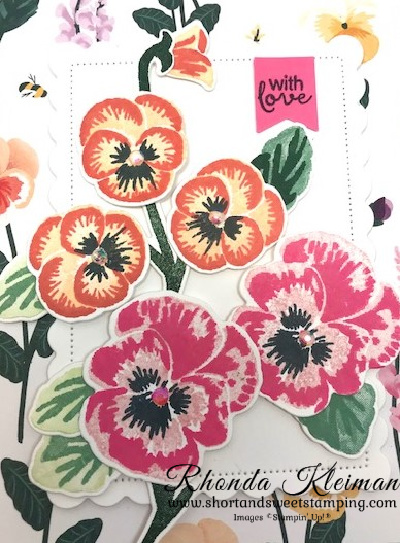
  • Stamp the larger leaf image in the Sending Smiles stamp set on the scalloped rectangled piece with Parakeet Party ink. Stamp the two flower images with Orchid Oasis ink. Stamp the centers of the flowers with Daffodil delight ink.
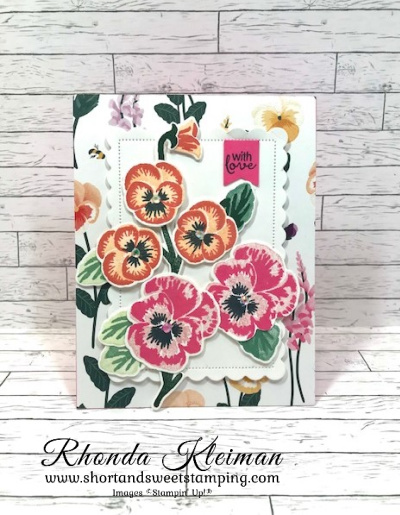
  • Cut a piece of Starry Sky cardstock at 2″ x 4″ and run through the Cut & Emboss Machine with the solid “Sending” die from the Sending Dies set. Cut a piece of Orchid Oasis cardstock at 2″ x 4″. Cut a piece of an adhesive sheet the same size and adhere it to one side of the cardstock. Run through the Cut & Emboss Machine with the open script “sending” die. Peel adhesive backing off the piece and carefully adhere it to the Starry Sky piece.
  • Adhere scalloped rectangle piece to card front. Adhere the “sending” piece to the bottom of this piece with liquid glue. Adhere three Orchid Oasis 2022-2024 In Color Matte Decorative Dots to the card front.
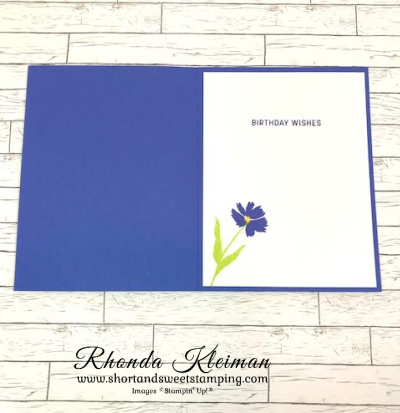
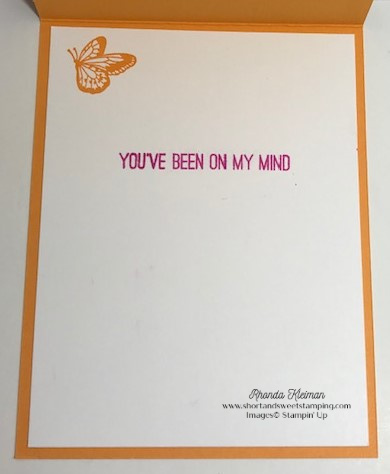
  • Cut a piece of Basic White cardstock at 4″ x 5 1/4″. Stamp the birthday greeting with Starry Sky ink. Stamp the smaller leaf in the lower left corner with Parakeet Party ink. Stamp the flower with Orchid Oasis ink and stamp the inside of the flower with Daffodil Delight ink.

This is a quick and easy card to make. Give it a try with different color combinations!

Thanks for stopping by today!

If you love the new In Colors, now is the time to take advantage of this great In Color Starter Kit Promotion!

Join Stampin’ Up! from May 3-May 31. Choose $125 worth of products for $99 plus get $66.50 in bonus 2022-2024 In Color Products for free! Here are the free items that will be added to your starter kit.

  • 2022-2024 In Color Grid Paper – Item number 160009
  • 2022-2024 In Color Ink Pad Collection – Item number 161108
  • 2022-2024 In Color Cardstock Collection – 159204
  • 2022 In Color 6″ x 6″ Designer Series Paper Assortment – Item number 159253

In addition, you will receive a free Paper Pumpkin Kit and free shipping. You do not have to build a business! Become a happy discount shopper and enjoy a minimum 20% discount on all future orders. Click here to learn more about the benefits of joining Stampin’ Up! For further information about joining my team, click here.

Place an online order between $50 and $149 and use this host code for May. You will receive a free gift from me the following month.  If your order is $150 or more DO NOT use the host code. You will qualify for Stampin’ Rewards.

Product List

Pansy Patch Card

Hello!

I’m finally back to posting after an absence of over two months! In the next two weeks I will be featuring a backlog of cards I’ve made during that time, mixed in with projects featuring products from the new annual catalog. Today’s card features the Pansy Patch bundle, which has carried over into the new catalog. Pansies are one of my favorite flowers so when the Pansy Petals Suite was introduced in the current catalog, I was very excited! As excited as I was, the stamp set and dies can be a little intimidating to figure out how to use them, so I didn’t do much with them until recently, when Kylie Bertucci offered a creative retreat that featured this suite. After the retreat, attendees received a tutorial with 21 exclusive projects. I CASE’d today’s card from one of Bruno Bertucci’s projects. I kept the design but totally changed up the Designer Series Paper and ink colors for a springtime feel.

Here is how I made the card.

  • Card base – cut a piece of Polished Pink cardstock at 4 1/4″ x 11″, score at 5 1/2″, fold and crease with a bone folder.
  • Cut a piece of Pansy Petals Designer Series Paper at 4 1/4″ x 5 1/2″ and adhere to card front. (This DSP is not carrying over into the new catalog and is now sold out.)
  • Die cut a piece of Basic White cardstock at 3 1/2″ x 4 1/2″ and run through the Stampin’ Cut and Emboss Machine with the next-to-largest rectangle from the Scalloped Contours Dies. Adhere to card front with Stampin’ Dimensionals.
  • This is a two-step stamp set. Stamp two of the large pansies. Stamp the base with Blushing Bride ink, stamping off once before stamping onto a piece of Basic White cardstock. Stamp the detailed stamp over the base with Polished Pink ink. Stamp the center of the flower with Blushing Bride ink, stamping off once. Stamp the beard with Tuxedo Black Memento ink. Cut out with the large pansy from the Pansy Dies.
  • Stamp three of the smaller pansies. Stamp the base with Pale Papaya ink. Stamp the detailed stamp over the base with Calypso Coral ink. Stamp the beard with Tuxedo Black Memento ink. Cut out with the smaller pansy from the Pansy Dies.
  • Stamp the pansy bud base with Pale Papaya ink and stamp the detailed stamp with Calypso Coral ink. Cut out with the bud from the Pansy Dies.
  • Stamp one bud stem and two long stems with Evening Evergreen ink and cut out with Pansy Dies.
  • Stamp three leaves from the base stamp with Soft Sea Foam ink and stamp the detail stamp with Soft Succulent ink. Stamp two leaves with Soft Succulent ink for the base and Evening Evergreen ink with the detail stamp. Use both leaf shapes. Cut out with the two different leaf dies.
  • Stamp greeting with Memento ink on a 5/8″ x 3/4″ piece of Polished Pink cardstock and flag one end. I needed a small greeting to fit into the space where I wanted the greeting go, so I chose one of the greetings from the Hydrangea Haven stamp set.
  • To assemble the flowers and leaves, first adhere the leaves to the flowers with Mini Glue Dots. Adhere the bud to the bud stem with a drop of liquid glue. Adhere the stems to the Basic White scalloped rectangle with Mini Stampin’ Dimensionals. Adhere the flowers to the stems with Stampin’ Dimensionals, as shown.
  • Finish off the card by adding some bling. I used the 2021-2023 In Color Jewels for the centers of the flowers. (These jewels are on the last chance list.)

Thanks for stopping by today!

2022-2023 Annual Catalog goes live on May 3, 2022!

There are just a few days left to purchase items that will be retiring from the 2021-2022 Annual Catalog. May 2nd is the last day to order from this catalog. Click here to view the Last Chance list. Everything on the list is while supplies last, so a number of products are now sold out.

$99 Starter Kit Promotion Begins on May 3, 2022

Join Stampin’ Up! from May 3-May 31. Choose $125 worth of products for $99 plus get $66.50 in bonus 2022-2024 In Color Products for free! This includes the Ink Pad Color Collection, In Color Cardstock Collection, In Color 6″ x 6″ Designer Series Paper Collection and In Color Grid Paper. In addition, you will receive a free Paper Pumpkin Kit and free shipping. You do not have to build a business! Become a happy discount shopper and enjoy a minimum 20% discount on all future orders. For further information about joining my team, click here.

Product List
Pansy Dies
[155680]
$32.00
Paper Snips
[103579]
$10.00

Always Valentine’s Day Card

Hello! Today I’m featuring a Valentine’s Day card that we did in my January class to go. It uses dies and an embossing folder and the only stamping is the greeting on the inside of the card. I’ve been seeing cards with a Basic Black, Basic White and Magenta Madness color combination that I think is very striking so here is what I came up with.

Here is how I made the card.

  • Cut piece of Basic Black cardstock at 4 1/2″ x 11″, score at 5 ½”, fold and crease with bone folder.  Cut piece of True Love Designer Series Paper at 4″ x 5 1/4″ and adhere to card front.
  • Cut piece of Basic White cardstock at 2 3/4″ x 4 1/4″. Run it through your die cutting and embossing machine with the Lace 3D embossing folder, centering the design so that it is even on both sides.  Adhere to a piece of Magenta Madness cardstock cut at 3 1/4″ x 4 1/2″.
  • Back a scrap piece of Basic Black cardstock with part of an adhesive sheet that is cut to size and run through your die cutting & embossing machine with the Always die from the Always Die set.  Cut a 2 1/2″ square piece of Magenta Madness cardstock and back with a piece of adhesive sheet. Run it through the machine with the second largest scalloped heart from the Stitched Be Mine die set.  Adhere the heart to the embossed Basic White piece.  Adhere to the Magenta Madness cardstock.  Adhere the Always die cut to the piece and then adhere piece to card front with Stampin’ Dimensionals.
  • You can use any greeting from your stamp sets for the inside greeting. I mixed sentiments from two different stamp sets. I used “In My Heart” from the Field of Flowers stamp set and the “Happy Valentine’s Day” greeting from the Forever Lovely stamp set, which is now retired. I lined both of them up on an acrylic block so I could stamp them both at the same time and stamped them with Magenta Madness ink on a piece of Basic White cardstock cut at 4″ x 5 1/4″. Adhere to inside of card.

Thanks for stopping by today!

Hey Chick and Hey Birthday Chick Bundles Now Available!

The Hey Birthday Chick bundle on page 52 in the Mini catalog probably reminded some of you of the Hey Chick stamp set that was a well-loved SAB item in 2017.  Stampin’ Up! decided to bring it back and has added a coordinating die set and a new bundle created in the same style. These products are now available through June 30th. For further information and to place an order in my online store click here

Product List
Always Dies
[154307]
$33.00
Paper Snips
[103579]
$10.00

Butterfly Beauty-Kylie’s International Blog Highlights

Hello! Today I’m participating in Kylie Bertucci’s International Blog Highlights. Readers get to vote on their top five favorites in the gallery and the top 10 winners will get to participate in an International Blog Hop later this month. The thank you theme is a way for us to show our appreciation to someone that has inspired, helped or supported us in some way. When I saw the Rainbow Glimmer Paper in the new annual catalog I immediately thought that it would work beautifully with the Butterfly Beauty dies and it did not disappoint! I combined it with the Artistry Blooms Designer Series Paper, which I knew I had to have the minute I laid eyes on it!

Here is how I made the card.

  • Card base – cut a piece of Mango Melody cardstock at 4 1/4″ x 11″, score at 5 1/2″ and fold in half.
  • Cut piece of Artistry Blooms DSP at 4 1/8″ x 5 3/8″ and adhere to card base. I knew I wanted to work with the orange & pink color palette so I cut the strip of DSP at the full 12″ length and then cut the piece down to show the portion of the strip that had the most Mango Melody in the gradation.
  • Cut strip of Rainbow Glimmer Paper at 4 1/2″ x 12″ and again, decide what gradation you want to use and make the final cut at 4 1’2″ x 6″. Run piece through a die cutting machine with one of the two large Butterfly Beauty dies. I chose the one that had the solid outside wings. Adhere to DSP.
  • Stamp hello greeting from the Beauty Abounds stamp set with Tuxedo Black Memento black ink on scrap of Daffodil Delight cardstock. Cut out with the small circle die from the Tasteful Touches die set.
  • Cut two pieces of Daffodil Delight Ruched ribbon, trim ends and adhere, criss-cross to butterfly. I found that either the Tear & Tape or Stampin’ Seal+ worked best when adhering to the glimmer paper surface. Adhere stamped greeting over the center of the ribbon.
  • Adhere Champagne Rhinestones on the butterfly for some extra bling.
  • For the inside of the card, cut a piece of Whisper White cardstock at 4″ x 5 1/4″. Stamp greeting from Butterfly Gala stamp set with Magenta Madness ink. Stamp butterfly from Beauty Abounds stamp set with Mango Melody ink. Adhere to card.

I had so much fun making this card and it turned out exactly as I had pictured it. I’d be so appreciative if you would vote for my card by clicking on the vote image below. To give a vote, once you are in the gallery, click on the heart at the top right hand side of the picture as the hearts appear.

Thanks for stopping by today!

Bonus Days are back once again! From July 1 through August 3rd, for every $50 you spend (before shipping & tax) you will receive a $5 Bonus Day coupon code that can be used from August 4th – 31st.

  • You must have an email address in order to participate because the codes can only be delivered electronically.
  • If you earn multiple coupons in a single order, all of the codes will be sent in one email. If you earn multiple coupons for multiple orders they will be sent in separate emails for each code earned.
  • There is no limit on the number of coupon codes you can earn during this promotion.
 Product List  
Paper Snips
[103579]
$10.00

Happy Halloween!

Hello! Today I’m sharing my last Halloween project with you, featuring the adorable Mini Curvy Keepsakes Box Dies. I attended an American Business Women’s Association local chapter mixer last evening and rather than bring a bottle of wine, I thought it would be a nice touch to bring treat boxes filled with candies for all of the attendees. They looked very nice placed on either side of the table centerpiece. Everyone oohed and aahed and were delighted when I told them they each got to take one home!

I ended up using mostly retired products because they worked really well and it was an opportunity for me to continue to use them up. I used some of the Monster Bash Designer Series Papers in the current Holiday catalog a as well as papers from Halloween DSP from previous years that had more small-scale prints. I also used Basic Black Bakers Twine and the pumpkin on the tag came from a very old set, Halloween Frights. I tend to keep many holiday sets after they retire.

Here is how I made the boxes.

  • Cut your selected Designer Series Papers into 6″ squares. Cut box shape with die from the Mini Curvy Keepsakes Box Dies by running through your die cutting machine. Fold box on all of the score lines.
  • Place candies in open box before closing it up. The box holds 4-5 Hershey Kisses or 2-3 Miniatures or other similar-sized candies.
  • Die cut tags using the oval-shaped die in the set. Stamp a greeting or image on scraps of Whisper White card stock. I stamped the pumpkin image with Pumpkin Pie ink.
  • Thread bakers twine or other ribbon through the tag and then thread it through the box handles and tie in a bow.

Thanks for stopping by today!

Product List

Wonderful Romance Wedding Card

I was recently asked by a business colleague to create a card for a wedding she will be attending in early June so I finally got a chance to use the beautiful Wonderful Romance stamp set from the Occasions catalog before it retires on June 3rd! The coordinating Wonderful Floral Framelits Dies have sold out and are no longer available.

This card was actually quite easy to put together. Here is how I made it.

  • Cut piece of Whisper White Thick Card Stock at 4 1/4″ x 11″ and fold in half.
  • Cut piece of Whisper White card stock at 4″x 5 1/4″ and emboss with the Lace Dynamic Textured Impressions Embossing Folder. This folder will be available in the new annual catalog. Attach to card base with Stampin’ Dimensionals.
  • Cut circle with the die in the Wonderful Flower Framelits Dies. Stamp greeting with Mint Macaron ink. I used a greeting from the Floral Phrases stamp set. Attach to card.
  • Stamp large floral image in Tuxedo Black Memento Ink on Shimmery White card stock. Color the leaves and flowers with these Stampin’ Blends: Petal Pink, Mint Macaron, Soft Sea Foam, Pool Party, Pineapple Punch. I used dark and light blends for all except Pineapple Punch. Die cut image and attach to card front with multipurpose liquid glue.
  • Make double bow with white ribbon of your choice. I used 1/8″ Sheer Whisper White ribbon and attached to the flower stems with glue dot. This ribbon retired last year and I was so sorry to see it go because I think it is was one of the best white ribbons we ever had.

Before I made the final card I did a practice piece for the floral image to see how the blends would look together. I was so happy with how it looked that I did another one and used the practice piece to make a 10th wedding anniversary card for a dear friend and her husband.


I followed most of the steps listed above, adding these changes.

I used a greeting from the Your Perfect Day stamp set, which retired a few years ago. I added a white flower from the Frosted Flower Embellishments. These pretty embellishments will be available in the new annual catalog. I positioned the greeting and floral piece differently and also eliminated a bow for this card.

Place an online order between $50-$149 with me and receive a free gift. This month’s gift is a package of clear rhinestones.

Thanks for stopping by today!

 Product List  
Glue Dots
[103683]
$5.25
Big Shot
[143263]
$110.00


Retiring Products List – 2018-2019 Annual Catalog & Occasions Catalog

Stampin’ Up! released the 2018-2019 Annual Catalog and 2019 Occasions Catalog retiring lists today.

Click here for the 2018-2019 Annual Catalog list.

Click here for the 2019 Occasions Catalog list.

Stampin’ Trimmer Retiring

Stampin’ Up! has decided to discontinue the Stampin’ Trimmer including all accessories—replacement cutting blades, scoring blades, and cutting mats. with the release of the new catalog. There will be a gap in time between when the current Stampin’ Trimmer retires and when a new product becomes available. If you currently own a trimmer NOW is the time to stock up on replacement cutting blades. There is a quantity limit of SIX packages (each package includes two blades), while supplies last.

Die-Cutting and Embossing Product Line Changes

Stampin’ Up! is making some big changes to our die-cutting and embossing product line that will give us a better opportunity to support the long-term vision we have for the line. Stampin’ Up! will be retiring the Big Shot and will be forming a relationship with a new manufacturer for new dies and embossing folders. However, we will offer new dies and embossing folders in the 2019–2020 annual catalog. Since we’re using a new supplier, the dies and folders will be manufactured differently; this means the way you use the new style of dies and folders will be a little different than how you used the old style. Both the new-style and old-style dies and embossing folders can work with any die-cutting & embossing machine (in some cases, adaptations like shims may be required because the gap between rollers on machines may vary slightly between manufacturers). You may have noticed we’re not referring to these products using names you’re familiar with. Another change required in this transition is to the terminology we use to refer to die-cutting and embossing products.

Here are some of the changes you’ll notice with our new-style dies and embossing folders:

  • Our new-style open dies (those that coordinate with stamps) use a high quality metal that’s thinner than before but still as strong and durable.
  • The new-style dies have an added lip to the inside of the blades.
  • On old-style dies, when you place an open die (dies that coordinate with stamps) over a stamped image, a small border of cardstock is visible around the stamped image. With new-style dies, the die hugs the edge of the stamped image. Instead of aligning the die to the space around the stamped image, you will align it to the edges of the stamped image. When the image is cut, there will still be a cardstock border around the image.
  • We’ve improved the adhesive that secures the dies to the insert sheet in the package so that it’s not too sticky. It’s easier to remove dies from the insert sheet, and the adhesive won’t cling to the dies.
  • We’ve standardized the size of the die inserts for easier storage based on our observation of how demonstrators store their dies. There are now only two insert sizes: 5″ x 7″ (12.7 x 17.8 cm), which coordinate in size with our stamp cases, and 6″ x 6″ (15.2 x 15.2 cm). The standard sizes will allow uniform storage in whatever system you use. The envelopes that the dies come in will be slightly larger.
  • With old-style Dynamic folders, we recommended you spritz cardstock before embossing to soften the fibers so you got a better impression. Now, that extra step will not be necessary because the new-style folders usually create a crisp impression without spritzing. The way the new folders are manufactured also gives us options for more detailed and intricate designs in the future.
  • 3D folders are thinner than our old-style Dynamic folders. Because they are thinner, you will need to use a shim, depending on the die-cutting & embossing machine you use.

While I know that change is not easy it does lead to product innovation and exciting new possibilities, so I’m looking forward to seeing what Stampin’ Up! has in store for us with a new and improved trimmer and die cutting machine in the future.

If you have any questions or concerns about these changes please do not hesitate to contact me.

Place an online order between $50-$149 with me to receive a free gift. This month’s gift is a package of Pearlized Doilies

Thanks for stopping by today!