
Hello!
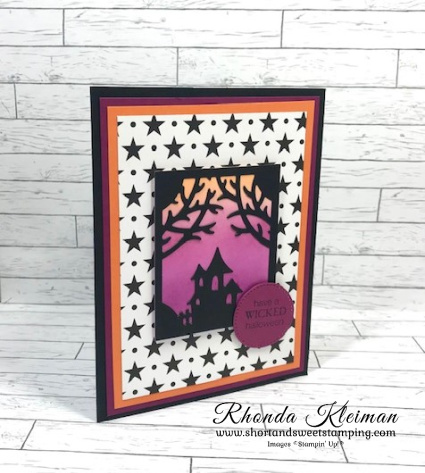
Today’s card features the Scary Silhouettes Dies from the holiday mini catalog. I’ve loved celebrating Halloween ever since I was a small child. I have made Halloween cards for years, but hadn’t offered a class for several years because my customers didn’t seem interested. However, I decided to offer a class this year and I got a great response, so was able to hold two sessions last week. This one of the cards we made and everyone had fun playing with the die cuts!
Here is how I made the card.
- Card base – cut a piece of Basic Black cardstock at 5 1/2″ x 8 1/2″, score at 4 1/4″, fold and crease with a bone folder.
- Cut a piece of Rich Razzleberry cardstock at 4″ x 5 1/4″. Cut a piece of Pumpkin Pie cardstock at 3 3/4″ x 5″. Cut a piece of the Black & White Designs Designer Series Paper with the stars at 3 1/2″ x 4 3/4″ and adhere to the Pumpkin Pie piece. Adhere to Rich Razzleberry piece and adhere to card front.

- Cut a piece of Basic White cardstock at 2 3/8″ x 2 7/8″. Color the piece with blending brushes. Color the top of the piece with Pumpkin Pie ink. Color the middle with Rich Razzleberry and then color the bottom with Blackberry Bliss ink. Go over each color as many times as you need with the blending brushes until you get the depth of color that you like.
- Cut a piece of Basic Black cardstock at 2 3/8″ x 2 7/8″ and run it through a die cutting & embossing machine with the tree branch die. Adhere to the piece colored with the blending brushes. Run a scrap piece of Basic Black cardstock through the machine with the haunted house die. Adhere house to bottom of the tree branch piece. Adhere to front of card with Stampin’ Dimensionals.
- Run a scrap piece of Rich Razzleberry cardstock through a die cutting machine with the second smallest circle from the Stylish Shapes Dies. Stamp greeting with Memento Black ink. I used a greeting from Wicked Cool, a long-retired stamp set that I kept because it is one of my favorite Stampin’ Up! Halloween stamp sets! Adhere to lower right corner of the tree branch piece with Stampin’ Dimenionals.
- Cut a piece of Basic White cardstock at 4″ x 5 1/4″. Stamp with greeting and adhere to inside of card.

Thanks for stopping by today!

Sneak Peek
Stampin’ Up! has released a collection of products, Fitting Florets, that will be available for purchase beginning on November 1. Several of the products will only be available until January 4th, while supplies last: Fitting Florets DSP, Framed & Festive Stamp Sets, Gold Adhesive Backed Swirls. The following products are also available for purchase in the Mini Catalog starting January 2023: Framed Florets Bundle, Framed Florets Stamp Set, and Framed Florets Dies. Add just the right touch of elegance to any occasion, including Christmas and seasonal celebrations, with the sweet Fitting Florets Collection. From color schemes to sentiments and embellishments to dies, these unique products blend together so that your cards and crafts fit whatever occasion you might need. Send birthday wishes, express your gratitude, or spread Christmas cheer—with so many options to mix and match you’ll be set no matter the celebration all year!

Place an online order between $50 and $149 and use this host code for October. You will receive a free gift from me the following month. If your order is $150 or more DO NOT use the host code. You will qualify for Stampin’ Rewards.
Product List  |  | |
 |  | |
 | ||
 |  |  |
 |  |  |
 |
 Designer Series Paper")


