Forever Fern Fun Fold Card

Hello!

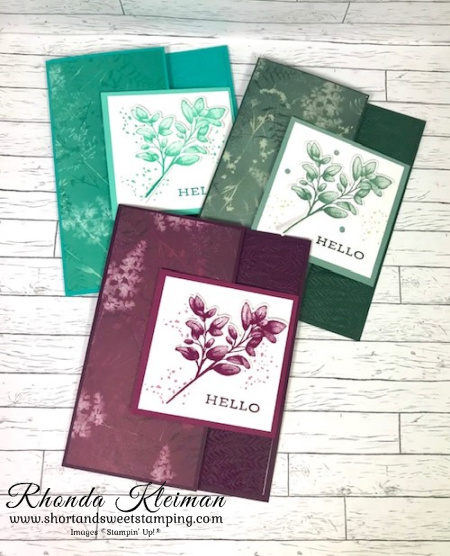
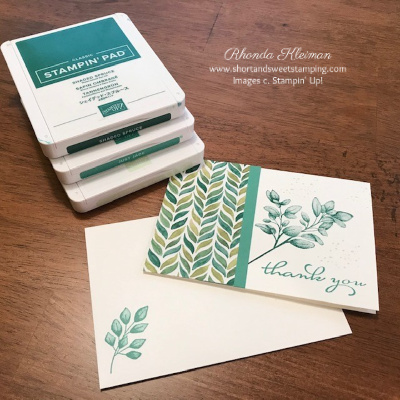
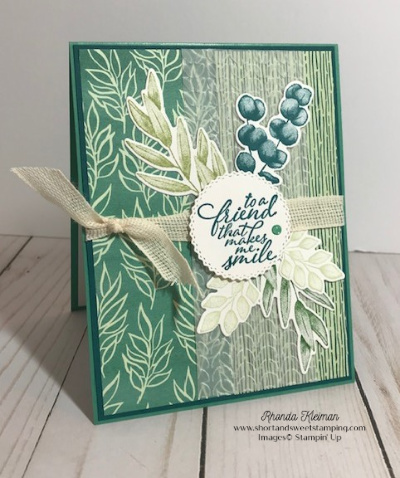
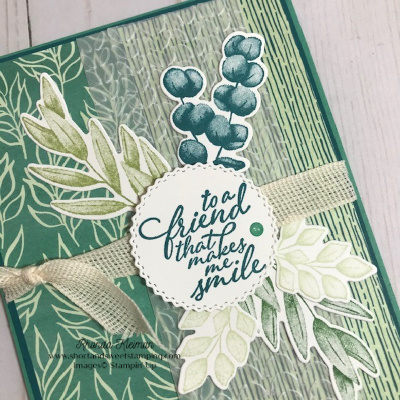
Today’s cards feature the Forever Fern stamp set and coordinating Forever Flourishing Dies, along with the Pretty Prints Designer Series Paper. I recently attended Stampapalooza, an online stamping retreat. One of the activities was a mystery project, where a series of clues were posted that included supplies needed, cutting and scoring dimensions, etc. I had an unopened package of Pretty Prints DSP waiting to be used, and once I decided on the DSP, the rest of the card quickly fell into place! I immediately thought that the Forever Fern stamp set and Fern 3D Embossing Folder would look great with the paper. The first card I made used Evening Evergreen as the main color and later on I went back and made two other cards with Blackberry Bliss and Bermuda Bay. Give this fun fold a try. It is easy to make and is also a great way to showcase DSP and coordinating stamps! I made a few Halloween cards using this fold too.

Here is how I made the cards,

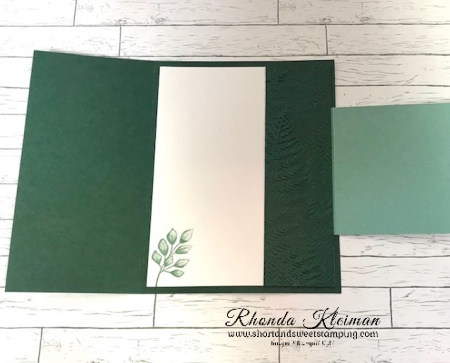
  • Card base – cut a piece of cardstock at 5 1/2″ x 8 1/2″. Score at 4 1/4″, fold and crease with a bone folder. Cut off a 1 1/2″ piece from the front side of the cardstock and trim it down to 1 1/2″ x 5 1/4″.
  • Cut a piece of DSP at 2 3/8″ x 5 3/8″ and adhere to card front.
  • Run 1 1/2″ strip through a die cutting & embossing machine with the Fern 3D Embossing folder.
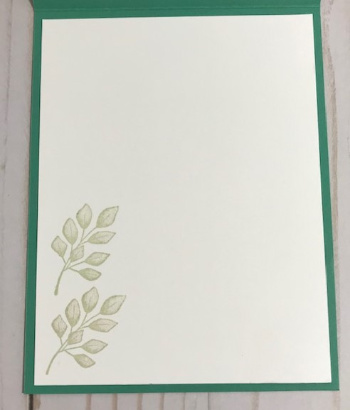
  • Cut a piece of Basic White cardstock at 4″ x 5 1/4″. Adhere the embossed piece to the right edge. Stamp one of the fern images from the stamp set at bottom left.
  • Cut a piece of cardstock at 3 1/2″ x 3″ and score at 1/2″ with the long side at the top of your trimmer. Fold on score line and give a sharp crease with a bone folder. Run a line of liquid glue or adhesive along the 1/2″ side. Center this piece in the middle of the Basic White cardstock piece and adhere. Adhere the entire piece to the inside of the card.
  • Cut a piece of Basic White cardstock at 2 3/4″ square. On a scrap piece of Basic White cardstock, stamp one of the fern images and run through die cutting and embossing machine with the coordinating die. Adhere to Basic White square piece at an angle. Stamp the speckled image several times around the fern. Stamp “hello” at bottom right. Adhere to front flap. Embellish with a few rhinestones.

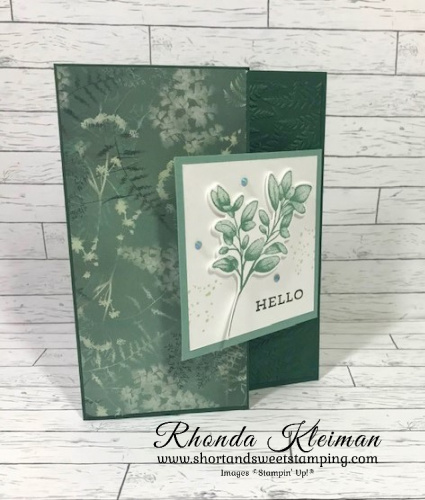
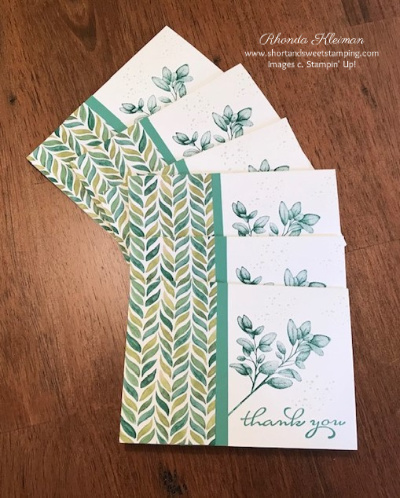
Colors used for this card: Cardstock: Evening Evergreen for card base, Soft Succulent for fun fold flap; Ink: Evening Evergreen for greeting, Soft Succulent for ferns, Soft Sea Foam for the speckles

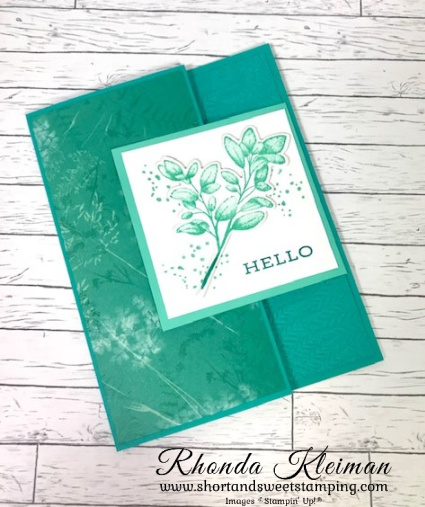
Colors used for this card: Cardstock: Bermuda Bay for card base, Coastal Cabana for fun fold flap; Ink: Evening Evergreen for greeting, Coastal Cabana for ferns, Pool Party for the speckles.

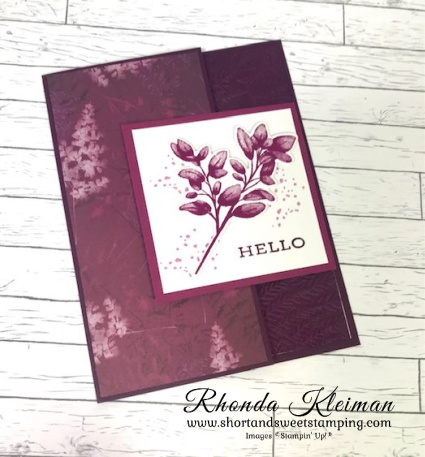
Colors used for this card: Cardstock: Blackberry Bliss for card base, Rich Razzleberry for fun fold flap; Ink: Blackberry Bliss for greeting, Rich Razzleberry for ferns, Fresh Freesia for the speckles.

Thanks for stopping by today!

Clearance Rack Refresh

Lots of new items were recently added to the clearance rack and they have been going fast! Sales are while supplies last! Click on the banner to check out the items that are still currently available in my online store

Now is a great time to consider joining Stampin’ Up! There is only one week remaining to take advantage of this great offer – when you purchase the Starter Kit you get to pick $155 worth of product for only $99 plus free shipping! You also get a free past Paper Pumpkin kit. Join as a happy discount shopper or as a business – the choice is yours! A few other benefits of joining are: enjoy a 20%-25% discount on all orders as an active demonstrator, get to see new catalogs early and place pre-orders, attend in-person and virtual Stampin’ Up! events. I’d love to have you on my team! Click here for further information and to join.

Place an online order between $50 and $149 and use this host code for October. You will receive a free gift from me the following month.  If your order is $150 or more DO NOT use the host code. You will qualify for Stampin’ Rewards.

Product List

Forever Fern-Kylie’s International Blog Highlights

Hello! Today I’m participating in Kylie Bertucci’s International Blog Highlights. Readers get to vote on their top five favorites in the gallery and the top 10 winners will get to participate in an International Blog Hop later this month. The thank you theme is a way for us to show our appreciation to someone that has inspired, helped or supported us in some way. Today’s card features Forever Fern, one of my favorite stamp sets from the annual catalog.

I was asked by a women’s organization I belong to, to make cards to go into 110 goodie bags that were hand-delivered to our members two weeks ago. Normally we have an annual membership dinner at a restaurant, however, due to Covid, we were unable to meet in person. We hosted a Zoom event and everyone opened up their bags at the same time. While we couldn’t be together in person, this was the next best option and it was a fun evening! Since I had to do so many cards I stuck to stamps, ink, paper and threw in a punch. Highland Heather and Pacific Point matched our logo perfectly and I added in Granny Apple Green.

Here is how I made the card.

  • Card base – cut Highland Heather cardstock at 4 1/4″ x 11″, score at 5 1/2″ and crease with a bone folder.
  • Cut piece of Whisper White cardstock at 4″ x 5 1/4″. Stamp the floral images from the Forever Fern stamp set with Highland Heather, Pacific Point and Granny Apple Green ink. Since I had to make multiple cards, I used the Stamparatus, which was a great time saver! Stamp the splatter image around the leaves with Pacific Point ink, stamping off once before stamping onto the cardstock.
  • On a scrap piece of Whisper White cardstock, stamp the thank you greeting from the Borders Abound stamp set. Punch out with the Tailored Tag punch. Overstamp the small leaf image twice with Highland Heather ink, first stamping off each time. I added a small pearl at the bottom of the tag.
  • Adhere the stamped floral piece to the card base with Stampin’ Dimensionals and then adhere the tag to the center of the floral spray with Mini Stampin’ Dimensionals.

We wanted to put a special message into the card so I ended up creating the inside of the card by using my computer printer. I selected a font that came close to matching the font on the tag and then used the RGB numbers for Pacific Point to print the messages, which I did four to a page and then cut apart with the Stampin’ Trimmer.

I’d be so appreciative if you would vote for my card by clicking on the vote image below. To give a vote, once you are in the gallery, click on the heart at the top right hand side of the picture as the hearts appear.

Thanks for stopping by today!

 Product List  
Stamparatus
[146276]
$49.00
November 5-7

Forever Fern Note Cards

Hello! Today I’m sharing with you my June customer thank you cards that feature products from the Forever Greenery Suite. I’ve written before that I often neglect to use Stampin’ Up’s note cards, especially when I only need to write a few lines so this time I remembered! The note cards come with envelopes, 20 of each, and at $7.00 for the package, this is a great deal!

Here is how I made the cards:

  • I used the Whisper White note cards. Fold note cards on score line.
  • Cut piece of Forever Greenery Designer Series Paper at 2″ x 3 1/2″.
  • Cut strip of Just Jade cardstock at 1″ x 3 1/2″.
  • Stamp large leaf image from the Forever Fern stamp set with Shaded Spruce ink. Stamp greeting from the Borders Abound stamp set with Just Jade ink. I used the Stamparatus, which is a great tool for making multiples of the same card.
  • Stamp the speckle image from the Forever Fern stamp set with Soft Sea Foam ink around the leaf image.
  • Adhere cut Just Jade strip to card front, close to left edge of the leaf image. Adhere DSP over the Just Jade strip so that 1/4″ of the Just Jade shows as a thin strip.
  • I left the inside blank so I would have enough room to write my note but you can certainly add a thin strip of DSP or stamp a small image if you choose to decorate it.
  • Stamp one of the smaller leaf images with Shaded Spruce ink in the bottom left corner of the envelope

This was a quick and easy project!

Bonus Days are back once again! From July 1 through August 3rd, for every $50 you spend (before shipping & tax) you will receive a $5 Bonus Day coupon code that can be used from August 4th – 31st.

  • You must have an email address in order to participate because the codes can only be delivered electronically.
  • If you earn multiple coupons in a single order, all of the codes will be sent in one email. If you earn multiple coupons for multiple orders they will be sent in separate emails for each code earned.
  • There is no limit on the number of coupon codes you can earn during this promotion.

Thanks for stopping by today!

 Product List  
Stamparatus
[146276]
$49.00

Forever Fern-Kylie’s International Blog Highlights

Hello! Today I’m participating once again in Kylie Bertucci’s International Blog Highlights. Readers get to vote on their top five favorites in the gallery and the top 10 winners will get to participate in an International Blog Hop later this month. The thank you theme is a way for us to show our appreciation to someone that has inspired, helped or supported us in some way. I chose to use the Forever Greenery product suite in the new catalog. This was one of my “had to haves” when I placed my pre-order last month.

Here is how I made the card.

  • Card base – cut a piece of Just Jade cardstock at 4 1/4″ x 11″, score at 5 1/2″ and fold in half.
  • Cut piece of Pretty Peacock cardstock at 4 1/8″ x 5 3/8″.
  • Cut two pieces of paper from the Forever Greenery Designer Series Papers at 2″ x 5 1/4″ and adhere to Pretty Peacock piece.
  • Cut piece of vellum at 2″ x 5 1/4″ and emboss with the repeating pattern Greenery embossing folder in the 2 folder pack. Adhere off center to DSP piece.
  • Stamp greeting from the Forever Fern stamp set with Pretty Peacock ink on scrap piece of Whisper White cardstock. Cut with the large circle from the Tasteful Frames die set.
  • Stamp two of the large leaves, one in Garden Green and one in Pear Pizzazz ink. Stamp round leaf image in Pretty Peacock ink. Stamp two of the small leaves in Soft Sea Foam ink. Note that there are two small leaf stamps. They are directional so stamp and cut one of each. Cut with coordinating dies from the Forever Flourishing die set. Arrange leaves and adhere with liquid glue.
  • Cut piece of the vanilla ribbon from the Forever Greenery Trim combo pack and tie in knot around the art piece. Adhere the greeting with Stampin’ Dimensionals. Add a Just Jade enamel dot to greeting.
  • Cut piece of Whisper White cardstock at 4″ x 5 1/4″. Stamp two of the small leaves with Soft Sea Foam ink . Adhere to inside of card.

I’d be very appreciative if you would vote for my card by clicking on the vote image below. To give a vote, once you are in the gallery, click on the heart at the top right hand side of the picture as the hearts appear.

Thanks for stopping by today!

Want to earn additional Stampin’ Rewards? From now through June 30th, when you place an order of $250 or more you will receive an additional $25 in Stampin’ Rewards. This is in addition to the standard host rewards.

Now is a great time to join Stampin’ Up! as a demonstrator or a “happy discount shopper!” You get to pick $125 worth of products and only pay $99, plus you get free shipping. In addition, now through June 30th you get to pick any bundle for free! Choose a stamp set with either a coordinating punch or set of dies. I would love to have you as part of my team. Click here to learn how.

 Product List  
Paper Snips
[103579]
$10.00