Today I’m sharing another card I made with products from the Ornate Garden suite. I cased a card by Anne Marie Hile that was part of an Ornate Garden Suite Mega Tutorial.
Here is how I made the card.
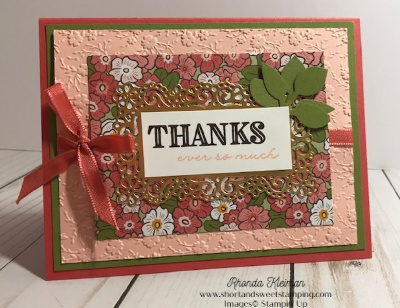
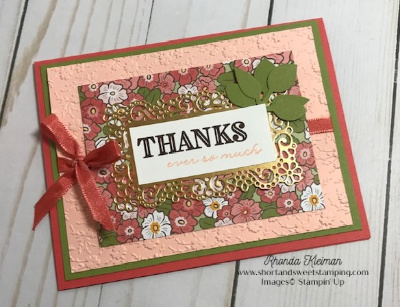
- Card base – cut piece of Terracotta Tile cardstock at 5 1/2″ x 8 1/2″, score and fold in half.
- Cut piece of Old Olive cardstock at 4″ x 5 1/4″ and adhere to card base.
- Cut piece of Petal Pink cardstock at 3 3/4″ x 5″ and run through embossing machine with the Ornate Floral 3D Embossing Folder. Cut piece of Terracotta Tile ribbon from the Ornate Garden Ribbon Combo Pack and tie in bow around this piece. Adhere to Old Olive mat.
- Cut piece of paper from the Ornate Garden Specialty Designer Series Papers at 3″ x 4″.
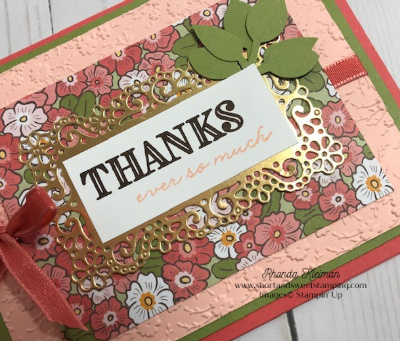
- Cut scrap piece of Whisper White cardstock at 1 1/8″ x 2 1/2″. Stamp thanks greeting from the Ornate Thanks stamp set with Early Espresso ink. Stamp “ever so much” or other greeting of your choice from this set with Petal Pink ink.
- Cut piece of Gold Foil paper at 2 1/2″ x 3 1/2″ and cut with the third smallest of the wider labels from the Ornate Layers die set. I punched two sets of Old Olive leaves with the Leaf Punch, which is now retired, so you can substitute it with any of the leaves that are included in die sets in your collection.
- Adhere leaves in upper right corner of the foil piece. Adhere greeting piece to foil piece. Adhere the decorated foil piece to the DSP.

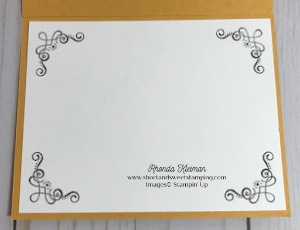
- Cut piece of Whisper White cardstock at 4″ x 5 1/4″. Stamp filigree image with Early Espresso ink in each of the four corners and adhere piece to inside of card.
Thanks for stopping by today!


Place an individual or group order of $250 or more now through June 30th and receive an additional $25 in Stampin’ Rewards! This is on top of the standard host rewards that you get with an order of $150 or more.

Now is a great time to join Stampin’ Up! as either a demonstrator or a “happy discount shopper!” You get to pick $125 worth of products for only $99, plus you get free shipping. Now through June 30th you will also get to pick any bundle of your choice for free! Choose either a stamp set with coordinating punch or set of dies. There are some fabulous bundles to choose from in the new catalog. I would love to have you be part of my team. Click here to learn how.
Product List
") | |
 | |
 | |
 | |
 |  |
 |
")