Hello! Welcome to Kylie Bertucci’s Demonstrator Training Blog Hop for April. I’m part of a group of Stampin’ Up! demonstrators from around the world that participate in Kylie’s program for building our businesses. The theme for this year is thank you cards that we make as a way to show appreciation to our customers. Please be sure to click on the names in the list at the end of this post to hop around and view the beautiful projects posted by these talented stampers.
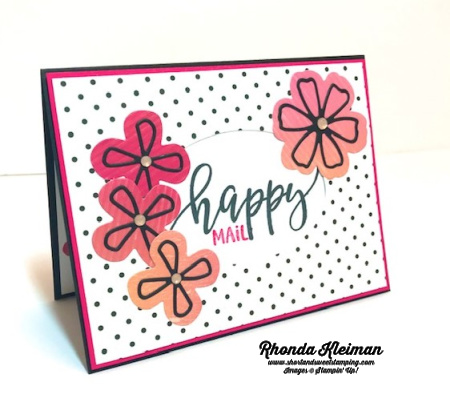
Today’s card features the Pretty Perennials bundle from the mini catalog, along with two favorite products that will be retiring on May 3rd. This is the last chance for you to purchase the fabulous Artistry Blooms Designer Series Paper and the Layering Ovals Dies. I was shocked to see that the dies were retiring – these are a staple for me!! Grab them now while you can – I just checked the inventory status and it is getting low.

Here is how I made the card.
- Card base – cut a piece of Basic Black cardstock at 5 1/2″ x 8 1/2″, fold in half and crease with a bone folder.
- Layering mat – cut a piece of Melon Mambo cardstock at 4 1/8″ x 5 3/8″.
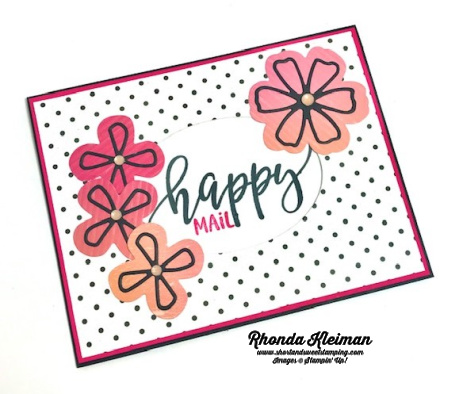
- Cut piece of polka dot paper from the True Love Designer Series Paper at 4″ x 5 1/4″. Using the third largest oval from the Layering Ovals dies, center it on the DSP and cut.
- Cut a piece of Basic White cardstock at 3 1/2″ x 4 1/2″. Stamp the “happy” greeting from the Pretty Perennials stamp set in center with Memento Tuxedo Black Ink. Stamp “mail” with Melon Mambo ink directly under the “happy.” Adhere to the polka dot DSP piece.
- Using the Perennial Petals Dies, cut one large and three next-to-largest flowers from the Artistry Blooms Designer Series Paper. I used two different papers that featured the pinks and oranges, and cut them out from different sections of the paper to get a variety of colors from the one sheet of paper.
- Die cut the Basic Black petal overlays from scrap pieces that have been backed with pieces of an adhesive sheet. Adhere them to the flowers. Adhere the flowers to the polka dot DSP piece, arranging them around the outside of the oval.
- Adhere piece to the Melon Mambo cardstock mat. Adhere this piece to the Basic Black cardbase with Stampin’ Dimensionals.
- Adhere Elegant Faceted Gems to the flower centers. I used the Petal Pink gems.
- Card inside – cut piece of Basic White cardstock at 4″ x 5 1/4″. I die cut two small flowers from the Artistry Blooms paper and adhered them in the lower left corner. Adhere to inside of card.

Thanks for stopping by today!


Click here to see the list of retiring products, some at prices discounted up to 60%. Products are only available while supplies last.


