
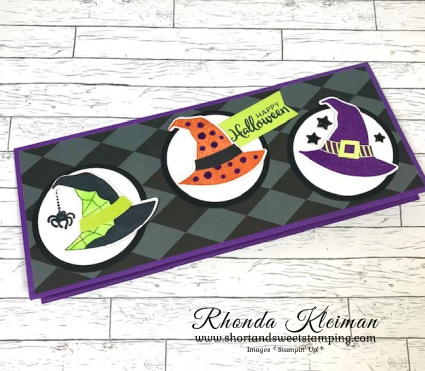
Hello and Happy Halloween! Today’s card features the Bewitching stamp set and coordinating Witches Hat Builder Punch. This is another one of the cards we made in my recent Halloween Card class and everyone loved making it! Sadly, the punch proved to be so popular that it is no longer available.
Here is how I made the card.
- Card base: Cut a piece of Gorgeous Grape cardstock at 7″ x 8 1/2″, score at 3 1/2″, fold and crease with a bone folder.
- Cut a piece of the Black & White Designs Designer Series Paper with the diamonds at 3 1/4″ x 8 1/4″ and adhere to card front.
- Cut three pieces of Basic Black cardstock at 3″ square and run them through a die cutting machine with the 3rd largest circle in the larger set of Layering Circles Dies. Adhere to card front as pictured.
- Cut three pieces of Basic White cardstock at 2 1/2″ and run through a die cutting machine with the 3rd largest circle in the smaller set of Layering Circles Dies. Stamp the spiderweb from the Bewitching stamp set on one of the circles. Adhere the circles to the Basic Black circles.
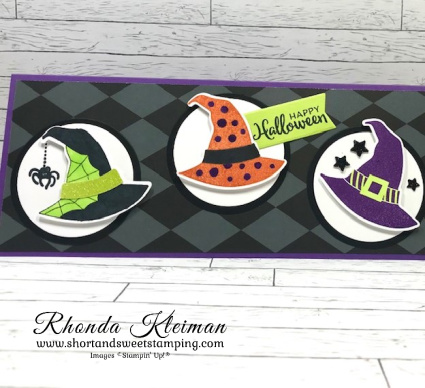
- On a scrap piece of Basic White cardstock stamp the spiderweb hat with Memento Black ink, color the spiderweb with Parakeet Party Stampin’ Blends and Basic Black Stampin’ Blends for the rest of the hat. Punch out the hat with the Witches Hat Builder Punch. Cut a scrap piece of Parakeet Party Glimmer Paper from the 2022-2024 In Color paper and punch out the hatband from the punch. Adhere to hat. Adhere hat to circle with Stampin’ Dimensionals.
- On a scrap piece of Basic White cardstock, stamp the hat with the polka dots with Pumpkin Pie ink. Color in the dots with a Gorgeous Grape Stampin’ Write marker. Color hatband with Basic Black Stampin’ Blends. Punch out hat and adhere to Basic White circle with Stamin’ Dimensionals.
- On a scrap piece of Basic White cardstock, stamp hat with buckle with Gorgeous Grape ink. Color buckle with Parakeet Party Stampin’ Blends. Punch out hat and adhere to Basic White Circle with Stampin’ Dimensionals. Punch out the stars from the hat punch with a scrap piece of Basic Black cardstock. I used a piece of retired Black Glimmer Paper for some extra bling. Adhere with either Mini Glue Dots or liquid glue.
- Stamp greeting with Memento Black ink on a scrap piece of Parakeet Party cardstock and run through die cutting machine with the label die from the Scary Silhouettes Dies. Adhere to circle with the Pumpkin Pie hat.

- Cut a piece of Basic White cardstock at 3 1/4″ x 8 1/4″. Stamp spider and spiderweb with Memento Black ink. Stamp greeting with Gorgeous Grape ink. I used greetings for the front and inside of the card that are from retired Halloween stamp sets. The spiderweb is also from a retired set. I like to hold onto some of my favorite retired holiday stamp sets because they have some favorite images that I like to bring out from year to year to use on my personal cards.

Wishing you a frightfully, delightful Halloween!
Thanks for stopping by today!


Today is the last day to take advantage of this great offer – when you purchase the Starter Kit you get to pick $155 worth of product for only $99 plus free shipping! You also get a free past Paper Pumpkin kit. Join as a happy discount shopper or as a business – the choice is yours! You might want to consider adding the beautiful new Fitting Florets Collection to the kit! A few other benefits of joining are: enjoy a 20%-25% discount on all orders as an active demonstrator, get to see new catalogs early and place pre-orders, attend in-person and virtual Stampin’ Up! events. I’d love to have you on my team! Click here for further information and to join.

Place an online order between $50 and $149 and use this host code for October. You will receive a free gift from me the following month. If your order is $150 or more DO NOT use the host code. You will qualify for Stampin’ Rewards.
Product List ") |  | |
 | ||
 | ||
 | ||
 |  |  |
 |  |  |
 |
")


 Designer Series Paper")
 Glimmer Paper")


")
")
")


 Designer Series Paper")


 Sheer Ribbon")


