Fond of Autumn Bouquet

Hello!

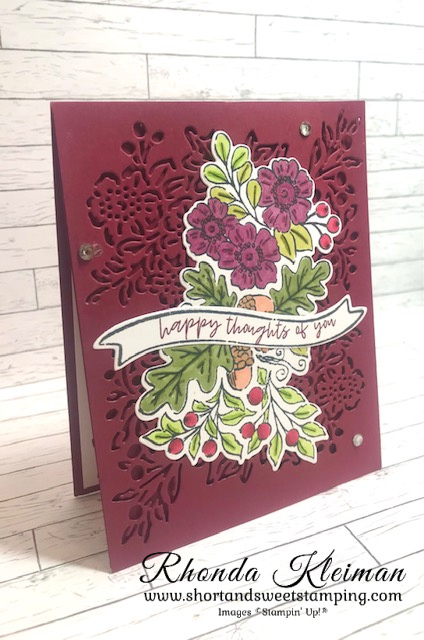
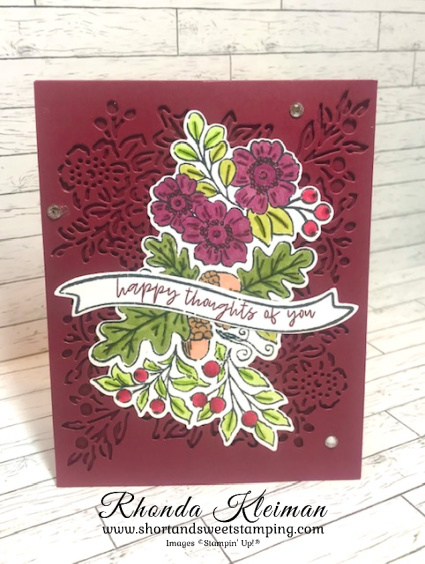
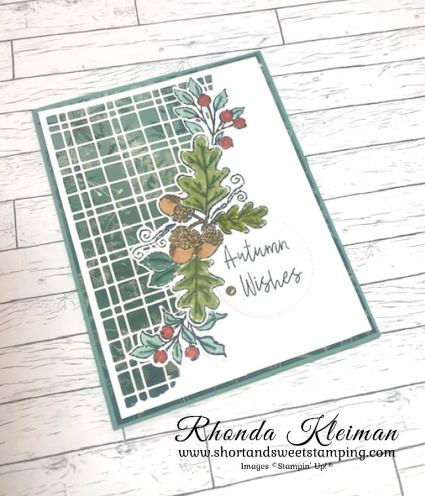
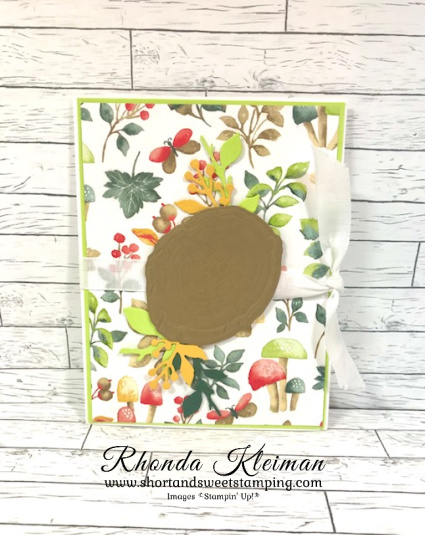
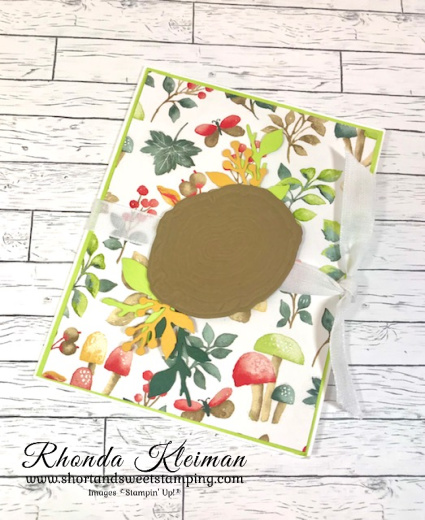
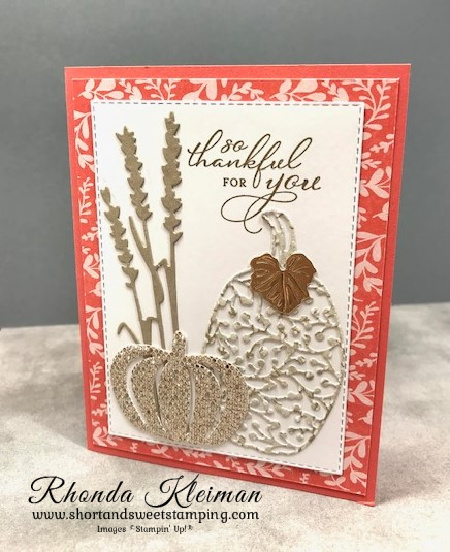
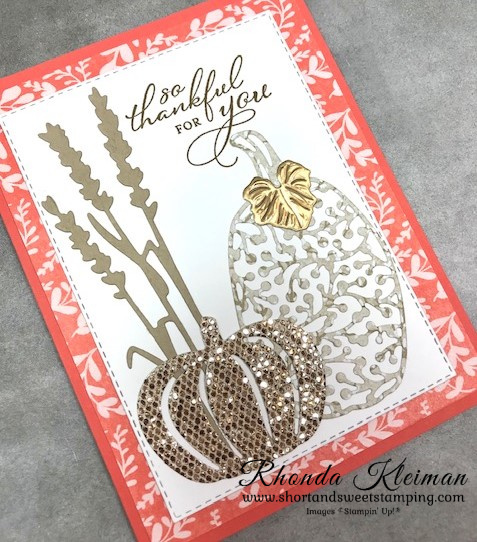
Today I’m featuring another one of the cards we recently made in my Fall Card class last month. This card uses the Fond of Autumn Stamp set and the Autumn Bouquet Dies. I decided to use Merry Merlot for the card base and detailed die cut layer. It is a color I love but don’t get to use often. I think it is a deep, rich color that goes well with many fall colors.

Here is how I made the card.

  • Card base: Cut a piece of Merry Merlot cardstock at 4 1/4″ x 11, score at 5 1/2″, fold and crease with a bone folder.
  • Cut another piece of Merry Merlot cardstock at 4 1/4″ x 5 1/2″. Run through die cutting and embossing machine with the detailed floral die. You will do this twice. First position the die at the top of the piece of cardstock. Once that is done, position the die at the bottom of the cardstock, and reverse the direction of the die. Adhere to card base with Stampin’ Dimensionals.
  • Stamp full floral image with Memento Black ink on piece of Basic White cardstock cut at 3 1/2″ x 5 1/2″. Color the image with these Stampin’ Blends using both dark and light: Mossy Meadow, Old Olive, Granny Apple Green for the leaves; Blackberry Bliss for the large flowers; Cherry Cobbler for the berries; Natural Tones Medium & Medium Light for the acorns. Run through die cutting and embossing machine with the large open floral die.
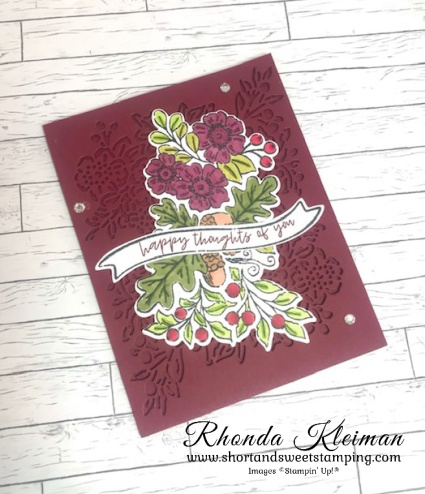
  • Stamp banner image with Memento Black ink on piece of Basic White cardstock cut at 1″ x 4 1/2″. Stamp the “happy thoughts of you” greeting inside the banner. In order to get the greeting to fit in the curves, because the stamp is photopolymer, you can slightly bend it on your acrylic block. Position greeting to make sure it fits and then ink up the stamp with Merry Merlot ink and stamp the greeting. Run through die cutting and embossing machine.
  • Adhere the floral piece to the card. Adhere the banner over the floral piece.
  • Embellish card with a few Rhinestone Basic Jewels.

Thanks for stopping by today!

Now is also a great time to join Stampin’ Up! Between October 4-31 you will get even MORE FREE products in the starter kit. Get $155 worth of products for only $99. You can select products from the annual catalog or current mini catalog for your personalized kit. The kit ships for free. The starter kit also includes a FREE past Paper Pumpkin kit. Become a happy shopper and enjoy a discount of 20%-25% as a hobby stamper – you do NOT have to do this as a business! Click here for additional information about the benefits of joining Stampin’ Up! I’d love to have you on my team!

Place an online order between $50 and $149 and use this host code for October. You will receive a free gift from me the following month.  If your order is $150 or more DO NOT use the host code. You will qualify for Stampin’ Rewards.

Product List

Fond of Autumn Split Card

Hello!

Today’s card features the beautiful Fond of Autumn Bundle in the July-December 2022 Mini Catalog and is another one of the cards we made in my recent Fall Cards class. I love to color and I also love the rich fall colors so the Fond of Autumn stamp set was a winner for me! The stamp set and coordinating Autumn Bouquet Dies were cleverly designed so that you can use the entire large image or just a portion of the image, making for lots of possibilities! I also paired the card with the Split Card Textures Dies, which is a nice way to feature the stamp set.

Here is how I made the card.

  • Card base – cut a piece of Soft Succulent cardstock at 5 1/2″ x 8 1/2″, score at 4 1/4″, fold and crease with a bone folder.
  • Cut a piece of one of the green DSP sheets from the Pretty Prints Designer Series Paper pack at 4 1/8″ x 5 3/8″ and adhere to card base. Cut a piece of Basic White cardstock at 4″ x 5 1/4″ and run through die cutting machine with the grid die from the Split Card Texture Dies. Adhere to card front
  • Stamp large floral image from the Fond of Autumn stamp set with Memento Black Ink on piece of Basic White cardstock cut at 3 1/2″ x 4 1/2″. Cut out with the large sectioned Autumn Bouquet die.
  • Color the leaf and acorn image with Mossy Meadow, Evening Evergreen and Old Olive Stampin’ Blends. Color the acorns with Crumb Cake and Soft Suede Stampin’ Blends. Color the two smaller leaf and berry pieces with Soft Succulent and Cajun Craze Stampin’ Blends.
  • Cut a piece of Basic White cardstock at 2 1/4″ square. Run through die cutting machine with the third smallest circle from the Stylish Shapes Dies. To stamp the greeting, use Evening Evergreen ink and cover the word “wishes” with a Post-it-Note, ink the word “Autumn”, remove Post-it-Note and stamp onto circle. Repeat the process again, this time covering up the word “Autumn” to stamp the word “wishes.”
  • Position the three leaf pieces along the diagonal line on the Texture Card piece. Before adhering, decide where to place the greeting and adhere it first and then adhere the leaf pieces. Embellish the greeting with a Brushed Metallic Dot.
  • Cut a piece of Basic White cardstock at 4″ x 5 1/4″. Stamp two acorns in bottom left corner and one acorn in upper right corner and color with the Stampin’ Blends. Adhere piece to inside of card.

Thanks for stopping by today!

There are just a few days left for you to purchase any of these six die sets that coordinate with existing stamp sets in the annual and holiday mini catalog. If you already own any of the stamp sets you can purchase the dies separately, or if you don’t currently own the stamp sets you can purchase both the stamp sets and dies as bundles and save 10%.

Product List

Rustic Harvest Card

Hello!

Today’s card features the Rustic Harvest Suite in the July-December 2022 Mini Catalog. It is a quick and easy card and a nice way to use several different Designer Series Papers. This is one of four cards we made in my Fall Card class last week. I will be posting the rest of the cards in my next few blog posts.

Here is how I made the card.

When I was deciding on a layout for this card, I decided to go back to a box of past sample cards that I keep for inspiration and ended up casing this card. I made it in the fall of 2019 and I used the Come to Gather Designer Series Paper that was in the September 2019-January 2020 Mini Catalog.

Here is how I made the card:

  • Card base – cut a piece of Basic Black cardstock at 5 1/2″ x 8 1/2″, score a 4 1/4″, fold and crease with a bone folder.
  • Cut a piece of the Mossy Meadow paper from the Rustic Harvest Designer Series Paper pack at 4″ x 5 1/4″ and adhere to card front.
  • Cut one piece of Basic Black cardstock at 1 7/8″ x 5″ and another at 1 7/8″ x 4 1/2″. Cut two different pieces of DSP, one at 1 3/4″ x 4 7/8″ and one at 1 3/4″ X 4 3/8″ and adhere to the Basic Black strips. Adhere to card front as pictured.
  • Stamp greeting from the Hello Harvest stamp set with Mossy Meadow ink on a scrap piece of Basic White cardstock. Run through die cutting machine with coordinating die from the Rustic Pumpkin Dies.
  • Cut a piece of Cajun Craze cardstock at 2 3/4″ X 3 1/2″ to make the pumpkin. Run through die cutting machine with the two pumpkin die pieces. To make the stem, run a scrap piece of Soft Suede cardstock through the die cutting machine with the stem die.
  • Adhere stem to the smaller DSP strip. Adhere larger pumpkin piece, slightly overlapping the bottom of the stem. Adhere narrow pumpkin piece over the larger pumpkin piece. Adhere greeting over pumpkin with Stampin’ Dimensionals.
  • Cut a piece of Basic White cardstock at 4″ x 5 1/4″ and adhere to inside of card.

Thanks for stopping by today!

Stampin’ Up! has introduced six new sets of dies that coordinate with existing stamp sets in the annual and holiday mini catalog.  They will only be available for the month of September and while supplies last.  If you already own any of the stamp sets you can purchase the dies separately, or if you don’t currently own the stamp sets you can purchase both the stamp sets and dies as bundles and save 10%.

Place an online order between $50 and $149 and use this host code for September. You will receive a free gift from me the following month.  If your order is $150 or more DO NOT use the host code. You will qualify for Stampin’ Rewards.

Product List

Ringed With Nature Fun Fold Card

Hello!

This is the last day for Sale-A-Bration! Today’s card is another one that features the Ringed With Love Designer Series Paper that is still available as a free gift with a $50 purchase. This card is a Z fun fold that I came across on Lisa Curcio’s blog and YouTube channel where she shows how to make it. I love this fold because it is a great way to show off any Designer Series Paper and while it looks difficult to make, it is actually very easy! This card also uses the Ringed With Nature Bundle that coordinates with the DSP.

Click on the blog link above to go to Lisa Curcio’s post for all of the cutting dimensions and instructions on how to put the card together. Here is how I made my card.

  • Card base – Thick Basic White cardstock 5 1/2″ x 8 1/2″, score at 4 1/4″, fold and crease sharply with a bone folder.
  • Cut piece of Parakeet Party cardstock at 4 1/8″ x 5 3/8″. Cut piece of Ringed With Love DSP at 4″ x 5 1/4″ and adhere to cardstock. Adhere piece to card front.
  • Die cut and emboss one of the larger tree rings from the Tree Rings Hybrid Embossing Folder with a piece of Soft Suede cardstock. Die cut several different leaves with scrap pieces of Crushed Curry, Evening Evergreen and Parakeet Party cardstock. Adhere to tree ring with Mini Glue Dots.
  • Adhere two pieces of a contrasting piece of DSP cut at 4″ x 5 1/4″ to both sides of the inside of the card base.
  • Cut a piece of Thick Basic White cardstock for the inside Z fold as per Lisa Curcio’s instructions.
  • Cut strip of the tree trunk DSP and follow the instructions for cutting the strips before adding them to the fold.
  • Stamp the acorns from the Ringed With Nature stamp set. First stamp the bottom of the acorns with Poppy Parade ink and then stamp the acorn tops with Soft Suede ink. Stamp the greeting on the smallest panel with Soft Suede ink. Adhere to inside of card as instructed.
  • To finish off the card, adhere the tree ring to the card front with two Stampin’ Dimensionals at the top and two at the bottom, leaving space in the middle of the tree ring. Cut a length of ribbon at 18″ and slide one end through the middle of the tree ring. I used some retired 1/2″ white ribbon from my stash. You can use one or two Mini Glue Dots to adhere the ribbon at the back of the card in order to keep it in place. Tie ribbon into either a bow or a double knot, which is how I tied it.

Thanks for stopping by today!

Select free items with every $50 or $100 purchase. There is no limit on the number of times you can earn free items. Please note that all SAB prroducts are only available while supplies last. The Pool Party and Soft Sea Foam Cards & Envelopes (Item #159940), Tree Lot Dies (Item #159938) and Hippo Dies (Item #159928) are no longer available.

The Brushed Metallic Cardstock (Item #163103) and Silver Foil Specialty Pack (Item #163096) are no longer available as free Sale-A-Bration items, however, they are still available for purchase in the annual catalog. Brushed Metallic Cardstock, Item #153524, $15.00 and Silver Foil Specialty Pack, Item #156457, $10.00.

This new Cozy & Bright Card Kit is now available for purchase. The kit has everything you need to make twelve 5 1/2″ x 4 1/4″ cards. It includes a photopolymer stamp set, acrylic block, adhesives, preprinted card bases, die cuts and stickers, Poppy Parade Stampin’ Spot, gold foil accents, preprinted envelopes, linen thread, as well as step-by-step instructions. Product colors: Cajun Craze, Early Espresso, Evening Evergreen, Garden Green, Poppy Parade, Pumpkin Pie. The cost of the kit is $23.00 and the item number is 160338. Click here to place your order in my online store. This kit is available only while supplies last.

Place an online order between $50 and $149 and use this host code for August. You will receive a free gift from me the following month.  If your order is $150 or more DO NOT use the host code. You will qualify for Stampin’ Rewards.

Product List
Paper Snips
[103579]
$11.00

Pretty Pumpkins-Kylie’s International Blog Highlights

Hello! Today I’m participating in Kylie Bertucci’s International Blog Highlights. Readers get to vote on their top five favorites in the gallery and the top 10 winners will get to participate in an International Blog Hop later this month. The theme is “thank you”. This is the thank you card I sent out to my customers in October and it uses products from the Pretty Pumpkin Bundle and the Harvest Meadow Suite.

Here is how I made the card.

  • Card base – Cut a piece of Calypso Coral cardstock at 5 1/2″ x 8 1/2″, score at 4 1/4″, fold and crease with a bone folder.
  • Cut a piece of Calpyso Coral paper from the Harvest Meadow Designer Series Paper at 4″ x 5 1/4″ and adhere to card front.
  • Cut a piece of Basic White cardstock at 3 3/4″ x 5 1/4″ and run through the Stampin’ Cut & Emboss Machine with the largest Stitched Rectangle Die.
  • Stamp greeting from the Pretty Pumpkins stamp set with Crumb Cake ink.
  • Cut piece of Crumb Cake cardstock at 1 3/4″ x 5″. Cut out with the thin wildflower die from the Harvest Dies.
  • Cut piece of Be Dazzling Specialty Paper at 2″ x 2 1/2″. Cut a piece of an adhesive sheet to the same size and adhere. Cut out with the small pumpkin die from the Detailed Pumpkin Dies. Note: The Be Dazzling Specialty Paper was a Sale-A-Bration item and is no longer available. You can substitute any other metallic paper in its place.
  • Cut a piece of the Crumb Cake paper that looks like willows from the Harvest Meadow Designer Series Paper at 2 1/4″ x 4″. Cut a piece of an adhesive sheet to the same size and adhere . Cut out with the large filigree pumpkin die from the Detailed Pumpkin Dies.
  • Die cut a leaf from a scrap piece of a Gold Foil sheet.
  • Before adhering the Crumb Cake wildflower piece, trim the bottom of the stems to fit the Basic White cardstock piece. Adhere with Multipurpose Liquid Glue.
  • Peel backing off the adhesive sheet on the filigree pumpkin and adhere to Basic White cardstock piece. Adhere the gold leaf under the pumpkin stem with liquid glue.
  • Peel backing off the adhesive sheet on the small pumpkin and adhere, overlapping the bottom of the wildflower piece and filigree pumpkin.

I’d be so appreciative if you would vote for my card! Click on the vote image below. Once you are in the gallery, click on the heart at the top right hand side of the picture as the hearts appear.

Thanks for stopping by today!

Stampin’ Up! is offering the Start With Savings promotion, an excellent opportunity to join from November 4-30. You can choose to join either as a “happy discount shopper” or build a business. Instead of the standard $99 USD Starter Kit—which is already a steal of a deal— you can get a completely custom Starter Kit for only $75 USD. What an absolutely unbeatable bargain for a box with a value of $125 USD. In addition, SHIPPING IS FREE!  You can select any items from the Annual Catalog or the current Mini Catalog.  If you’ve been thinking about purchasing a new Stampin’ Cut & Emboss Machine or the Mini Stampin’ Cut & Emboss Machine you can even add those to your kit! The benefits speak for themselves. You get personal discounts of 20%-25%, early access to new catalogs and products, exclusive access to events, and the opportunity to earn additional income and other rewards. You are under no obligation to commit to making this a business, you are not required to host workshops or parties, and you can drop at anytime without penalties!  Stampin’ Up! has never had such an amazing deal!  For further information and to join, click here.  I’d love to have you as a team member!

Place an online order between $50 and $149 and use this host code for November. You will receive a free gift from me the following month.  If your order is $150 or more DO NOT use the host code. You will qualify for Stampin’ Rewards.

Product List
Harvest Dies
[156504]
$38.00

Pretty Pumpkins Fun Fold Card

Hello! Today’s project is a fun fold card using the Pretty Pumpkins bundle. The stamp set has great images and sentiments and the coordinating dies are beautiful. It isn’t often that we get Designer Series Papers to match the browns in the Stampin’ Up! color range, so while the colors in the Blackberry Beauty Specialty DSP are predominantly purples, I was excited to see that a few sides of the papers have some wonderful designs in Early Espresso and Cinnamon Cider.

Here is how I made the card.

  • Main card base – Cut a piece of Early Espresso cardstock at 4 1/4″ x 8 1/2″, score at 3″, fold and crease with bone folder. 
  • Smaller card base – Cut a piece of Cinnamon Cider cardstock at 3″ x 8″, score at 4″, fold and crease with bone folder.
  • Cut one piece of the Blackberry Beauty DSP at 4″ x 5 1/4″ and one at 2 3/4″ x 4″. Adhere the smaller piece of DSP to front fold and the larger piece to the inside.
  • Cut a piece of Pumpkin Pie cardstock at 2 1/4″ x 2 1/2″. Cut an adhesive sheet to the size of the cardstock.  Run through die cutting machine using the pumpkin die from the Detailed Pumpkins dies.
  • Cut piece of Very Vanilla cardstock at 2 1/2″ x 3″. Stamp large pumpkin line image with Tuxedo Black Memento ink. Color with a variety of Stampin’ Blends.  I used Stampin’ Blends and colored the stems with light Cinnamon Cider and light and dark Old Olive for the leaves.  For the smallest pumpkin I used dark Pale Papaya and light Pumpkin Pie, for the medium pumpkin I used dark Pumpkin Pie and light Cajun Craze, and for the largest pumpkin I used light and Dark Cajun Craze.  You can also color the image with Stampin’ Write Markers, colored pencils, or use ink pads with blender pens. Run through die cutting machine with coordinating die from the Detailed Pumpkins dies.
  • Cut two pieces of Very Vanilla cardstock at 2 7/8″ x 3 7/8″. Stamp greeting from Pretty Pumpkins stamp set with Early Espresso ink in upper right corner of one the pieces.  Adhere die cut Pumpkin Pie pumpkin and then adhere the colored pumpkin piece, overlapping the die cut pumpkin.  You can adhere with or without Stampin’ Dimensionals.  Adhere to front flap of the smaller Cinnamon Cider card base.
  • Stamp the small pumpkin vine and leaf image with Memento ink on the other piece of the 2 7/8” x 3 7/8” Very Vanilla cardstock and color the leaves with the Old Olive and Cinnamon Cider Stampin’ Blends.  Adhere to inside of the smaller card base.
  • Adhere smaller card to larger card, making sure that the card opening faces to the left.  Adhere a Brushed Metallic Adhesive-Backed Dot to the card front.

Thanks for stopping by today!

The Gifts Galore Paper Pumpkin Kit is available now through November 10. With classic Christmas sentiments, bright and festive colors, a sweet snowman, a tree with all the trimmings, or a playful pile of presents, you’ll have everything you need to make eye-catching treat packages that are sure to spread Christmas cheer. Each Gifts Galore box contains enough supplies to create nine treat packages—three each of three designs—and nine food-safe bags that are adorably styled for easy Christmas gifting. Coordinating colors: Evening Evergreen, Flirty Flamingo, Old Olive, Pool Party, Poppy Parade. There’s plenty of joy to share with Gifts Galore! Visit my Paper Pumpkin website to subscribe to this kit.

Place an online order between $50 and $149 and use this host code for October. You will receive a free gift from me the following month.  If your order is $150 or more DO NOT use the host code. You will qualify for Stampin’ Rewards.

Product List
Paper Snips
[103579]
$10.00

World Cardmaking Day-Blackberry Beauty Card

Hello! Today is World Cardmaking Day! This event was started by the now defunct Card Maker magazine as a way to promote cardmaking and stamping and as a way to jumpstart cardmaking for the holiday season. This event always occurs on the first Saturday of October. I wasn’t able to plan my own event this year, however, I am sharing a card we made in my quarterly club last week. Take some time today to make a card and send a card to spread sunshine and let someone know that you care about them and are thinking of them. To see what others are doing and see some projects that are being posted around the internet, enter hashtag #wcmd2021.

This card features products from the Blackberry Beauty and Harvest Beauty suites and is a quick and easy card to make. Here is how to make the card.

  • Card base – Cut piece of Blackberry Bliss cardstock at 5 1/2″ x 8 1/2″, score at 4 1/4″, fold and crease with a bone folder.
  • Cut piece of Crumb Cardstock at 4″ x 5 1/4″.
  • Cut three different pieces of Blackberry Beauty Designer Series Paper into 1 5/8″ x 4″ strips. Adhere to Crumb Cake piece.
  • Using the Harvest Dies, run the coneflower through the Stampin’ Cut & Emboss Machine with scrap piece of Rich Razzleberry cardstock. Run the stalks through the machine with the Be Dazzling Specialty Paper. This paper is now retired, as it was one of the free Sale-A-Bration items in the promotion that has now ended. Adhere both pieces to the DSP piece with liquid glue. Trim the ends of the stems down to the edge of the bottom of the piece.
  • Adhere piece to card base.
  • Cut a piece of Crumb Cake cardstock at 1″ x 4 1/2″. Stamp greeting from the Beauty of Tomorrow stamp set with Blackberry Bliss ink. Run through die cutting machine with the long label die from the Harvest Dies. Adhere to card front with Stampin’ Dimensionals.
  • Cut piece of Very Vanilla cardstock at 4″ x 5 1/4″. Stamp the bird with Blackberry Bliss ink in one of the corners of the piece and adhere to inside of card.

Thanks for stopping by today!

Place an online order between $50 and $149 and use this host code for October. You will receive a free gift from me the following month.  If your order is $150 or more DO NOT use the host code. You will qualify for Stampin’ Rewards.

Product List
Harvest Dies
[156504]
$38.00
Paper Snips
[103579]
$10.00