Arrange a Wreath Christmas Card

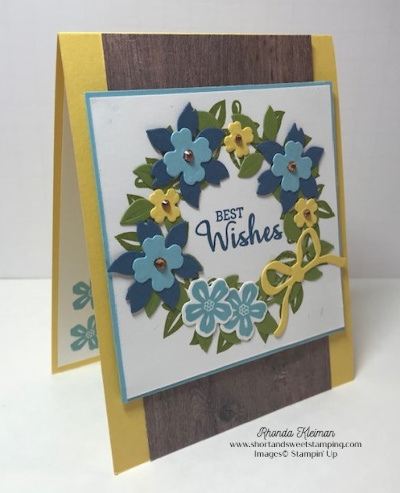
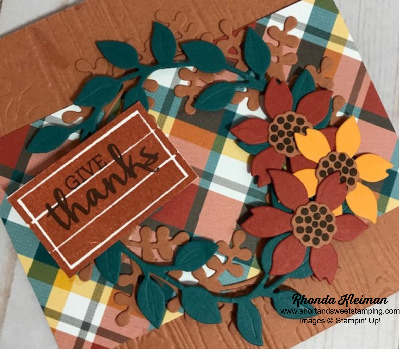
Hello! Today I’m sharing a fun fold Christmas card that features the Arrange a Wreath bundle. This is one of my favorite bundles in the annual catalog. It is so versatile because there are endless possibilities for you to make seasonal as well as all-occasion cards. This is one of the projects we made in my August class to go.

Here is how I made the card:

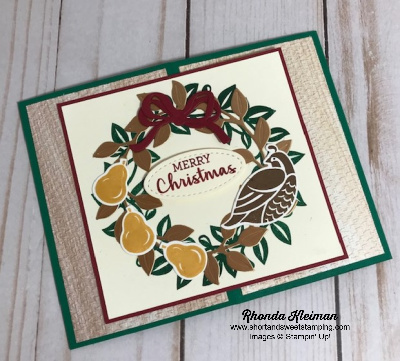
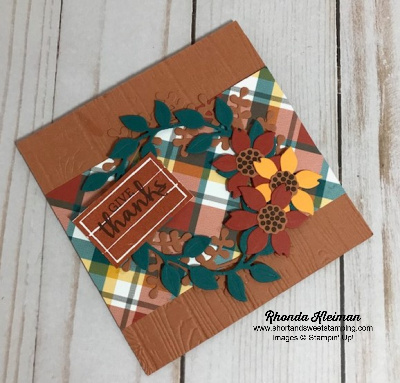
  • Card base – cut piece of Shaded Spruce cardstock at 4 1/4″ x 11″, score at 2 ¾” and 8 ¼”, fold and crease sharply with bone folder.  This is a fun fold so the sharper the crease the better the folds will lay flat.
  • Cut four pieces of one of the lighter wood image papers from the In Good Taste Designer Series Paper at 2 1/2″ x 4″. Run all four pieces of the DSP through the Tasteful Textile embossing folder.  Adhere to front and inside card flaps.
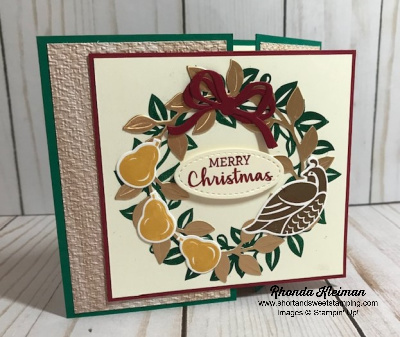
  • Stamp leaf wreath from the Arrange a Wreath stamp set with Shaded Spruce ink on 3 5/8” x 3 7/8” piece of Very Vanilla. 
  • Cut piece of gold metallic brushed foil at 3 3/4″ square and die cut with the leaf wreath from the Wreath Builder dies.  Adhere over the stamped wreath image.
  • Cut piece of Cherry Cobbler cardstock at 3 3/4″ x 4″. Adhere the wreath image to this piece.
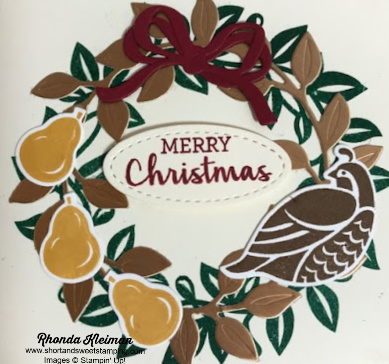
  • Stamp pheasant with Soft Suede ink and three pears with Crushed Curry ink on scrap piece of Very Vanilla cardstock.  You will notice that there are two pear images on both the one stamp and coordinating die.  It makes stamping and cutting the same pieces multiple times faster. Die cut images, arrange around wreath and adhere to card.  For added dimension you can use Stampin’ Dimensionals.
  • Die cut the full bow and bow loops from a scrap piece of Cherry Cobbler cardstock.  Adhere the centers together with small dot of liquid glue and adhere to top of wreath.
  • Stamp greeting with Cherry Cobbler ink on scrap piece of Very Vanilla cardstock.  Die cut with smallest oval in the Stitched Shapes dies set.  Adhere to wreath with Stampin’ Dimensionals.
  • Adhere the wreath piece to the left front flap.  Be sure to only apply adhesive to the left side of the piece, leaving the right side unattached so that the can card open.
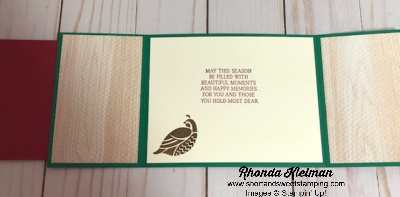
  • Stamp pheasant with Soft Suede ink in bottom left corner of the 4” x 5 ¼” piece of Very Vanilla cardstock. Stamp a greeting if you choose.  I used a greeting from the Toile Christmas stamp set and stamped it with Cherry Cobbler ink.

Thanks for stopping by today!

November 5-7, 2020
 Product List  

Arrange A Wreath-Autumn

Hello! What was supposed to be a one-week break turned out to be a two-week hiatus from blogging due to time sensitive commitments I had with my primary business. Now that they are completed, I’m back to blogging once again. I must admit that it was nice to take a little break!

Today’s card is one of five cards featuring the Arrange a Wreath bundle that were in my August class to go kits and this is one I created with an autumn theme. I just love Cinnamon Cider, one of this year’s new InColors. It is such a rich, warm color. I haven’t made a square card in quite some time so I decided to make one measuring 4 1/4″ square.

  • Card base – cut piece of Cinnamon Cider cardstock at 4 1/4″ x 8 1/2″, score at 4 1/4″, fold and crease with a bone folder.
  • Cut piece of Cinnamon Cider cardstock at 4 1/4″ x 4 1/4″ and run through embossing machine with the Pinewood Planks 3D embossing folder. Adhere to card front.
  • Cut piece of coordinating Plaid Tidings Designer Series Paper at 2 1/2″ x 4 1/4″ and adhere to card front.
  • Cut piece of Cinnamon Cider cardstock at 3 3/4″ x 3 3/4″. Use the sprig wreath die from the Wreath Builder die set and run through die cutting machine.
  • Cut piece of Shaded Spruce cardstock at 3 3/4″ x 3 3/4″. Use the leaf wreath die and run through the die cutting machine.
  • Adhere the sprig wreath to the card front. Adhere the leaf wreath over the sprig wreath, popping it up with Mini Stampin’ Dimensionals.
  • Die cut three of the large flowers, two from Cajun Craze cardstock and one from Mango Melody. Stamp the dot image three times on scrap piece of Cinnamon Cider cardstock and die cut. Adhere to centers of the three flowers.
  • Stamp wood crate image with Cinnamon Cider ink on scrap piece of Whisper White cardstock. Stamp greeting onto the crate with Early Espresso ink and fussy cut around the image.
  • Arrange flowers on right side of wreath, adhering with Mini Stampin’ Dimensionals. Adhere crate with Mini Stampin’ Dimensionals on other side of wreath.
  • Cut piece of Whisper White cardstock at 4″ x 4″, stamp with a greeting of your choice or leave blank, and adhere to inside of card.

Stampin’ Up! has a great offer to join this September! You pay $99 for the starter kit and get to pick out $125 in products (and you can opt to select the new Stampin’ Cut and Emboss Machine!). In addition, you will also receive these items for FREE: Queen Anne’s Lace stamp set, So Much Love stamp set, cardstock pieces to make 16 cards, 16 envelopes, and a pack of Basic Rhinestone Jewels. One pack of 8 cardstock is Coastal Cabana and the other pack is Granny Apple Green – such fun colors! Here are some sample cards created by Stampin’ Up! artists. I’d love to have you as part of my team. There is NO obligation to be a business builder – happy discount shoppers are welcome!  Please contact me if you’d like more information. Click here to join.

Thanks for stopping by today!

 Product List  
Paper Snips
[103579]
$10.00

Arrange a Wreath-Kylie’s Training Blog Hop

Hello! Welcome to Kylie Bertucci’s Demonstrator Training Blog Hop for July. I’m part of a group of Stampin’ Up! demonstrators from around the world that participate in Kylie’s program for building our businesses. Please be sure to click on the names in the list at the end of this post to hop around and view the beautiful cards posted by so many talented stampers.

Today I’m sharing a card I made with the new Arrange a Wreath bundle. I love that this set is very versatile and can be used for so many different occasions. Without any holidays coming up right now I decided to make something with a summer feel to it and picked blue and yellow for my color palette.

Here is how I made the card.

  • Card base – cut a piece of Daffodil Delight cardstock at 4 1/4″ x 11″, score at 5 1/2″ and fold in half.
  • Cut a piece of one of the woodgrain papers from the In Good Taste Designer Series Papers at 3 1/4″ x 5 1/2″ and adhere to card front.
  • Cut piece of Whisper White cardstock at 3 3/4″ square. Cut piece of Balmy Blue cardstock at 3 7/8″ for the layering piece.
  • Stamp wreath image from the Arrange a Wreath stamp set in Old Olive ink. Stamp greeting with Misty Moonlight ink in center of wreath. Because the wreath image is large I used the Stamparatus to get good ink coverage, and it also helped to line up the greeting.
  • Stamp two flowers with Balmy Blue ink and run through die cutting machine with coordinating dies.
  • Die cut the rest of the pieces for the wreath as follows:
    • Leaf circle – Old Olive cardstock
    • Large flowers – cut three from Misty Moonlight cardstock
    • Medium flowers – cut three from Balmy Blue cardstock
    • Small flowers – cut three from Daffodil Delight cardstock
    • Bow – cut one from Daffodil Delight cardstock
  • Adhere leaf circle on top of stamped wreath image and then arrange the flowers and bow around the wreath. I layered the blue flowers together.
  • Adhere image to Balmy Blue layer and adhere to card front with Stampin’ Dimensionals.
  • For some extra bling I added Champagne Rhinestones to the centers of the flowers, using the smallest size or the yellow flowers and the medium size for the blue flowers.
  • For the inside of the card, cut a piece of Whisper White cardstock at 4″ x 5 1/4″. Stamp a cluster of flowers with Balmy Blue ink at bottom left corner of piece and adhere.

Bonus Days are back once again! From July 1 through August 3rd, for every $50 you spend (before shipping & tax) you will receive a $5 Bonus Day coupon code that can be used from August 4th – 31st.

  • You must have an email address in order to participate because the codes can only be delivered electronically.
  • If you earn multiple coupons in a single order, all of the codes will be sent in one email. If you earn multiple coupons for multiple orders they will be sent in separate emails for each code earned.
  • There is no limit on the number of coupon codes you can earn during this promotion.

Thanks for stopping by today!


 Product List  
Stamparatus
[146276]
$49.00