
Hello! It’s been a while since I last posted. Sometimes I don’t know where the time goes! Today’s card is one of the projects from my May Class to Go featuring the Butterfly Brilliance bundle. It was scheduled before the pretty Butterfly Bijou Designer Series Paper sold out, so I still went ahead with the class since I had a full package of the DSP that I was able to include in several projects. However, I wanted to show possibilities for using the bundle without the coordinating paper and this is one of the cards I came up with, using the fun Rainbow Glimmer Paper.
Here is how I made the card.
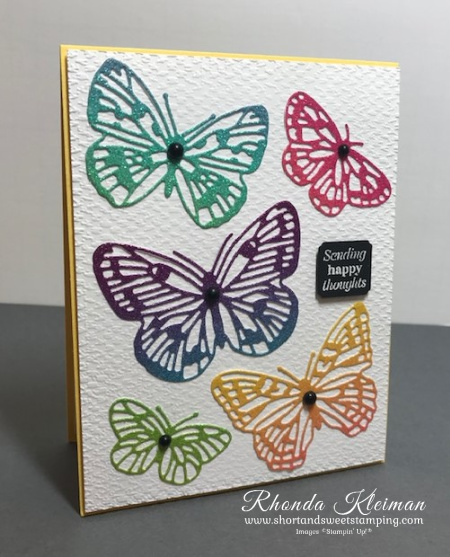
- Daffodil Delight Card base – cut at 4 ¼” x 11”, score at 5 ½”, fold and crease with bone folder.
- Cut piece of Basic White cardstock at 4 1/8″ x 5 3/8″. Run through the Stampin’ Cut & Emboss Machine with the Tasteful Textile 3D embossing folder. Adhere to card front
- Cut a 3″ x 12″ strip of the Rainbow Glimmer Paper. Cut the strip into five different color sections. Cut five pieces of Adhesive Sheet and apply to the backs of the glimmer paper. Run five different sizes of butterflies from the Brilliant Wings dies through the die cutting machine. To adhere butterflies, pull off the backings from the adhesive sheets and arrange on card front, leaving space for a small greeting. If you don’t have adhesive sheets you can apply small dots of liquid glue on the back of each butterfly.

- For the greeting, I used the Many Messages stamp. It is in the January-June Mini Catalog and has carried over to the 2021-2022 Annual Catalog, along with the coordinating die. I use the Stamparatus when I work with this stamp. Since all of the greetings are on the one stamp I just inked up the section with the greeting I wanted to use with Versamark, placed a scrap piece of Basic Black cardstock in the Stamparatus and stamped the greeting. After removing the cardstock sprinkle it with White Embossing Powder and set with the heat tool. To die cut greeting, position the Messages Die so that the correct part of the die matches up with the greeting. Adhere to card front with a Stampin’ Dimensional.
- Cut a piece of Basic White cardstock at 4″ x 5 1/4″ and adhere to inside of card. Add greeting of your choice.
- Embellish card front by adding large and small Matte Black Dots to the centers of the butterflies.

Thanks for stopping by today!


There is less than a week remaining to take advantage of this great deal to join Stampin’ Up! and become a Happy Shopper! You get to choose $155 worth of products for only $99, free shipping and a free Paper Pumpkin kit. These are some of the benefits of joining:
- This is a great way to save on your crafting hobby – you will receive a 20% discount on every order you place. There is no obligation for you to build a business or host workshops!
- Get early access to new catalogs and products.
- Opportunity to attend demonstrator-only events.
- The chance to earn a modest supplemental income, should you choose.
- Be a part of my team.
Click here for more information. Have questions? Please feel free to send me a message.

 |  | |
 |  |  |
 |  | |
 |  | ") |
 |  |  |
 |  |  |
 |


Place an online order between $50 and $149 and use this host code for May. You will receive a free gift from me the following month. If your order is $150 or more DO NOT use the host code. Click here for instructions on using the host code.


 Designer Series Paper")


