Forever Blossoms Wedding Card

Hello! My cousin’s daughter was married two weeks ago so I needed to make a wedding card. It’s been a few years since I’ve had to make a wedding card! All of the wedding stamp sets I have are retired so I turned to Pinterest for some inspiration and saw a number of ideas for cards that use the Forever Blossoms stamp set. I own this beautiful stamp set and haven’t used it recently so decided to give it a little love.
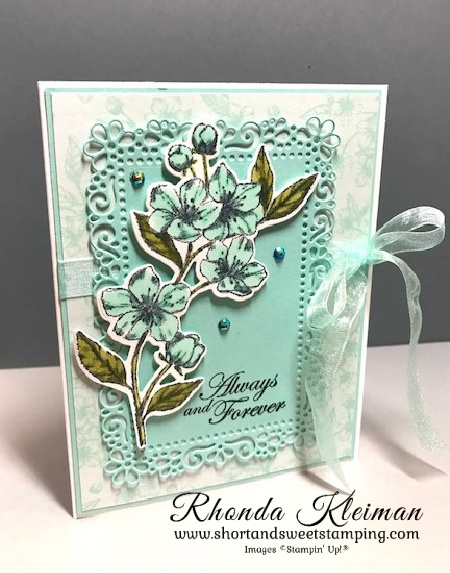
Here’s how I made the card.

  • Card base – Cut a piece of Thick Basic White cardstock at 5 1/2″ x 8 1/2″, score at 4 1/4″, fold and crease with a bone folder.
  • Cut a piece of Pool Party cardstock at 4 1/8″ x 5 3/8″ and a piece of coordinating Designer Series Paper at 4″ x 5 1/4″. I used the Parisian Blossoms Specialty Designer Series Paper, which is now retired. It was part of the Parisian Blossoms Suite in the January-June 2020 Mini Catalog. Adhere the two pieces together. Cut a 24″ length of Pool Party Sheer Ribbon and tie in a bow around the piece. Adhere piece to card front.
  • Run a 4″ x 5″ piece of Pool Party cardstock through your die cutting machine with the next-to-largest die in the Ornate Layers die set. Stamp the “Always and Forever” greeting from the Forever Blossoms stamp set with Tuxedo Black Memento ink in bottom right corner.
  • Stamp the large floral image from the stamp set with Memento ink on piece of Basic White cardstock. Color the flowers with the light and dark Pool Party Stampin’ Blends and color the leaves with the light and dark Old Olive Stampin’ Blends. Run through your die cutting machine with the coordinating die from the Cherry Blossoms Dies.
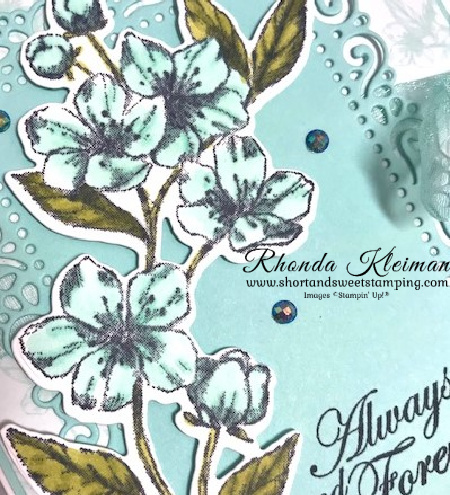
  • Adhere the Pool Party Ornate Layer piece to card front. Adhere the floral piece over the Ornate Layer piece with Stampin’ Dimensionals.
  • Add a bit of bling to accent the floral piece by adhering three Night of Navy Blue Adhesive-Backed Gems.
  • For the inside of the card I stamped another greeting from the Forever Blossoms stamp set with Memento ink. I also stamped a blossom in the lower left corner and colored it in with the Pool Party Stampin’ Blends.

Thanks for stopping by today!

Place an online order between $50 and $149 and use this host code for September. You will receive a free gift from me the following month.  If your order is $150 or more DO NOT use the host code. You will qualify for Stampin’ Rewards.

Join Stampin’ Up! now through September 30th. You get to select $125 worth of products for only $99 and will also get a FREE bundle from the Holiday Catalog! The kit ships for free. I’d love to have you join my team. Become a happy discount shopper or build a business – the choice is yours! Click here for the benefits of joining Stampin’ Up!

Here is a list of bundles you can select from.

Experience everything the autumn season has to offer with the Haunts & Harvest Paper Pumpkin Kit! This month’s kit includes enough supplies to create 12 treat boxes—4 each of 3 designs. That means you can take your pick of apple, pumpkins, or jack-o-lantern treat boxes! Plus, the Paper Pumpkin box is designed to easily transform into a vintage wheelbarrow for you to display your harvest! The kit contains enough supplies to create 12 treat packages—4 each of 3 designs. The all-inclusive kit includes printed die-cut boxes, die-cut sheets, adhesive, and more! Finished treat box size: 2-1/2″ x 2″ (6.4 x 5.1 cm). Coordinating colors are Basic Black, Pale Papaya, Poppy Parade, Pumpkin Pie, Soft Succulent. Subscribe now through September10th. The kit will arrive in your mailbox around the 20th of the month. For further information and to subscribe, click here to visit my Paper Pumpkin website.

Product List
Paper Snips
[103579]
$10.00

Floral Dresses-Kylie’s Training Blog Hop

Hello! I’m so excited that spring begins in the United States just a few days from now! Welcome to Kylie Bertucci’s Demonstrator Training Blog Hop for March. I’m part of a group of Stampin’ Up! demonstrators from around the world that participate in Kylie’s program for building our businesses. Please be sure to click on the names in the list at the end of this post to hop around and view the beautiful cards posted by so many talented stampers.

Today I’m sharing two cards I made using a dress template as the focal point. I was going through some old issues of Stamper’s Sampler and Take Ten magazines recently and saw this dress template and the creative juices began to flow. I loved coloring and playing with paper dolls when I was a child and in my teen years, living in New York City, one of the fashion capitals of the world, had thought of a career in fashion at one point, so it has been fun to revisit my “inner fashion designer” !! I apologize for the quality of some of the photos. With glare from lighting and the metallics in the cards it was challenging!

The first card uses products from the Parisian Blossoms Suite. Here is how I made the card.

  • For the card base, cut a piece of Petal Pink cardstock at 4 1/4″ x 11″, score and fold in half.
  • Cut piece of DSP from the Parisian Blossoms Specialty Designer Series Paper at 4″ x 5 1/4″ and adhere to card front.
  • For the dress, I photocopied the page from the magazine and then reduced the image to 90%, cut out and traced it around piece of the Pool Party floral DSP.
  • I stamped the blossom image from the Forever Blossoms stamp set with Early Espresso ink five times on a piece of Whisper White cardstsock. I lightly water colored the centers of the flowers with Pool Party and Petal Pink with an aquapainter and cut them out with the die from the Cherry Blossoms die set.
  • Using the Cherry Blossoms die set I also cut out a variety of blossoms from a scrap piece of Champagne Foil.
  • Stamp the sentiment with Early Espresso ink on a scrap piece of Petal Pink cardstock and cut out with die from the Ornate Frames Dies that carried over from the Holiday Catalog. This has been a “go to” set of dies for me!
  • Tie a piece of Petal Pink 1/4″ Metallic Edge Ribbon around dress waist. Adhere dress on slight angle to card front. Adhere sentiment with Mini Stampin’ Dimensionals.
  • Arrange die cut flowers along both edges of dress and glue down each one individually with multipurpose glue along both sides of the dress.
  • Add some Champagne Rhinestones along the neckline of the dress.
  • For the inside of the card I decided not to stamp a greeting so I cut a strip of the Pool Party floral DSP at 3/4″ x 5 1/4″ and adhered along the side of a piece of Whisper White cardstock cut at 4″ x 5 1/4.”

For the next card I wanted to play with the Flowering Foils Specialty Designer Series Paper from the Sale-A-Bration 2nd Release.

  • Cut piece of Rococo Rose cardstock at 4 1/4″ x 11″, score and fold in half.
  • Cut piece of the Flowering Foils DSP at 4″ x 5 1/4″. Color the paper using a sponge brayer and Rocoso Rose ink.
  • Cut piece of 1/2″ Rococo Rose gathered ribbon and adhere to DSP, folding both ends over each side of the card. I used pieces of tape to secure both sides of the ribbon. Adhere DSP to card front with Stampin’ Dimensionals.
  • For the dress, cut piece of Whisper White cardstock at 5 1/2″ x 6″. Using the brayer and Rococo Rose ink, color the inside of the raised side of the Parisian Flourish 3D Embossing Folder, insert paper and run through an embossing machine. Trace dress template and cut out.
  • For the bow on the dress I wanted to use the gathered ribbon but it was too wide and bulky when I tried tying it on the dress so I ended up cutting away the gold middle of the ribbon and just using the edges, which gave me a double bow.
  • Adhere dress to card front with Stampin’ Dimensionals. I put them all around the dress and down the middle.
  • I colored some Pearl Basic Jewels with the Light Rococo Rose Stampin’ Blends and adhered to the dress.
  • For the inside of the card I decided not to use a greeting. I cut a piece of the Flowering Foils DSP at 3/4″ x 4″. I colored in the flowers with the Light Rococo Rose Stampin’ Blends and the Dark Rococo Rose Stampin’ Blends for the centers, and adered to bottom piece of Whisper White cardstock cut at 4″ x 5 1/4″.

I had lots of fun making these cards and have a few more ideas that I will be featuring here in the next week so be sure to visit again.

Thanks for stopping by today!


 Product List  
Paper Snips
[103579]
$10.00

Amour

Hello! Today’s card features products from the Parisian Blossoms mega-suite and it is for Valentine’s Day. There are two bundles in the suite and I used both of them for this card. I especially love the Eiffel Tower images. Over the years, Stampin’ Up! has included images of the Eiffel Tower in other stamp sets, however, I think this is the best one of all – it is tall and elegant!

Here is how I made the card.

  • Card base: Cut piece of Cherry Cobbler cardstock at 4 1/4″ x 11,” score and fold in half.
  • Cut piece of Whisper White cardstock at 4″ x 5 1/4″. Using the Parisian Flourish 3D Embossing Folder, run through your embossing machine. Adhere to card front.
  • Die cut the Eiffel Tower out of a piece of a Black Foil Sheet using the die from the Parisian Dies set. Adhere to card front. Die cut “Amour” out of a piece of Flirty Flamingo cardstock using the die from the same set. I had originally planned on using Cherry Cobbler but it didn’t show up as well as I thought it would as there didn’t seem to be enough contrast. In the end, I really like how the Flirty Flamingo looks! Adhere to the lower part of the tower. I used the Fine-Tip Glue Pen for this.
  • Using the single flower image from the Forever Blossoms stamp set, stamp flowers with Tuxedo Black Memento Ink on Cherry Cobbler and Flirty Flamingo cardstock and cut out with the die from the Cherry Blossoms Die set. I like to use an odd number in groupings so decided on three flowers for each of the two groups. Arrange them on the card and glue them down with Multipurpose Glue so that you have some wiggle room to move them around until they are positioned to your liking.
  • I used a few gems from the From My Heart Faceted Gems in the From My Heart suite for a touch of bling.
  • For the inside of the card I cut a piece of Whisper White cardstock at 4″ x 5 1/4″ and stamped the Valentine’s greeting from the Meant to Be stamp set in Cherry Cobbler ink. This set was in the 2019 Occasions catalog and was carried over to the 2019-2020 Annual catalog. It is a lovely set and has a fantastic set of dies, Stitched Be Mine, that were also carried over. I used the Stamparatus to partially position the large blossom image from the Forever Blossoms stamp set and stamped it with the Tuxedo Black ink.


Thanks for stopping by today!

 Product List  
Stamparatus
[146276]
$49.00

Parisian Beauty-Kylie’s Training Blog Hop

Hello and welcome to Kylie Bertucci’s Demonstrator Training Blog Hop for February! I’m part of a group of demonstrators from around the world that participate in Kylie’s program for building our businesses. Please be sure to click on the names in the list at the end of this post to hop around and view the beautiful cards posted by so many talented stampers.

Today I’m featuring another card using products from the gorgeous Parisian Blossoms Suite.

Here is how I made the card.

  • Card base – cut piece of Pool Party cardstock at 5 1/2″ x 8 1/2″, score and fold in half.
  • Cut piece of paper from the Parisian Blossoms Specialty Designer Series Paper at 4″ x 5 1/4″. Cut piece of Petal Pink 1/4″ Metallic Edge Ribbon at 5 3/4″ and adhere lengthwise to center of DSP. Adhere DSP to card base.
  • For the double mats, die cut piece of Petal Pink cardstock with the next-to-largest of the Stitched Nested Labels Dies. Cut next piece from the DSP with the script writing using the third largest die from the set. Adhere to larger label and adhere to center of card front.
  • Stamp the Eiffel Tower image from the Parisian Beauty stamp set with Sahara Sand ink and cut out with the coordinating Parisian Dies. Adhere to label piece with Stampin’ Dimensionals.
  • Stamp “Love” sentiment from the Forever Blossoms stamp set with Soft Suede ink on scrap piece of Pool Party cardstock. Cut out with die from the Ornate Frames Dies. Add Champagne Rhinestones to both sides of the greeting and adhere to the tower.
  • For the inside of the card, cut a piece of Whisper White cardstock at 4″ x 5 1/4″. Partially stamp the cherry blossom image from the stamp in the Forever Blossoms stamp set with Petal Pink ink.
  • Stamp a greeting of your choice. I used the Happy Valentine’s Day greeting from the Meant to Be stamp set on page 76 in the annual catalog.

Thanks for stopping by today!