Geared Up Garage Card Idea

Hello! Today I have a card for you that features one of my favorite stamp sets for making masculine cards – Geared Up Garage. When I attended the Stampin’ Up OnStage convention in November, 2018, the 2019 Occasions Catalog was introduced. We got to do several make and take projects with the product suite and I just loved it! I’m so glad the stamp set and dies are still available in the 2020-2021 Annual Catalog.

I attended the Creativate Summer 2020 Virtual Retreat two weeks ago and Brandy Cox, one of the five Stampin’ Up! demonstrators that organized the event, did a session on color challenges. She selected Poppy Parade, Bermuda Bay and Smoky Slate for her color palette. After the event I started thinking about stamp sets in my collection that would lend themselves to these colors and thought Geared Up Garage would work really well. Here is the card I came up with.

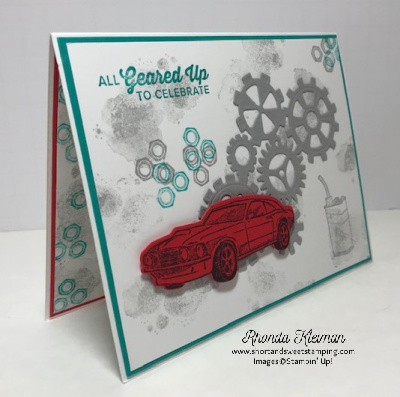
Here is how I made the card.

  • Card base – Cut a piece of Thick Whisper White cardstock at 4 1/4″ x 11″, score at 5 1/2″ , fold and crease with a bone folder.
  • Cut piece of Bermuda Bay cardstock at 4 1/8″ x 5 3/8″ and adhere to card front.
  • Cut piece of Whisper White cardstock at 4″ x 5 1/4″.
  • Stamp car image with Tuxedo Black Memento ink on scrap piece of Poppy Parade cardstock. Cut with coordinating die from the Garage Gears die set.
  • Die cut large gear piece from a piece of Smoky Slate cardstock.
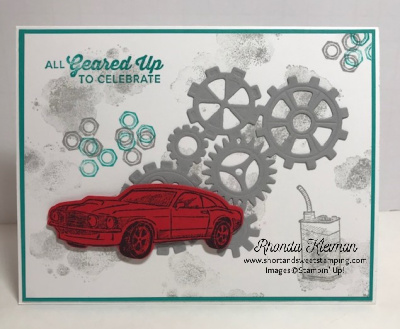
  • Stamp the oil splotch image with Smoky Slate ink all around the piece of Whisper White cardstock and stamp nut image three times, stamping off each time before stamping onto the cardstock. Stamp oil can in bottom right corner. Stamp the nut image three times with Bermuda Bay ink, slightly offsetting them from the previously stamped Smoky Slate images. Stamp greeting in upper left corner with Bermuda Bay ink.
  • Adhere die cut gears to card front with liquid glue. Adhere car image to bottom portion of gears with Stampin’ Dimensionals.
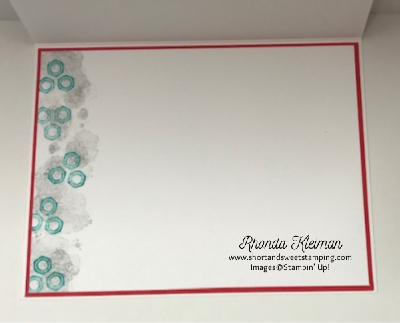
  • For the inside of the card, cut a piece of Poppy Parade cardstsock at 4 1/8″ x 5 3/8″ and adhere to card. Cut a piece of Whisper White cardstock at 4″ x 5 1/4″. Stamp oil splotch image with Smoky Slate ink four times along left side of card, stamping off before stamping onto cardstock. Stamp nut image five times with Bermuda Bay ink. Adhere to Poppy Parade piece.

Bonus Days are back once again! From July 1 through August 3rd, for every $50 you spend (before shipping & tax) you will receive a $5 Bonus Day coupon code that can be used from August 4th – 31st.

  • You must have an email address in order to participate because the codes can only be delivered electronically.
  • If you earn multiple coupons in a single order, all of the codes will be sent in one email. If you earn multiple coupons for multiple orders they will be sent in separate emails for each code earned.
  • There is no limit on the number of coupon codes you can earn during this promotion.

Thanks for stopping by today!

 Product List  

Classic Garage Birthday Cards

Hello! Today I’m featuring two birthday cards using products from the Classic Garage Suite, which is pictured on pages 42-43 in the Occasions catalog. This is one of my favorite suites in the catalog and I’m so glad that the stamp set and coordinating dies will be carrying over into the new 2019-2020 Annual Catalog. These products are great for making masculine cards and are so much fun to work with!

I made this for my friend Bill’s birthday last month and used my “go to” layout, which is a great way to showcase our great Designer Series Papers.

This card was made for my brother Mark, who celebrated his birthday yesterday. I decided to use the same layout for this card too.

To make both of these cards here are the basic dimensions.

  • Tranquil Tide cardstock for card base – 5 1/2″ x 8 1/2″ and fold in half
  • Classic Garage Designer Series Paper – 4″ x 5 1/4″
  • Tranquil Tide cardstock mat for art piece – 3 1/4″ x 4″
  • Whisper White base for art piece – 3″ x 3 3/4″

For the first card stamp the car with Tuxedo Black Memento Ink and die cut it with the coordinating framelit from the Garage Gears Thinlits Dies. Select a few of the gear dies and cut with Basic Black, Basic Gray and Silver Foil cardstock.

Wrap piece of silver metallic thread around Whisper White base and tape at back of piece. Using the Stamparatus, stamp the greeting in the upper left corner of the base with Tranquil Tide ink.

Adhere gears to base with multipurpose liquid glue. Adhere car using Stampin’ Dimensionals. Adhere base to Tranquil Tide mat and adhere this piece to the card.

For the second card stamp the car with Tuxedo Black Memento Ink and die cut it with the coordinating framelit from the Garage Gears Thinlits Dies. Select a few of the gear dies and cut with Basic Black and Crushed Curry cardstock.

Using the oil splotch stamp, ink it up with Smoky Slate and stamp off once before stamping onto Whisper White piece. Do this several times. Using the Stamparatus, stamp the greeting in the upper left corner of the base with Tuxedo Black Memento Ink.

Adhere gears to base with multipurpose liquid glue. Adhere car using Stampin’ Dimensionals. Adhere base to Tranquil Tide mat and adhere this piece to the card.

As a reminder, Tranquil Tide, one of the 2017-2019 InColors will be retiring soon. In addition, the Classic Garage Designer Series Paper will also be retiring. This is a terrific set of papers and it really makes the cards pop! If you have been thinking about purchasing them now is the time!

Place an online order between $50-$149 with me and receive a free gift. This month’s gift is a package of Pearlized Doilies.


Thanks for stopping by today!


 Product List  


Geared Up Garage

Hello! Today’s card is one that I made for my father, who turned 97 years old last week! He lives nearby in a wonderful personal care facility so I get to see him frequently. He is still able to get around quite well on his own, and as a lifelong reader, still has a voracious appetite for reading. You’d never know by looking at him that he is 97! Dad has always loved cars and as a retired industrial arts teacher, knew his way around fixing them too. I got a chance to work with the Geared Up Garage bundle during one of the make-and-take sessions at OnStage last year and knew immediately that I’d have to purchase it so I could make some cards for him in the coming year.

I partially CASE’d this idea from a card I saw on Pinterest. Here are the steps to make it.

  • Cut a piece of Real Red cardstock at 5 1/2″ x 8 1/2″ and fold in half.
  • Select a piece of paper from the Classic Garage Designer Series Paper and cut at 4″ x 5 1/4″ and adhere to card base.
  • Stamp the car image in Real Red ink and using the coordinating die from the Garage Gears Thinlits, run through the Big Shot.
  • Stamp “Best Dad” image in Memento black ink on piece of Crushed Curry cardstock and run through Big Shot with coordinating die.
  • Die cut a circle from Whisper White cardstock, using the third largest circle from the Stitched Shapes Framelits. Randomly stamp the nuts in Memento black ink and the oil blobs in Crushed Curry ink.
  • Adhere circle to card, adhere “Best Dad” image and adhere automobile with Stampin’ Dimensionals.

This card was fun to make and easy to put together. Dad absolutely loved it! I’m planning on using some of the designer papers to make a few Valentine’s Day cards for men and will post them sometime next week.

For those of you experiencing the great chill, especially in the Midwest, stay safe and warm! My brother lives in Wisconsin so I know what you are going through. Temps are due to drop to 2 below here in Pennsylvania overnight. I’m spending the rest of my stamping time this week making cards that will help me to “think spring!”

To order any of the products I used to make this card you can shop my online store by clicking here. Thanks for stopping by today!

 Product List