Berry Delightful Note Cards and Gift Box

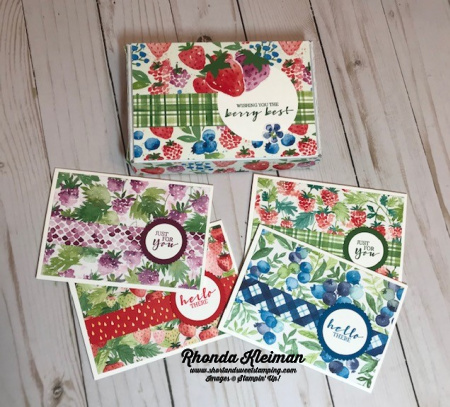
Hello! Today’s project is a set of four note cards and a coordinating gift box that features the yummy Berry Delightful Designer Series Paper. This paper is part of a Sale-A-Bration bundle that also includes the Berry Blessings stamp set. You can earn this bundle for free with a $100 order, but time is running out because Sale-A-Bration ends tomorrow, February 28th. This will be your last chance to earn these products. This is one of the projects we did in my stamping club this month.

Here is how to make the note cards.

  • This project uses the Basic White Note Cards & Envelopes in the annual catalog. Use four cards and envelopes. Cards measure 5″ x 3 1/2″ folded.
  • Fold note cards and crease with bone folder.  Select four different sheets of the Berry Delightful DSP and cut them at 3 1/4″ x 4 3/4″. Adhere DSP to card fronts.
  • Cut four pieces of contrasting DSP at 3/4″ x 4 3/4″ and adhere them to the to card fronts, slightly below the middle.
  • Stamp greetings from the Sweet Strawberry stamp set. Select four ink colors that coordinate with the DSP. These cards use Poppy Parade, Blackberry Bliss, Garden Green and Pacific Point. I used two different greetings and stamped each of the two in a different color to coordinate with the cardstock for the scalloped circles.  Die cut the smaller “Just for You” greeting with the smallest circle in the Layering Circles die set.  Die cut the larger “Hello There” greeting with the second smallest circle in the die set.
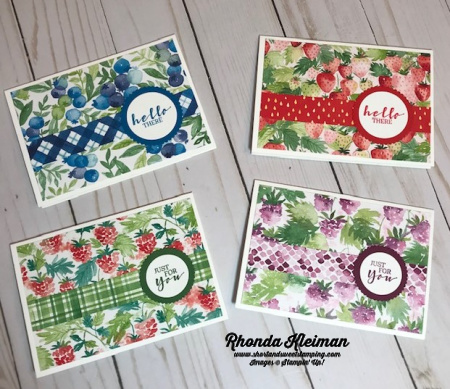
  • I used the same colors of cardstock as the inks. Die cut the scalloped circles from each of the four different colors of cardstock.  For the smaller circle use the second smallest scalloped circle and for the larger circle use the third smallest scalloped circle.
  • Adhere the stamped greetings to the coordinating scalloped circle pieces and adhere to right side of card front.

The box is made with one of the Mini Paper Pumpkin Boxes from the annual catalog. Here is how I made it.

  • Make box by folding along all score lines. These boxes are food safe so one side is shiny and the other side is matte.  You want the shiny side to be the inside of the box.
  • Cut piece of DSP at 3 ¾” x 5 ½” and adhere to top of box.  Using the same sheet of DSP, cut two strips at 1″ x 5 3/4″ and two strips at 1″ x 3 3/4″. Adhere the strips to the sides of the boxes.  Cut a contrasting strip of DSP at 1″ x 5 1/2″ and adhere to the center of the top of the box.
  • Stamp greeting from the Berry Best stamp set with Garden Green Ink on a 3″ square piece of Basic White cardstock.  Die cut with the second largest circle in the Layering Circles dies, with the greeting closer to the bottom of the circle in order to leave space above to adhere punched out strawberries.  You can also punch out the circle if you own the 2 ½” circle punch, which is now retired. Adhere to right side of the top of the box.
  • From the 12” x 12” sheet of DSP with the multi-colored strawberries and flower blossoms, punch out the Poppy Parade and Rich Razzleberry strawberries with the Strawberry Builder punch.  This will cut off the stem part of the strawberry.  To add stems back, punch out from scraps of Garden Green cardstock using the Strawberry Builder punch and adhere to strawberries.  Using the builder punch, punch out the Pacific Point flower blossoms. Arrange strawberries and flower blossoms around the circle and adhere.
  • Add the four note cards and envelopes to the inside of the box and voila! You have a beautiful gift to give to someone special!

Thanks for stopping by today!

Sale-A- Bration is a great time to consider joining Stampin’ Up! This is your last opportunity to take advantage of this special promotion. During this promotion you can purchase the starter kit for only $99 and select $125 worth of merchandise from the current annual catalog or the new mini catalog. This is the BEST deal! You will also get a FREE 200 6″ x 6″ sheet assortment of our newest Designer Series Papers for five current color families, a $57.50 value! This paper will not be available for purchase until May 2021. Free shipping is also included. Become a happy shopper and enjoy a 20% discount on future orders. Click here to join.

Product List

Perfectly Plaid Foil Box

Hello! Today is my first day back to blogging after being absent for almost two weeks. In addition to preparing for and running my holiday classes I am going through a total kitchen renovation from top to bottom and had to clear out the contents of all the cabinets at the same time. It’s taken me a while to play catch up but I’m finally back on track. Demolition began on November 18th and the project is scheduled to be completed a few days before Christmas – quite an extravagant present to me!! My entire house is upside down – boxes everywhere, refrigerator, kitchen table, microwave all in my dining room, with other stuff scattered about in the basement and my guest room. I normally photograph my projects in my dining room because that is where I get the best light, so I’ve had to switch to my craft room and the light fixture in that room produces a terrible glare from all angles, so it has been challenging. I apologize for the quality of photos that will appear in my blog posts in the next few weeks. It’s all worth the trouble because I”m going to have a beautiful kitchen in the end! I will be sure to post before and after pictures later this month.

Now onto today’s project, a treat box featuring products from the Wrapped in Plaid Suite in the Holiday Catalog. The Gold Mini Pizza Boxes are the perfect touch for some holiday glitz.

Here’s how I made the project.

  • Fold on the scored lines to create the box.
  • Cut piece of Night of Navy cardstock at 3 1/4″ x 3 1/4″and adhere to box lid. Cut piece of Wrapped in Plaid Specialty Desgner Series Paper at 3″ x 3″ and adhere to Night of Navy square.
  • Stamp greeting from Perfectly Plaid stamp set in Cherry Cobbler ink on scrap piece of Very Vanilla cardstock. Die cut using the 2nd smallest of the longer dies from the Stitched Rectangles die set. Adhere to the DSP square.
  • Select two pieces of DSP using the other side of the plaids. Punch out two trees with the Pine Tree Punch. Punch a hole at the top of each tree with a 1/8″ hole puncher.
  • Tie piece of ribbon around box, leaving it loose enough so that it will slide on and off easily. The ribbon I used is retired but I really liked how it looked. You can use the Shaded Spruce Gold ribbon that is part of the suite or any ribbon of your choice.
  • Cut piece of linen thread and slide it through the holes in the tops of the trees and tie around the ribbon bow. Trim ends.

Easy peasy for an elegant little gift box!

Stampin’ Up’s Year End Close-Out Sale begins tomorrow, December 3rd. Save big on a selection of retiring and surplus items including holiday catalog items, stamp sets, and Paper Pumpkin past kits. Supplies are limited and popular items will sell out quickly. The sale ends on January 2. More details to follow in tomorrow’s post.

Thanks for stopping by today!

 Product List  

Happy Halloween!

Hello! Today I’m sharing my last Halloween project with you, featuring the adorable Mini Curvy Keepsakes Box Dies. I attended an American Business Women’s Association local chapter mixer last evening and rather than bring a bottle of wine, I thought it would be a nice touch to bring treat boxes filled with candies for all of the attendees. They looked very nice placed on either side of the table centerpiece. Everyone oohed and aahed and were delighted when I told them they each got to take one home!

I ended up using mostly retired products because they worked really well and it was an opportunity for me to continue to use them up. I used some of the Monster Bash Designer Series Papers in the current Holiday catalog a as well as papers from Halloween DSP from previous years that had more small-scale prints. I also used Basic Black Bakers Twine and the pumpkin on the tag came from a very old set, Halloween Frights. I tend to keep many holiday sets after they retire.

Here is how I made the boxes.

  • Cut your selected Designer Series Papers into 6″ squares. Cut box shape with die from the Mini Curvy Keepsakes Box Dies by running through your die cutting machine. Fold box on all of the score lines.
  • Place candies in open box before closing it up. The box holds 4-5 Hershey Kisses or 2-3 Miniatures or other similar-sized candies.
  • Die cut tags using the oval-shaped die in the set. Stamp a greeting or image on scraps of Whisper White card stock. I stamped the pumpkin image with Pumpkin Pie ink.
  • Thread bakers twine or other ribbon through the tag and then thread it through the box handles and tie in a bow.

Thanks for stopping by today!

Product List