

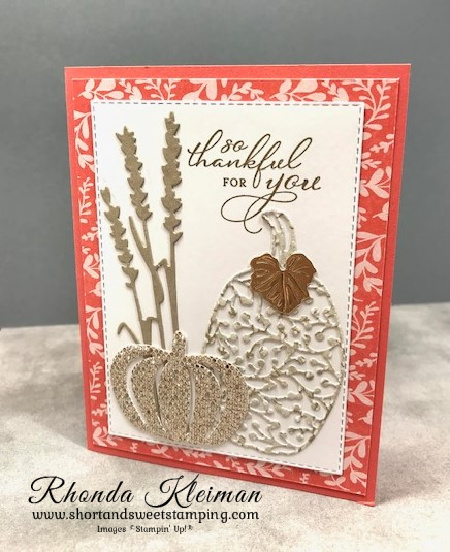
Hello! Today I’m participating in Kylie Bertucci’s International Blog Highlights. Readers get to vote on their top five favorites in the gallery and the top 10 winners will get to participate in an International Blog Hop later this month. The theme is “thank you”. This is the thank you card I sent out to my customers in October and it uses products from the Pretty Pumpkin Bundle and the Harvest Meadow Suite.
Here is how I made the card.
- Card base – Cut a piece of Calypso Coral cardstock at 5 1/2″ x 8 1/2″, score at 4 1/4″, fold and crease with a bone folder.
- Cut a piece of Calpyso Coral paper from the Harvest Meadow Designer Series Paper at 4″ x 5 1/4″ and adhere to card front.
- Cut a piece of Basic White cardstock at 3 3/4″ x 5 1/4″ and run through the Stampin’ Cut & Emboss Machine with the largest Stitched Rectangle Die.
- Stamp greeting from the Pretty Pumpkins stamp set with Crumb Cake ink.
- Cut piece of Crumb Cake cardstock at 1 3/4″ x 5″. Cut out with the thin wildflower die from the Harvest Dies.
- Cut piece of Be Dazzling Specialty Paper at 2″ x 2 1/2″. Cut a piece of an adhesive sheet to the same size and adhere. Cut out with the small pumpkin die from the Detailed Pumpkin Dies. Note: The Be Dazzling Specialty Paper was a Sale-A-Bration item and is no longer available. You can substitute any other metallic paper in its place.
- Cut a piece of the Crumb Cake paper that looks like willows from the Harvest Meadow Designer Series Paper at 2 1/4″ x 4″. Cut a piece of an adhesive sheet to the same size and adhere . Cut out with the large filigree pumpkin die from the Detailed Pumpkin Dies.
- Die cut a leaf from a scrap piece of a Gold Foil sheet.
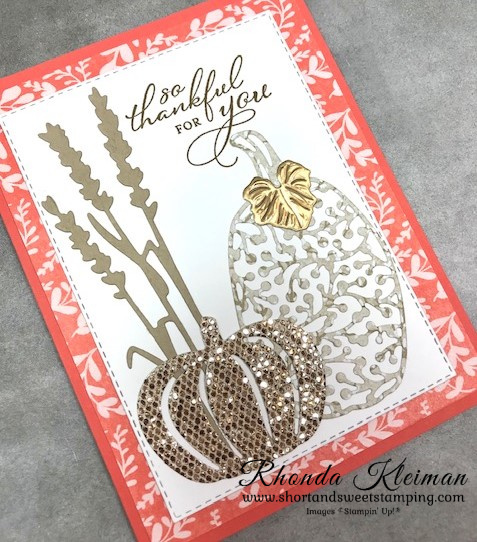
- Before adhering the Crumb Cake wildflower piece, trim the bottom of the stems to fit the Basic White cardstock piece. Adhere with Multipurpose Liquid Glue.
- Peel backing off the adhesive sheet on the filigree pumpkin and adhere to Basic White cardstock piece. Adhere the gold leaf under the pumpkin stem with liquid glue.
- Peel backing off the adhesive sheet on the small pumpkin and adhere, overlapping the bottom of the wildflower piece and filigree pumpkin.

I’d be so appreciative if you would vote for my card! Click on the vote image below. Once you are in the gallery, click on the heart at the top right hand side of the picture as the hearts appear.

Thanks for stopping by today!


Stampin’ Up! is offering the Start With Savings promotion, an excellent opportunity to join from November 4-30. You can choose to join either as a “happy discount shopper” or build a business. Instead of the standard $99 USD Starter Kit—which is already a steal of a deal— you can get a completely custom Starter Kit for only $75 USD. What an absolutely unbeatable bargain for a box with a value of $125 USD. In addition, SHIPPING IS FREE! You can select any items from the Annual Catalog or the current Mini Catalog. If you’ve been thinking about purchasing a new Stampin’ Cut & Emboss Machine or the Mini Stampin’ Cut & Emboss Machine you can even add those to your kit! The benefits speak for themselves. You get personal discounts of 20%-25%, early access to new catalogs and products, exclusive access to events, and the opportunity to earn additional income and other rewards. You are under no obligation to commit to making this a business, you are not required to host workshops or parties, and you can drop at anytime without penalties! Stampin’ Up! has never had such an amazing deal! For further information and to join, click here. I’d love to have you as a team member!

Place an online order between $50 and $149 and use this host code for November. You will receive a free gift from me the following month. If your order is $150 or more DO NOT use the host code. You will qualify for Stampin’ Rewards.
Product List  |  |  |
 |  | |
 | ||
 |  |  |
 |  |  |
 Designer Series Paper")


 Specialty Paper")


")
")


