Perennial Lavender Fun Fold Card

Hello!

Today’s card features products from the Perennial Lavender mega suite from the soon-to-be-retired January-April Mini Catalog. The good news is that all of the products in this suite, with the exception of the Perennial Postage stamp set, are carrying over into the new 2024-2025 Annual Catalog, including the Perennial Lavender Designer Series Paper. It isn’t often that Stampin’ Up! carries over DSP! The Painted Lavender bundle will not be sold as a bundle in the new catalog. You will be able to purchase the stamp set and dies separately. If this bundle is still on your wish list, you might want to take advantage of saving 10% on the bundle now.

Here is how I created this fun fold card.

  • Card base – cut a piece of Gorgeous Grape cardstock at 4 1/4″ x 11″, score at 5 1/2″, fold and crease sharply with a bone folder.
  • Cut a piece of the Perennial Lavender DSP at 4 1/4″ x 5 1/2″ and run through a die cutting machine with the largest die from the Perennial Postage die set and adhere to card front.
  • Cut a piece of Basic White cardstock at 2 1/4″ x 4″. Stamp the stems with Pretty Peacock ink. Stamp large lavender spray with Gorgeous Grape ink. Stamp spray again with Highland Heather ink over the Gorgeous Grape spray. Adhere to a piece of Highland Heather cardstock cut at 2 3/8″ x 4 1/8″.
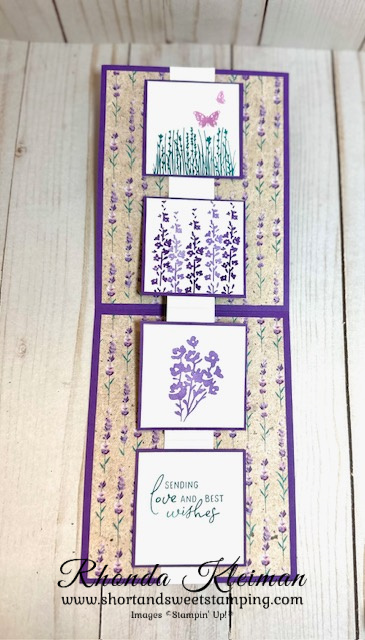
  • Cut two pieces of DSP at 4″ x 5 1/4″ and adhere to both sides on the inside of the card. Cut a strip of Basic White cardstock at 1″ x 11″. Score at 2 3/4″, 5 1/2″ and 8 1/4″. Crease all folds very sharply with a bone folder.
  • Run a thin line of liquid glue at the top of the 11″ strip. Open card and center the strip in the middle. Line up the top of the strip with the top of the card and adhere. Run a thin line of liquid glue at the bottom of the strip. Line up the strip with the bottom of the card and adhere.
  • Cut four pieces of Highland Heather cardstock at 2 1/4″ x 2 1/4″each and four pieces of Basic White cardstock at 2″ x 2″ each.
  • On the first piece of Basic White, stamp the grass image with Pretty Peacock ink. Stamp the butterflies with Fresh Freesia ink.
  • On the second piece of Basic White, stamp the thin lavender spring several times with Gorgeous Grape ink and alternating with Highland Heather ink.
  • On the third piece of Basic White, stamp the small flower spray with Highland Heather ink.
  • On the fourth piece, stamp a greeting from the Perennial Postage stamp set or leave it blank and write in your own note.
  • Adhere the four stamped images to the four squares of Highland Heather cardstock.
  • Adhere the four squares to the strip, running a thin line of liquid glue in the middle of each square. Don’t apply glue to the entire square otherwise the fold won’t work properly.

This is what the fold looks like when the card is opened.

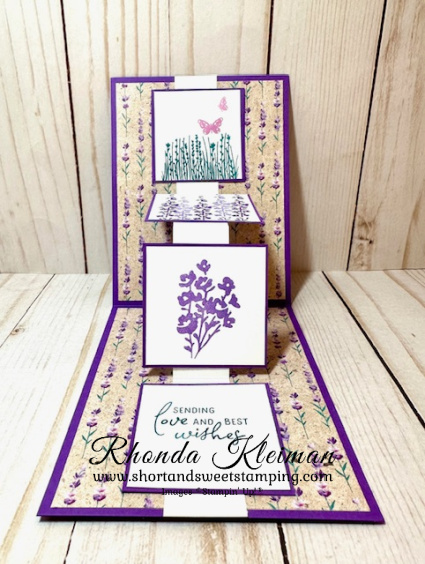
  • To finish off the card, fold the card and crease again very sharply with a bone folder. Adhere the stamped floral spray piece to the card front with Stampin’ Dimensionals. Adhere a few of the Purple Fine Shimmer Gems to the card front. Make bow and adhere to floral spray with a Mini Glue Dot. I used a piece of retired Gorgeous Grape ribbon from my ribbon stash.

Thanks for stopping by today!

There are only four days remaining before the 2023-2024 catalog and the January-April Mini Catalog are retired. Save up to 60% on selected products, while supplies last.

Click on the catalog cover to view the list of retiring products from the 2023-2024 Annual Catalog.

Click on the catalog cover to view the list of retiring products from the January-April 2024 Mini Catalog.

The new annual catalog goes live on Wednesday, May 1 ! The inside pages have been redesigned and incorporate many new and useful features. If you are one of my customers and have made purchases in the last year you will automatically get a catalog from me in the mail. If you do not and would like one please contact me and I would be happy to send one out to you.

These are the five new and yummy 2024-2026 In Colors. I look at them as more saturated pastels and I LOVE them because they are bright and fresh!

Place an online order between $50 and $149 and use this host code for April. You will receive a free gift from me the following month.  If your order is $150 or more DO NOT use the host code. You will qualify for Stampin’ Rewards.

Product List
Paper Snips
[103579]
$11.00

Softly Sophisticated Fun Fold

Hello!

Today’s card features several new Sale-A-Bration products. Sale-A-Bration runs through February 29. For every $50 or $100 purchase you make you get to select exclusive free items. I used the Softly Sophisticated Bundle which includes a stamp set and an embossing folder, free with a $100 purchase. I also used the Flight & Airy Designer Series Paper, free with a $50 purchase. I have used this fun fold many times because it is a nice way to feature smaller stamped images as well as embossing folders.

Here is how I made the card.

  • Card base – cut a piece of Pretty Peacock cardstock at 5 1/2″ x 8 1/2″. Score at 4 1/4″, fold and crease with a bone folder. Cut off a 1 1/2″ piece from the front side of the cardstock and trim it down to 1 1/2″ x 5 1/4″. You will use this strip for the embossing.
  • Cut a piece of DSP at 2 1/2″ x 5 1/4″ and adhere to card front.
  • Run the 1 1/2″ strip through a die cutting & embossing machine with the Softly Sophisticated embossing folder.
  • Cut a piece of Basic White cardstock at 4″ x 5 1/4″. Adhere the embossed piece to the right edge.
  • Cut a piece of Lost Lagoon cardstock at 3 1/2″ x 3″ and score at 1/2″ with the long side at the top of your trimmer. Fold on score line and give a sharp crease with a bone folder. Run a line of liquid glue or adhesive along the 1/2″ side. Center this piece in the middle on the back side of the Basic White cardstock piece and adhere.
  • Cut a piece of Basic White cardstock at 2 3/4″ square. Stamp the leaf image with Parakeet Party ink. Stamp the flowers with Lost Lagoon ink. I decided to stamp a few speckled images to fill in some of the blank white spaces so I used a stamp from the Queen Bee stamp set and stamped with Pretty Peacock ink. Stamp the birthday greeting from the Go To Greetings stamp set with Pretty Peacock ink. Adhere to the Lost Lagoon front flap.
  • For the inside greeting I used one of the greetings from the Layering Leaves stamp set and stamped with Pretty Peacock ink. I stamped a leaf image from this set with Parakeet Party ink in the lower left corner. Adhere to inside of card and close the card so that the flap overlaps the front of the card.
  • Add a bit of bling to the front of the card. I used a few of the green sequins from the Adhesive Backed Glitter Sequins which were in the September-December 2023 Mini Catalog. They are now retired.

Thanks for stopping by today!

During Sale-A-Bration, when you join Stampin’ Up! you can choose $125 of products for only $99, which includes shipping. You get to choose from two FREE bonus options – either this Glass Mat Studio (a $60 value) or your choice of an additional $30 in FREE products. The Glass Mat Studio has been creating quite a buzz!

The Stampin’ Glass Mat Studio is a paper crafter’s dream! The heavy-duty glass mat comes printed with a ruler and grid lines for easy measuring, while the large surface space gives ample room for spreading out while paper crafting. The safety-tempered glass has a heat and scratch resistant surface that wipes clean with the included cloth and water—no chemicals needed. The reusable cloth also cleans ink off your stamps! The nonslip, heat resistant, waterproof silicone mat features four palette squares for mixing custom ink colors or for holding small ink spots in place while crafting. Each component can be used separately or you can use all three items together for a multipurpose paper crafting studio that’s both functional and elegant.

The Stampin’ Glass Mat Studio includes:

GLASS MAT
* 5 mm thick
* 17″ x 14″ (43.2 x 35.6 cm)
* Safety-tempered
* Heat and scratch resistant
* Wipes clean with water or alcohol

SILICONE MAT
* 8-3/8″ x 6″ (21.3 x 15.2 cm)
* Multiuse, nonslip
* Waterproof, heat resistant
* 4 palette squares for custom-color mixing or holding Stampin’ Spots
* Product color: white CLEANING CLOTH
* 8-1/4″ x 8-1/4″ (21 x 21 cm)
* Durable, reusable
* Lint free
* Cleans stamps and other surfaces with only water
* Product color: dark gray

Place an online order between $50 and $149 and use this host code for January. You will receive a free gift from me the following month.  If your order is $150 or more DO NOT use the host code. You will qualify for Stampin’ Rewards.

Product List

Spring Mini Catalog and Sale-A-Bration Begin

Hello!

The January-April 2024 Mini Catalog, also known as the Spring Mini Catalog, along with Sale-A-Bration, began yesterday, January 4. This is always an exciting time of the Stampin’ Up! year! I lost Internet service most of the day and evening yesterday so I’m a day late with this post!

Click on the images to view the Mini Catalog and Sale-A-Bration brochure. You can also click on the images on the right side bar on the home page.

Sale-A-Bration runs from January 4-February 9. With every $50 or $100 purchase that you make (before shipping and sales tax) you earn free gifts! There are many wonderful products to choose from and some of them coordinate with products in the Mini Catalog.

Join Stampin’ Up! and Get This Free Glass Mat Studio

During Sale-A-Bration, when you join Stampin’ Up!  you can choose $125 of products for only $99, which includes shipping.  You get to choose from two FREE bonus options – either this Glass Mat Studio (a $60 value) or your choice of an additional $30 in FREE products.  The Glass Mat Studio has been creating quite a buzz!  I was able to purchase one during demonstrator pre-order and am still playing with the many different ways to use it.

The Stampin’ Glass Mat Studio is a paper crafter’s dream! The heavy-duty glass mat comes printed with a ruler and grid lines for easy measuring, while the large surface space gives ample room for spreading out while paper crafting. The safety-tempered glass has a heat and scratch resistant surface that wipes clean with the included cloth and water—no chemicals needed. The reusable cloth also cleans ink off your stamps! The nonslip, heat resistant, waterproof silicone mat features four palette squares for mixing custom ink colors or for holding small ink spots in place while crafting. Each component can be used separately or you can use all three items together for a multipurpose paper crafting studio that’s both functional and elegant.

The Stampin’ Glass Mat Studio includes:

GLASS MAT
* 5 mm thick
* 17″ x 14″ (43.2 x 35.6 cm)
* Safety-tempered
* Heat and scratch resistant
* Wipes clean with water or alcohol

SILICONE MAT
* 8-3/8″ x 6″ (21.3 x 15.2 cm)
* Multiuse, nonslip
* Waterproof, heat resistant
* 4 palette squares for custom-color mixing or holding Stampin’ Spots
* Product color: white CLEANING CLOTH
* 8-1/4″ x 8-1/4″ (21 x 21 cm)
* Durable, reusable
* Lint free
* Cleans stamps and other surfaces with only water
* Product color: dark gray

This month’s Paper Pumpkin is designed to coordinate with the new Perennial Lavender Suite in the new Mini Catalog as shown on pages 22-25.. The kit includes supplies to make 8 love themed cards, 4 each of 2 different designs with 8 coordinating envelopes; 4 bonus tags that punch out from the card front; precut paper pieces and linen thread; Berry Burst Stampin’ Spot.  Coordinating colors are: Garden Green, Pretty Peacock, Lost Lagoon, Highland Heather, Gorgeous Grape. In addition, the occasional add-on dies have become so popular that this year there will be a new add-on die set that is designed to work with three kits each quarter.  The Love of Spring Dies, Item #164396 will be available for purchase in my online storeClick here to learn more about Paper Pumpkin subscription options.

Place an online order between $50 and $149 and use this host code for January. You will receive a free gift from me the following month.  If your order is $150 or more DO NOT use the host code. You will qualify for Stampin’ Rewards.

Thanks for stopping by today!