Symbols of Fortune Chrysanthemum Card

Hello!

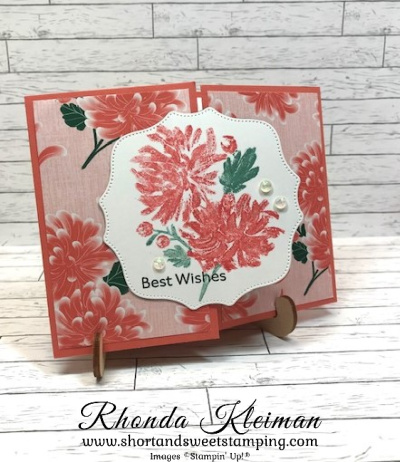
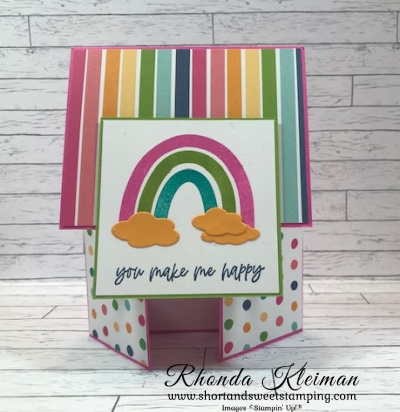
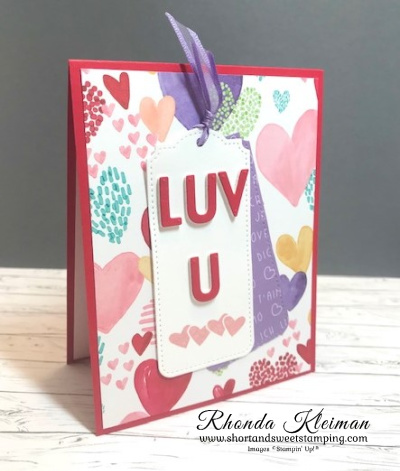
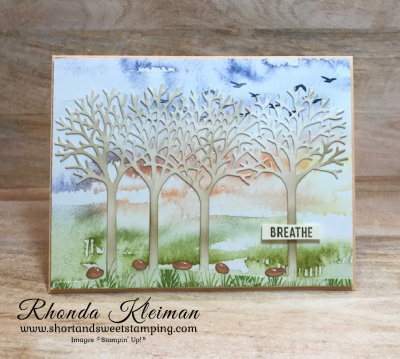
Today’s card is a fun fold card that features the gorgeous chrysanthemum flower image in the Crane of Fortune stamp set. This is part of the Symbols of Fortune Suite in the January-June 2022 Mini Catalog. This was the first Suite I purchased when the catalog went live and while I’ve made a number of cards using products from the suite, I haven’t had a chance to post any of them until now. This suite will be retiring at the end of June so if any of the products in the suite have been on your wish list, now is the time to purchase them.

Here is how I made the card.

  • Card base – cut a piece of Calypso Coral cardstock at 4 1/4″ x 11″, score at 2 3/4″ and 8 1/4″. Fold and crease sharply with a bone folder.
  • Cut two pieces of the chrysanthemum paper from the Symbols of Fortune Specialty Designer Series Paper at 2 1/2″ x 4″. Cut two pieces from a different sheet of paper at 2 1/2″ x 4″. Adhere the chrysanthemum DSP strips to the front folds and the contrasting DSP strips to the inside flaps.
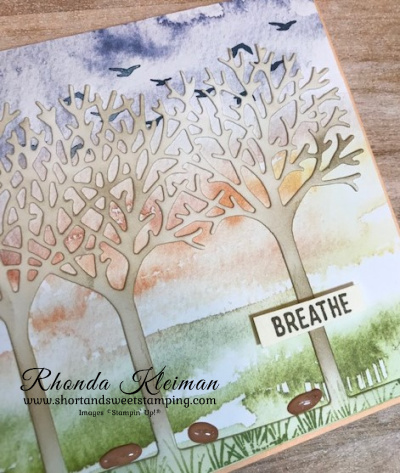
  • Cut a 4″ square piece of Basic White cardstock. Stamp the floral image using the direct to rubber technique. Color the flowers onto the stamp with a Calypso Coral Stampin’ Write marker. Color the leaves and stems with a Soft Succulent Stampin’ Write marker. Huff on the stamp to activate the ink and stamp onto the cardstock. This is a Distinktive stamp set, which will give you a photo realistic and beautifully shaded image. Brush image with Wink of Stella to add shimmer.
  • Cut out image with the largest scalloped die from the Hippo & Friend Die set. Note that this set of dies is now retired. You can use any other die that is similar in shape and size.
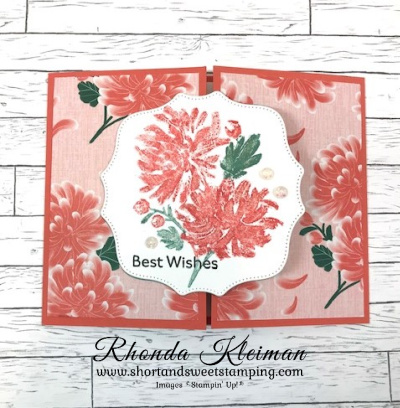
  • Stamp greeting with Evening Evergreen ink. I used one of the greetings from the Art Gallery stamp set. Embellish with three Opal Rounds.
  • Die cut a piece of Soft Succulent cardstsock with the same Hippo die and adhere to back of the stamped image.
  • Apply adhesive or liquid glue to the left side of the image and adhere to the left front flap.
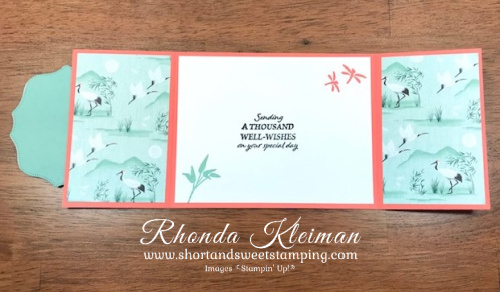
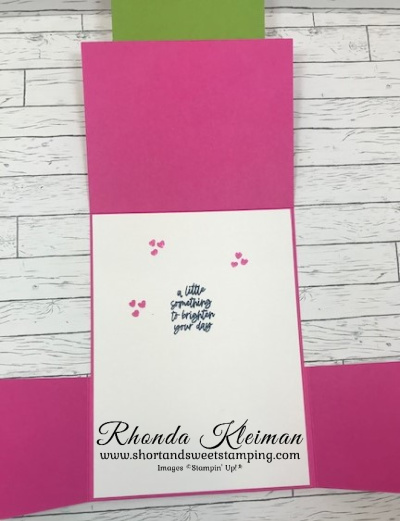
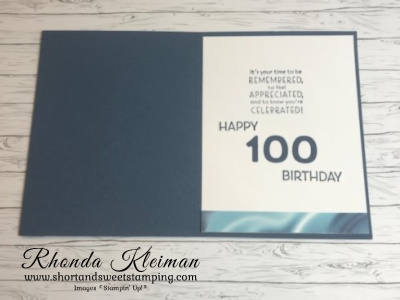
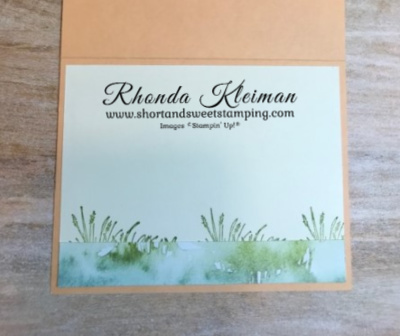
  • Cut a piece of Basic White cardstock at 4″ x 5 1/4″. Stamp greeting from Crane of Fortune stamp set with Evening Evergreen ink. Stamp dragonfly image in upper right corner with Calypso Coral ink. Stamp leaf image with Soft Succulent ink in bottom left corner. Adhere to inside of card.

Thanks for stopping by today!

The January–June 2022 Mini Catalog will be retiring soon! With every retiring catalog comes a spectacular sale: the Last Chance Products promotion! With this sale, you can stock up on your favorite products before they’re gone for good. Save up to 50% on essential craft supplies starting on June 1, 2022, with availability while products last.

Click here to view the list of retiring products.

Join Stampin’ Up! now through May 31. Choose $125 worth of products for $99 plus get $66.50 in bonus 2022-2024 In Color Products for free! Here are the free items that will be added to your starter kit.

  • 2022-2024 In Color Grid Paper – Item number 160009
  • 2022-2024 In Color Ink Pad Collection – Item number 161108
  • 2022-2024 In Color Cardstock Collection – 159204
  • 2022 In Color 6″ x 6″ Designer Series Paper Assortment – Item number 159253

In addition, you will receive a free Paper Pumpkin Kit and free shipping. You do not have to build a business! Become a happy discount shopper and enjoy a minimum 20% discount on all future orders. Click here to learn more about the benefits of joining Stampin’ Up! For further information about joining my team, click here.

Place an online order between $50 and $149 and use this host code for May. You will receive a free gift from me the following month.  If your order is $150 or more DO NOT use the host code. You will qualify for Stampin’ Rewards.

Product List

Rainbow of Happiness Double Dutch Door Fold

Hello! I haven’t been posting much lately. Sadly, my father, who turned 100 years old in January, unexpectedly passed away three weeks ago so I’ve had to put my projects on the back burner. My father was a kind and wonderful man, and everyone that knew him described him as a gentleman. He was an educator, teaching industrial arts for many years. His carpentry work was beautiful and he spent hours making exquisite model ships with thousands of pieces of wood and thread. He wasn’t only my father – he was also my mentor and friend and I will miss him more than I can say. I’d like to think that my artistic sensibilities and creativity came from him. So, for now, while I am back making cards and have started my in-person classes up again, I will probably be posting sporadically for the next month or two as I tend to my consulting business and taking care of my father’s business as well.

Today’s card is one of four projects we made at my stamping club yesterday and it features the Rainbows of Happiness Bundle and the coordinating Sunshine & Rainbows Designer Series Paper that you can get for free with a $50 purchase during Sale-A-Bration. The Sale-A-Bration promotion ends tomorrow, February 28th, so you have just two days left to get this DSP! I’ve been wanting to make a card using the Double Dutch Door fold for quite some time and thought these products would lend themselves perfectly to this fun fold. It is a super easy fold and a great way to show off Designer Series Papers you have in your stash.

Here is how I made the card.

  • Card base – Cut one piece of Magenta Madness cardstock at 8 3/4″ x 4 1/2″, score at 5 1/2″, fold and crease with a bone folder. Cut another piece of Magenta Madness cardstock at 8 1/2″ x 2 1/4″ and score at 2 1/8″ from each end. Fold and crease sharply with a bone folder.
  • For the top flap, cut piece of striped paper from the Sunshine and Rainbows Designer series paper at 4″ x 3 1/8″. The stripes are directional so keep it in mind when cutting so that they are vertical and not horizontal. Adhere to flap.
  • Cut two pieces of the polka dot DSP at 2″ x 2 1/8″ and adhere to each of the side flaps.
  • Adhere the front panel to the side panel.
  • Cut a piece of Basic White cardstock at 2 7/8″ square. Stamp three rainbow arcs with Magenta Madness, Granny Apple Green and Bermuda Bay ink. I started by using the next to largest stamp for the Magenta Madness arc. When stamping, leave enough room to stamp the greeting at the bottom of the piece. Stamp the greeting with Misty Moonlight ink. Cut three clouds from a scrap piece of Mango Melody cardstock with the dies from the Brilliant Rainbow Dies. Adhere to both sides at the bottom of the rainbow image.
  • Cut a piece of Granny Apple Green cardstock at 3″ square. Adhere it to the stamped image. Adhere piece to the top flap with Stampin’ Dimensionals.
  • Cut a piece of Basic White cardstock at 4″ x 5 1/4″. Stamp greeting with Misty Moonlight ink. Stamp small hearts with Magenta Madness ink. Adhere to inside of card.

I was cheered up as I was making this card. I love the fun images and bright colors!

Thanks for stopping by today!

There are only two days remaining for Sale-A-Bration! View the Sale-A-Bration brochure by clicking on the image on the right side-bar. This is a great time to join Stampin’ Up!  Select $125 worth of products for only $99 and you will also get two FREE stamp sets (excluding host sets and SAB sets) of your choice! The kit ships for free. As a demonstrator you will enjoy a 20% discount on all future orders. Become a happy discount shopper or build a business – the choice is yours. I’d love to have you join my team! Click here to learn more about the benefits of joining Stampin’ Up! 

The Beyond the Horizon Paper Pumpkin Kit includes watercolor prints and designs inspired by the beautiful nature around us to create nine cards and coordinating envelopes. And paper pieces that perfectly coordinate with the New Horizons Suite Collection in the January–June 2022 Mini Catalog. And if you thought one stamp set was great just wait—this month’s kit comes with a BONUS stamp set for FREE! That’s two stamp sets in one kit! It’s our way of saying THANK YOU to you our Paper Pumpkin subscribers. Create 3 each of 3 different designs. Coordinating colors: Bumblebee, Calypso Coral, Evening Evergreen, Misty Moonlight, Night of Navy, Old Olive, Pale Papaya. For further information and to subscribe, click here to visit my Paper Pumpkin website.

Place an online order between $50 and $149 and use this host code for February. You will receive a free gift from me the following month.  If your order is $150 or more DO NOT use the host code. You will qualify for Stampin’ Rewards.

Product List

Love & Happiness

Hello and Happy Valentine’s Day! Today’s card features the Love & Happiness Bundle in the January-June 2022 Mini Catalog. I used the more traditional colors for the card – red, white, and black. I CASE’d this card from Mary Fish and you can see her card here.

Here is how I made the card.

  • Card base – cut piece of Basic Black cardstock at 5 1/2″ x 8 1/2″, score at 4 1/4″, fold and crease with a bone folder.
  • Cut a piece of the black and white stripe paper from the Pattern Party Designer Series Paper at 3″ x 4″ and adhere to right side of card front.
  • Cut piece of Basic White cardstock at 3 1/2″ x 4 3/4″ and run through the die cutting machine with the next-to-largest die from the Scalloped Contours Dies.
  • Cut a piece of the red and white Playful Pets ribbon at 15″, wrap around scalloped piece and tie in a bow.
  • Cut a piece of Real Red cardstock at 2 3/4″ x 3 1/4″ and run through the Bouquet of Love Hybrid Embossing Folder, centering the cardstock in the center of the folder so that it covers the entire heart in the middle of the folder. Don’t forget to place the heart die from the hybrid folder die set inside the folder. Adhere to the scalloped rectangle. Adhere rectangle to card front.
  • Stamp greeting from Catching Butterflies stamp set with Memento ink on scrap piece of Basic White cardstock and run through die cutting machine with the larger label die from the hybrid embossing folder set. Adhere over the embossed heart with Stampin’ Dimensionals.
  • Stamp greeting from the Love & Happiness stamp on a 4″ x 5 1/4″ piece of Basic White cardstock with Memento ink. Adhere to inside of card.
  • Adhere two Matte Black Dots to card as shown.

Thanks for stopping by today!

Sale-A-Bration runs through February 28th and is a great time to join Stampin’ Up!  Select $125 worth of products for only $99 and you will also get two FREE stamp sets (excluding host sets and SAB sets) of your choice! The kit ships for free. As a demonstrator you will enjoy a 20% discount on all future orders. Become a happy discount shopper or build a business – the choice is yours. I’d love to have you join my team! Click here to learn more about the benefits of joining Stampin’ Up! 

The All Together Collection includes early-release products from the 2022–2023 Annual Catalog—an exciting new range of natural Stampin’ Blends.  There are six different combo packs ranging from light to deep skin tones.  These packs can be purchased separately or as a collection.  In addition to using these blends for skin tones, they will work beautifully for coloring animals, tree trunks and other nature images.  Note that these blends do not have color names – they are numbered, and they are different colors than the browns and neutrals in our current collection of Stampin’ Blends. Click here for detailed information in my online store.

Place an online order between $50 and $149 and use this host code for February. You will receive a free gift from me the following month.  If your order is $150 or more DO NOT use the host code. You will qualify for Stampin’ Rewards.

Product List
Paper Snips
[103579]
$10.00

Friendly Hello

Hello! Today’s card features the Friendly Hello stamp set and coordinating Designer Series Paper that you can earn for free with a $100 purchase during Sale-A-Bration. This is such a sweet stamp set and the DSP designs are soft and pretty. The card layout is one I frequently use, usually in landscape, however, I chose to do this card in portrait because it looked much better this way as I was designing the card!

Here is how I made the card.

  • Card base – cut a piece of Fresh Freesia cardstock at 4 1/4″ x 11″, score at 5 1/2″, fold and crease with a bone folder.
  • Cut a piece of Pool Party cardstock at 4″ x 4″ square. Cut a piece of the striped paper from the Friendly Hello DSP at 3 7/8″ x 3 7/8″ square and adhere to Pool Party cardstock.
  • Cut a length of Fresh Freesia 3/8″ Open Weave Ribbon and tie in a bow around the Pool Party Piece. Adhere to card base.
  • Cut a piece of Basic White cardstock at 3 1/2″ x 4 3/4″ and run through the Stampin’ Cut & Emboss Machine with the next to largest die from the Scalloped Contours Dies.
  • Stamp the bird image with Memento Tuxedo Black Ink. Color the bird with the light and dark Pool Party Stampin’ Blends. Color the flowers with the light and dark Petal Pink Stampin’ Blends. Color the leaf stem with the light Granny Apple Green Stampin’ Blend.
  • Stamp the greeting below the bird image with Fresh Freesia ink.
  • Adhere die cut piece to card front. Add an Irridescent Rhinestone to the center of each flower.
  • For the inside of the card, cut a piece of Basic White cardstock at 4″ x 5 1/4″. I used the birthday greeting from the set and stamped it with Fresh Freesia ink. Stamp the small floral image in the bottom left corner and color with Stampin’ Blends. Adhere to inside of card.

Thanks for stopping by today!

The All Together Collection includes early-release products from the 2022–2023 Annual Catalog—an exciting new range of natural Stampin’ Blends.  There are six different combo packs ranging from light to deep skin tones.  These packs can be purchased separately or as a collection.  In addition to using these blends for skin tones, they will work beautifully for coloring animals, tree trunks and other nature images.  Note that these blends do not have color names – they are numbered, and they are different colors than the browns and neutrals in our current collection of Stampin’ Blends. Click here for detailed information in my online store.

Sale-A-Bration runs through February 28th and is a great time to join Stampin’ Up!  Select $125 worth of products for only $99 and you will also get two FREE stamp sets (excluding host sets and SAB sets) of your choice! The kit ships for free. As a demonstrator you will enjoy a 20% discount on all future orders. Become a happy discount shopper or build a business – the choice is yours. I’d love to have you join my team! Click here to learn more about the benefits of joining Stampin’ Up! 

Product List
Paper Snips
[103579]
$10.00

Seas the Day Birthday Card

Hello! Last Sunday my father turned 100 years old! He is a wonderful man and I treasure every minute I’m able to spend with him. I set up a Zoom gathering so that family and friends could join in the celebration and we had a great time reminiscing. One of my most favorite stamp sets for making cards for men is Sailing Home and I decided to use the light house as focal point. I also thought that the large frame die in the Sea Dies from the Seas the Day bundle would be a perfect accent. The Simply Marbelous Designer Series Paper, one of the free Sale-A-Bration items, made for a great background piece because it looks like water. I used bits and pieces from several other stamp and die sets, making this card a mashup!

Here is how I made the card.

  • Card base – cut a piece of Misty Moonlight cardstock at 5 1/2″ x 8 1/2″, score at 4 1/4″, fold and crease with a bone folder.
  • Cut a piece of Balmy Blue cardstock at 4″ x 5 1/4″. Run through the Stampin’ Cut and Emboss Machine with the large frame die from the Sea Dies set. Use a sponge dauber or blending brush and Shaded Spruce ink to lightly accent the seaweed pieces at the bottom of the frame.
  • Cut a piece of Basic White cardstock at 2 1/2″ x 3 1/2″. Stamp the lighthouse from the Sailing Home stamp set with Basic Gray ink. Run through die cutting machine with the coordinating die from the Smooth Sailing Dies set. Brush Wink of Stella over the image.
  • Stamp greeting from the Handsomely Suited stamp set on scrap piece of Basic White cardstock with Misty Moonlight ink. Cut out with any die or punch that will fit the greeting.
  • Cut a piece of the Balmy Blue paper from the Simply Marbleous DSP at 4″ x 5 1/4″. At the bottom third of the paper, stamp the sand image from the Oceanfront stamp set with Crumb Cake ink multiple times. Stamp the long leaf image on the right side of the paper with Shaded Spruce ink three times. Stamp the seagulls from the Sailing Home stamp set in the upper middle of the paper with Misty Moonlight ink two times.
  • Place the lighthouse on the DSP and then place the frame over it to position the lighthouse. Once it looks good, remove the frame and adhere the lighthouse. Adhere the frame over the DSP. Adhere piece to card base.
  • Adhere the greeting with dimensionals. Adhere a variety of Pebbles Enamel Shapes around the bottom of the frame.
  • For the inside of the card, cut a piece of Basic White cardstock at 4″ x 5 1/4″. Stamp greeting from the Inspired Thoughts stamp set. This set has a wonderful variety of greetings for all occasions. Stamp Happy Birthday on scrap piece of cardstock . I used the greeting from the Artistically Inked stamp set and cut the words apart.
  • For the numbers, cut a piece of an adhesive sheet the same size as a scrap piece of Misty Moonlight cardstock. Use the numbers from the Playful Alphabet Dies and run through the die cutting machine. Arrange the words and numbers and adhere. I also used part of the remaining piece of DSP to cut a strip at 3/4″ x 4″ and adhered on the reverse side at the bottom of the piece. Adhere entire piece to inside of card.

Thanks for stopping by today!

Answer the call of the wild—and your creativity—with the Safari Celebration Paper Pumpkin Kit. This playful, party-themed kit includes all the goodies and gear you need to create nine cards and coordinating envelopes in safari-inspired shapes and patterns you’ll go wild for! Make every occasion a celebration with this month’s amusing animals, beautiful botanicals, and celebratory sentiments. Card size is 4 1/4″ x 5 1/2″, 3 each of 3 different designs. A Rich Razzleberry Stampin’ Spot comes in the kit. Coordinating colors: Bumblebee, Fresh Freesia, Pear Pizzazz, Rich Razzleberry, Soft Succulent, Soft Suede. Visit my Paper Pumpkin website here to subscribe and order the kit.

A new addition to the Kits Collection: Light the Candles—a birthday card kit, is now available. This kit features bright colors, sparkly embellishments, and a simple peek-through technique. These cards are perfect for wishing the happiest of birthdays, or to use as invitations to an exciting birthday bash! Now is the perfect time to stock up on birthday cards to use throughout the year. The kit includes supplies to create 8 cards, 2 each of 4 different designs; printed card bases and die cuts, embellishments, adhesives, clear block; exclusive stamp set and Coastal Cabana Stampin’ Spot; Coordinating colors: Coastal Cabana, Daffodil Delight, Magenta Madness, Mango Melody, Night of Navy. Item #159332, Cost of Kit is $19.00. To purchase the kit, visit my online store by clicking on the shop online icon at the bottom of this post.

Place an online order between $50 and $149 and use this host code for January. You will receive a free gift from me the following month.  If your order is $150 or more DO NOT use the host code. You will qualify for Stampin’ Rewards.

Product List
Sea Dies
[157857]
$36.00

Sweet Talk Tailor Made Tags Card

Hello! Today’s card is one of five cards from my January Valentine’s Day class-to go. All of the projects featured products from the Sweet Talk Suite in the January-June 2022 Mini Catalog. I cased the card from one that is shown on page 10 in the catalog. This card was quick and easy to make and shows off the fun Designer Series Paper.

Here is how I made the card.

  • Card base – Cut piece of Real Red cardstock at 4 1/4″ x 11″, score at 5 1/2″, fold and crease with a bone folder.
  • Cut a piece of Sweet Talk Designer Series Paper at 4″ x 5 1/4″ and adhere to card front.
  • Cut a piece of the Highland Heather sheet of DSP with the words written in white at 2 1/4″ x 4 1/2″. Run through the Stampin’ Cut & Emboss Machine with the largest Tailor Made Tag with the rounded top.
  • Cut a piece of Basic White cardstock at 2 1/4″ x 4 1/2″ and run through the machine with the same tag die.
  • Cut an 8″ length of ribbon to tie the two tags together. I used some retired Highland Heather ribbon that was a Sale-a-Bration item a few years ago, so you can use any ribbon in your stash that matches the colors in the DSP. Put the two tags together and insert ribbon into both of the holes and tie with a slip knot. Trim ends.
  • To make the words for the tag, use a scrap piece of Real Red cardstock that measures 1 1/4″ x 2 1/4″. Cut a piece of Foam Adhesive Sheet the same size, peel off one of the backings and adhere to cardstock. Cut letters from the Playful Alphabet Dies – one “L”, one “V” and two “U”. Run through the Cut and Emboss Machine. Peel backings off the letters and adhere to the Basic White tag as shown.
  • Stamp hearts with Blushing Bride ink at bottom of tag. I used a stamp from the Love Notes stamp set, which is retired. If you own the Sweet Conversations stamp set you can use the image with the three small hearts.
  • Adhere tags to front of card. Adhere the Highland Heather tag first, placing it at an angle. Adhere the Basic White tag over it, straight up and down.
  • Cut a piece of Basic White cardstock at 4″ x 5 1/4″ and stamp a Valentine’s Day greeting of your choice. Adhere to inside of card.

Thanks for stopping by today!

Sale-A-Bration is a great time to join Stampin’ Up!  Select $125 worth of products for only $99 and you will also get two FREE stamp sets (excluding host sets and SAB sets) of your choice! The kit ships for free. As a demonstrator you will enjoy a 20% discount on all future orders. Become a happy discount shopper or build a business – the choice is yours. I’d love to have you join my team! Click here to learn more about the benefits of joining Stampin’ Up! 

Answer the call of the wild—and your creativity—with the Safari Celebration Paper Pumpkin Kit. This playful, party-themed kit includes all the goodies and gear you need to create nine cards and coordinating envelopes in safari-inspired shapes and patterns you’ll go wild for! Make every occasion a celebration with this month’s amusing animals, beautiful botanicals, and celebratory sentiments. Card size is 4 1/4″ x 5 1/2″, 3 each of 3 different designs. A Rich Razzleberry Stampin’ Spot comes in the kit. Coordinating colors: Bumblebee, Fresh Freesia, Pear Pizzazz, Rich Razzleberry, Soft Succulent, Soft Suede. Visit my Paper Pumpkin website here to subscribe and order the kit.

A new addition to the Kits Collection: Light the Candles—a birthday card kit, is now available. This kit features bright colors, sparkly embellishments, and a simple peek-through technique. These cards are perfect for wishing the happiest of birthdays, or to use as invitations to an exciting birthday bash! Now is the perfect time to stock up on birthday cards to use throughout the year. The kit includes supplies to create 8 cards, 2 each of 4 different designs; printed card bases and die cuts, embellishments, adhesives, clear block; exclusive stamp set and Coastal Cabana Stampin’ Spot; Coordinating colors: Coastal Cabana, Daffodil Delight, Magenta Madness, Mango Melody, Night of Navy. Item #159332, Cost of Kit is $19.00. To purchase the kit, visit my online store by clicking on the shop online icon at the bottom of this post.

Place an online order between $50 and $149 and use this host code for January. You will receive a free gift from me the following month.  If your order is $150 or more DO NOT use the host code. You will qualify for Stampin’ Rewards.

Product List
Paper Snips
[103579]
$10.00

New Horizons Meets Inspiring Canopy

Hello! Today’s card features products from the New Horizons Suite in the January-June 2022 Mini Catalog, along with Inspiring Canopy, one of my favorite dies from the annual catalog.

This suite was the first thing that caught my eye in the new mini catalog, especially the stunning designer series paper. You can make simple and beautiful cards with just the DSP alone and a greeting, however the fun comes in when using the DSP as a backdrop to incorporate die cuts, stamped images, and accessories.

Here is how I made the card.

  • Card base – cut a piece of Pale Papaya cardstock at 5 1/2″ x 8 1/2″, score at 4 1/4″, fold and crease with a bone folder.
  • Select a piece of paper from the New Horizons Designer Series Papers and trim to 5 3/8″ x 4 1/8″. I chose a paper that had more subtle sections of grass and sky to get the look I wanted. In the upper right corner of the DSP, stamp the seagulls from the On the Horizon stamp set with Misty Moonlight ink once at full strength. Stamp the image again, moving slightly down and to the left of the first image, and stamping off once before stamping onto the paper.
  • Cut a piece of Very Vanilla cardstock at 4″ x 5 3/4″ and run it through the Cut & Emboss Machine with the trees from the Inspiring Canopy dies.
  • Color the trees using blending brushes. I used Old Olive as the primary color for the grass, adding a bit of Soft Succulent. For the tree trunks and branches I started with Soft Suede for the tree trunks, Crumb Cake for the bottom portion of the branches and Sahara Sand for the tops of the branches, going over each section to build up the color. I also stamped the grass part with the smallest grass image from the Oceanfront stamp set. I used Old Olive ink and randomly stamped the image across the area, some at full strength and some stamping off first.
  • Adhere the die cut to the DSP with liquid glue. You can also use adhesive sheets but you have to prep the cardstock with the sheet prior to die cutting.
  • Adhere the DSP piece to card front with Stampin’ Dimensionals.
  • Stamp “Breathe” with Soft Suede ink on a scrap piece of Very Vanilla cardstock and trim with Paper Snips Scissors. Adhere to card front with Mini Stampin’ Dimensionals. My strip of cardstock was narrow so I cut the dimensionals in half.
  • I added some Cinnamon Cider embellishments from the Pebbles Enamel Shapes right above the grassy area for an added accent.
  • For the inside of the card, cut a piece of Very Vanilla cardstock at 4″ x 5 1/4″.
  • Stamp the large grass image from the On the Horizon stamp set with Old Olive ink several times approximately 1 1/2″ from the bottom of the piece. Alternate stamping at full strength and stamping off. I used one of the strips of DSP that was left over from the piece I used for the card front, cutting it down to 3/4″ x 5 1/4″ and adhered it to the bottom of the piece, covering up the bottoms of the stamped leaves, leaving just the top of the leaves showing.

Thanks for stopping by today!

Sale-A-Bration is a great time to join Stampin’ Up!  Select $125 worth of products for only $99 and you will also get two FREE stamp sets (excluding host sets and SAB sets) of your choice! The kit ships for free. As a demonstrator you will enjoy a 20% discount on all future orders. Become a happy discount shopper or build a business – the choice is yours. I’d love to have you join my team! Click here to learn more about the benefits of joining Stampin’ Up! 

Place an online order between $50 and $149 and use this host code for January. You will receive a free gift from me the following month.  If your order is $150 or more DO NOT use the host code. You will qualify for Stampin’ Rewards.

Product List
Paper Snips
[103579]
$10.00