Ornate Garden Meets Healing Hugs

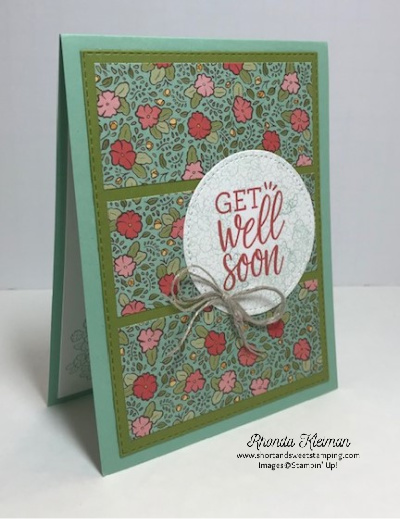
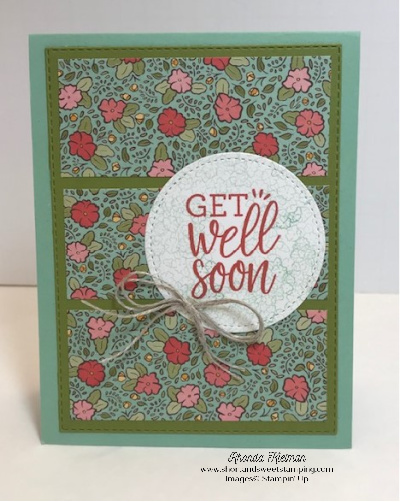
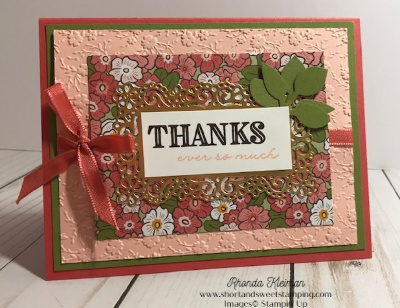
Hello! I recently needed to send a get well card so I created this card using products from the Ornate Garden suite and combined it with the Healing Hugs stamp set, which is a favorite of mine for get well cards. As I was checking out some demonstrator blogs I saw a number of cards with a layout that I thought would be easy to make, showcase our Designer Series Papers and make a pretty card all at the same time. The layout is from Sunday Stamps, a weekly challenge. You can click here to view the blog post in which this layout appeared in April 2019.

Here is how I made the card.

  • Card base – cut a piece of Mint Macaron cardstock at 4 1/4″ x 11″, score and fold in half.
  • Die cut a piece of Old Olive cardstock with the largest die in the Stitched Rectangles dies set and adhere to card front.
  • Cut three strips of paper from the Ornate Garden Specialty Designer Series Paper at 3 1/2″ x 1 1/2″. Adhere to Old Olive piece leaving space in between each strip.
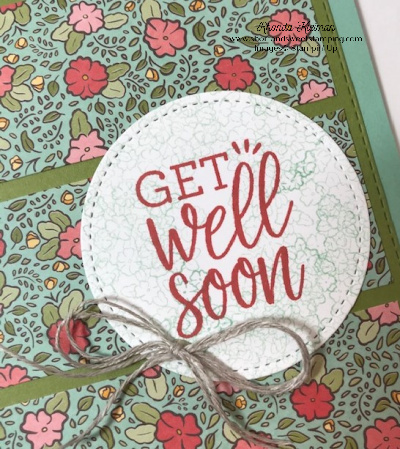
  • Stamp get well sentiment from Healing Hugs stamp set with Terracotta Tile ink on scrap piece of Whisper White cardstock. Using the small floral cluster stamp from the Ornate Style stamp set, stamp all over the greeting with Mint Macaron ink, stamping off each time before stamping onto the greeting. Cut greeting using the next-to-largest circle die in the Stitched Shapes die set. Adhere to card front.
  • Cut two pieces of linen thread and tie into bow. Adhere to greeting with a Mini Glue Dot.
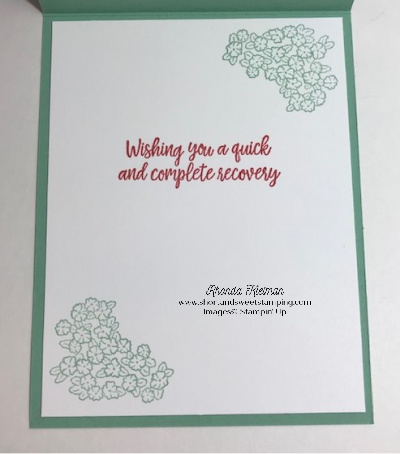
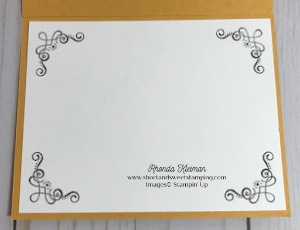
  • For the inside of the card cut a piece of Whisper White cardstock at 4″ x 5 1/2″. Stamp the floral cluster with Mint Macaron ink in opposite corners. Stamp greeting with Terracotta Tile ink. Adhere to card.

Only one week left for the Bonus Days promotion! Now through August 3rd, for every $50 you spend (before shipping & tax) you will receive a $5 Bonus Day coupon code that can be used from August 4th – 31st. Use the coupons to purchase products from the 2020-2021 Annual Catalog and the August-December Mini Catalog that goes live on August 4th.

Thanks for stopping by today!

 Product List  

Ornate Thanks

Today I’m sharing another card I made with products from the Ornate Garden suite. I cased a card by Anne Marie Hile that was part of an Ornate Garden Suite Mega Tutorial.

Here is how I made the card.

  • Card base – cut piece of Terracotta Tile cardstock at 5 1/2″ x 8 1/2″, score and fold in half.
  • Cut piece of Old Olive cardstock at 4″ x 5 1/4″ and adhere to card base.
  • Cut piece of Petal Pink cardstock at 3 3/4″ x 5″ and run through embossing machine with the Ornate Floral 3D Embossing Folder. Cut piece of Terracotta Tile ribbon from the Ornate Garden Ribbon Combo Pack and tie in bow around this piece. Adhere to Old Olive mat.
  • Cut piece of paper from the Ornate Garden Specialty Designer Series Papers at 3″ x 4″.
  • Cut scrap piece of Whisper White cardstock at 1 1/8″ x 2 1/2″. Stamp thanks greeting from the Ornate Thanks stamp set with Early Espresso ink. Stamp “ever so much” or other greeting of your choice from this set with Petal Pink ink.
  • Cut piece of Gold Foil paper at 2 1/2″ x 3 1/2″ and cut with the third smallest of the wider labels from the Ornate Layers die set. I punched two sets of Old Olive leaves with the Leaf Punch, which is now retired, so you can substitute it with any of the leaves that are included in die sets in your collection.
  • Adhere leaves in upper right corner of the foil piece. Adhere greeting piece to foil piece. Adhere the decorated foil piece to the DSP.
  • Cut piece of Whisper White cardstock at 4″ x 5 1/4″. Stamp filigree image with Early Espresso ink in each of the four corners and adhere piece to inside of card.

Thanks for stopping by today!

Place an individual or group order of $250 or more now through June 30th and receive an additional $25 in Stampin’ Rewards! This is on top of the standard host rewards that you get with an order of $150 or more.

Now is a great time to join Stampin’ Up! as either a demonstrator or a “happy discount shopper!” You get to pick $125 worth of products for only $99, plus you get free shipping. Now through June 30th you will also get to pick any bundle of your choice for free! Choose either a stamp set with coordinating punch or set of dies. There are some fabulous bundles to choose from in the new catalog. I would love to have you be part of my team. Click here to learn how.

 Product List  

Ornate Garden-Daisies

Hello! Today’s card features the Ornate Garden Suite. This suite includes two bundles: Ornate Thanks is a photopolymer stamp set with greetings that can be mixed and matched and coordinates with the Ornate Borders die set; Ornate Style stamp set is red rubber and has floral images that can be colored and coordinates with the Ornate Layers dies. For this card I chose to showcase the daisy image.

Here is how I made the card.

  • Card base – cut piece of Bumblebee cardstock at 5 1/2″ x 8 1/2″, score at 4 1/4″ and fold in half.
  • Cut piece of daisy print paper from the Ornate Garden Specialty Designer Series Papers at 4 1/4″ x 5 1/2″ and cut out using the largest frame from the dies with the wider widths. Adhere to card base.
  • Cut piece of Old Olive cardstock at 2 1/4″ x 5 1/4″ and cut out using the next to largest die from the dies with the narrower widths. Adhere to center of DSP piece.
  • Cut two pieces of Whisper White cardstock at 2″ x 3 1/4″. Stamp daisy image with Black Memento Ink on both pieces. Color images with light and dark Daffodil Delight, light and dark Old Olive and dark Soft Suede Stampin’ Blends. Leave some white areas on the tips of the flower petals. Cut with the third smallest rectangle die from the Stitched So Sweetly die set.
  • Adhere to Old Olive panel with Stampin’ Dimensionals, staggering them so that one is higher than the other.
  • Finish off by adding a Gilded Gem to each of the daisy pieces.
  • Cut piece of Whisper White cardstock at 4″ x 5 1/4″. Stamp the filigree design with Early Espresso ink in all four corners. Adhere to inside of the card.

Thanks for stopping by today!

 Product List