
Hello! Last Sunday my father turned 100 years old! He is a wonderful man and I treasure every minute I’m able to spend with him. I set up a Zoom gathering so that family and friends could join in the celebration and we had a great time reminiscing. One of my most favorite stamp sets for making cards for men is Sailing Home and I decided to use the light house as focal point. I also thought that the large frame die in the Sea Dies from the Seas the Day bundle would be a perfect accent. The Simply Marbelous Designer Series Paper, one of the free Sale-A-Bration items, made for a great background piece because it looks like water. I used bits and pieces from several other stamp and die sets, making this card a mashup!

Here is how I made the card.
- Card base – cut a piece of Misty Moonlight cardstock at 5 1/2″ x 8 1/2″, score at 4 1/4″, fold and crease with a bone folder.
- Cut a piece of Balmy Blue cardstock at 4″ x 5 1/4″. Run through the Stampin’ Cut and Emboss Machine with the large frame die from the Sea Dies set. Use a sponge dauber or blending brush and Shaded Spruce ink to lightly accent the seaweed pieces at the bottom of the frame.
- Cut a piece of Basic White cardstock at 2 1/2″ x 3 1/2″. Stamp the lighthouse from the Sailing Home stamp set with Basic Gray ink. Run through die cutting machine with the coordinating die from the Smooth Sailing Dies set. Brush Wink of Stella over the image.
- Stamp greeting from the Handsomely Suited stamp set on scrap piece of Basic White cardstock with Misty Moonlight ink. Cut out with any die or punch that will fit the greeting.

- Cut a piece of the Balmy Blue paper from the Simply Marbleous DSP at 4″ x 5 1/4″. At the bottom third of the paper, stamp the sand image from the Oceanfront stamp set with Crumb Cake ink multiple times. Stamp the long leaf image on the right side of the paper with Shaded Spruce ink three times. Stamp the seagulls from the Sailing Home stamp set in the upper middle of the paper with Misty Moonlight ink two times.
- Place the lighthouse on the DSP and then place the frame over it to position the lighthouse. Once it looks good, remove the frame and adhere the lighthouse. Adhere the frame over the DSP. Adhere piece to card base.
- Adhere the greeting with dimensionals. Adhere a variety of Pebbles Enamel Shapes around the bottom of the frame.
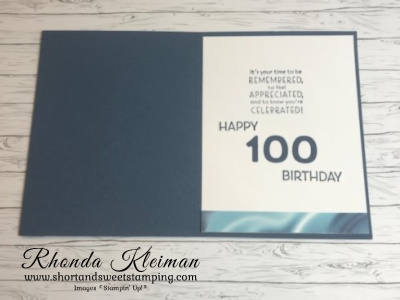
- For the inside of the card, cut a piece of Basic White cardstock at 4″ x 5 1/4″. Stamp greeting from the Inspired Thoughts stamp set. This set has a wonderful variety of greetings for all occasions. Stamp Happy Birthday on scrap piece of cardstock . I used the greeting from the Artistically Inked stamp set and cut the words apart.
- For the numbers, cut a piece of an adhesive sheet the same size as a scrap piece of Misty Moonlight cardstock. Use the numbers from the Playful Alphabet Dies and run through the die cutting machine. Arrange the words and numbers and adhere. I also used part of the remaining piece of DSP to cut a strip at 3/4″ x 4″ and adhered on the reverse side at the bottom of the piece. Adhere entire piece to inside of card.

Thanks for stopping by today!


Answer the call of the wild—and your creativity—with the Safari Celebration Paper Pumpkin Kit. This playful, party-themed kit includes all the goodies and gear you need to create nine cards and coordinating envelopes in safari-inspired shapes and patterns you’ll go wild for! Make every occasion a celebration with this month’s amusing animals, beautiful botanicals, and celebratory sentiments. Card size is 4 1/4″ x 5 1/2″, 3 each of 3 different designs. A Rich Razzleberry Stampin’ Spot comes in the kit. Coordinating colors: Bumblebee, Fresh Freesia, Pear Pizzazz, Rich Razzleberry, Soft Succulent, Soft Suede. Visit my Paper Pumpkin website here to subscribe and order the kit.

A new addition to the Kits Collection: Light the Candles—a birthday card kit, is now available. This kit features bright colors, sparkly embellishments, and a simple peek-through technique. These cards are perfect for wishing the happiest of birthdays, or to use as invitations to an exciting birthday bash! Now is the perfect time to stock up on birthday cards to use throughout the year. The kit includes supplies to create 8 cards, 2 each of 4 different designs; printed card bases and die cuts, embellishments, adhesives, clear block; exclusive stamp set and Coastal Cabana Stampin’ Spot; Coordinating colors: Coastal Cabana, Daffodil Delight, Magenta Madness, Mango Melody, Night of Navy. Item #159332, Cost of Kit is $19.00. To purchase the kit, visit my online store by clicking on the shop online icon at the bottom of this post.

Place an online order between $50 and $149 and use this host code for January. You will receive a free gift from me the following month. If your order is $150 or more DO NOT use the host code. You will qualify for Stampin’ Rewards.
Product List  |  |  |
 |  |  |
 | ||
 | ||
 |  |  |
 |  |  |
 |


 Designer Series Paper")


 Braided Linen Trim")


