Fresh Freesia Flowers of Friendship

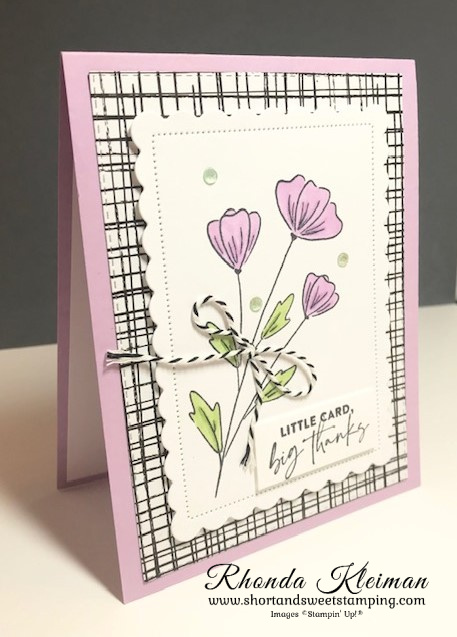
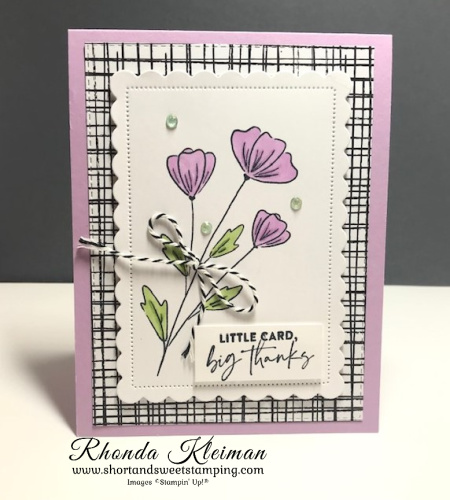
Hello! I hope you had a wonderful July 4th! It was great to see people out and about and celebrating the holiday this year. I was finally able to hold my first in-person club last Saturday for the first time since February 2020 and it was so nice to see my customers and stamp together! This is one of the cards we made. I love all of the new InColors, however, Fresh Freesia is definitely my most favorite. I paired it with one of the black and white papers from the Pattern Party DSP, which you can earn for free with Stampin’ Rewards.

Here is how I made the card.

  • Card base – cut a piece of Fresh Freesia cardstock at 4 1/4″ x 11″, score at 5 1/2″, fold and crease with a bone folder.
  • Cut piece of DSP at 4″ x 5 1/4″. Die cut with the largest Stitched Rectangles dies and adhere to card front.
  • Cut piece of Basic White cardstock at 3 1/2″ x 4 3/4″ and die cut with the second largest frame die from the Scalloped Contours dies.
  • Stamp the large floral image from the Flowers of Friendship stamp set with Tuxedo Black Memento ink on the Basic White scalloped piece. Color the flowers with Fresh Freesia and Granny Apple Green Stampin’ Blends. Adhere to card front with Stampin’ Dimensionals.
  • Cut piece of Basic White cardstock at 3/4″ x 1 3/4″. Stamp greeting with Memento ink. Adhere to floral piece with Stampin’ Dimensionals.
  • Embellish the floral piece. Tie a bow with the Playful Pets black and white bakers twine and adhere with a glue dot. Adhere three Mint Macaron Genial Gems.

Thanks for stopping by today!

These Designer Series Papers are now on sale at 15% off. Stock up on your favorites!

  • Beauty of the Earth
  • Bloom Where You’re Planted
  • Hand-Penned
  • In Good Taste
  • In the Wild
  • Pansy Petals
  • Sweet Symmetry
  • Tidings of Christmas
  • You’re a Peach

Place an online order between $50 and $149 and use this host code for June. You will receive a free gift from me the following month.  If your order is $150 or more DO NOT use the host code. Click here for instructions on how to use the host code.

Product List
Paper Snips
[103579]
$10.00

Flowers of Friendship-Kylie’s Training Blog Hop

Hello! Welcome to Kylie Bertucci’s Demonstrator Training Blog Hop for May. I’m part of a group of Stampin’ Up! demonstrators from around the world that participate in Kylie’s program for building our businesses. The theme for this year is thank you cards that we make as a way to show appreciation to our customers and teams. Please be sure to click on the names in the list at the end of this post to hop around and view the beautiful projects posted by so many talented stampers.

My project this month features the Flowers of Friendship bundle, new In Colors, as well as a bunch of other products from the new 2021-2022 Annual Catalog. I got the idea for the layout from a past Freshly Made Sketches layout.

Here is how I made the card.

  • Card base – cut a piece of Evening Evergreen cardstock at 4 1/4″ x 11″, score at 5 1/2″, fold and crease with a bone folder.
  • Scalloped frame – cut piece of Basic White cardstock at 4 1/4″ x 5 1/2″ and cut out with the largest scallop die from the Scalloped Contours die set.
  • Stamp the smaller flower image from the Flowers of Friendship stamp set eight times with Memento Tuxedo Black ink on Basic White cardstock. Color two flowers each with Pale Papaya, Polished Pink, Fresh Freesia and Soft Succulent Stampin’ Blends. I colored the flowers with the light blend and then used the dark blend to color in the inner petals. Punch out with the Flowers & Leaves punch.
  • Stamp the smaller flower image with Jet Black Stazon ink on scrap pieces of Pale Papaya, Polished Pink, Fresh Freesia and Soft Succulent In Color Shimmer Vellum. Punch out with the Flowers & Leaves punch.
  • Stamp thank you greeting from the Inspired Thoughts stamp set with Evening Evergreen ink on scrap piece of Basic White cardstock. Cut out with label die from the Potted Succulents die set. Cut another label from scrap piece of Evening Evergreen cardstock. Cut this label in half vertically and adhere each piece to either end of the stamped greeting.
  • To put the front of the card together adhere the flowers in rows, leaving space in the middle of the card to add the greeting. Adhere the flowers colored with the Blends in columns on the left and right side of the scalloped piece. Adhere the vellum flowers in the middle column with a small dot of liquid adhesive in the flower centers. Adhere stamped greeting with Mini Stampin’ Dimensionals.
  • Add bling with the pretty new In Color Jewels. Use the smaller jewels in the centers of the flowers colored with the Blends and use the larger jewels in the centers of the vellum flowers.
  • For the inside of the card, cut a piece of Basic White cardstock at 4″ x 5 1/4″. Stamp the top part of the large floral spray image from the Flowers of Friendship stamp set with Evening Evergreen ink in lower left corner. Adhere to inside of card.

This was such a fun card to make! I love the new In Colors – so fresh and bright!

Thanks for stopping by today!

Now is a great time to join Stampin’ Up! and become a Happy Shopper! You get to choose $155 worth of products for only $99, free shipping and a free Paper Pumpkin kit. These are some of the benefits of joining:

  • This is a great way to save on your crafting hobby – you will receive a 20% discount on every order you place. There is no obligation for you to build a business or host workshops!
  • Get early access to new catalogs and products.
  • Opportunity to attend demonstrator-only events.
  • The chance to earn a modest supplemental income, should you choose.
  • Be a part of my team.

Click here for more information. Have questions? Please feel free to send me a message.

Product List

Place an online order between $50 and $149 and use this host code for May. You will receive a free gift from me the following month.  If your order is $150 or more DO NOT use the host code.  Click here for instructions on using the host code.

Birthday Goodness

Today I’m featuring a yummy birthday card made with the Birthday Goodness stamp set pictured on page 62 in the 2019-2020 annual catalog. I love the images and type font in this set.

Purple Posy is my favorite of the five new InColors and I decided to use it as the main color for the card. One evening as I was searching for color combinations I came across some cards from a recent Color Fusers Blog Hop that featured Purple Posy, Seaside Spray and Soft Sea Foam and thought it was a soft, feminine color combination. While I love pastels, I tend to go a little brighter with my colors, so I decided to challenge myself and am pleased with how pretty the colors look together.

Here is how I made the card.

  • Card base – Purple Posy cardstock cut at 4 1/4″ x 11″ and fold in half.
  • Cut another piece of Purple Posy cardstock at 4 1/8″ x 5 3/8″. Emboss with the Country Floral 3D Embossing Folder. Cut an 18″ piece of Polka Dot Tulle Ribbon and tie in a bow around embossed piece. Adhere to card base.
  • Cut piece of Whisper White cardstock at 2 3/4″ x 4 3/4″. Stamp image using Memento Tuxedo Black ink. Color image with Stampin’ Blends. I used Seaside Spray dark and light Blends for the roses, Purple Posy and Soft Sea Foam dark and light for the macarons and dark Petal Pink for the cream filling. For the cake stand I used dark and light Smoky Slate.
  • Die cut image using the next-to- largest die in the Stitched Nested Label set. Using the largest die in the set cut a piece of Soft Sea Foam . Adhere together. Attach to card front with Stampin’ Dimensionals.
  • Stamp the greeting with Seaside Spray ink and punch out with the Classic Label punch. Adhere to image with Mini Stampin’ Dimensionals. Add a few sequins from the Woven Threads Sequin Assortment for an extra-added touch.
  • Inside of card – Stamp a greeting from the set on piece of Whisper White cardstock cut at 4″ x 5 1/4″ with Seaside Spray ink.

Tomorrow is the last day you can earn Bonus Coupons. For every $50 you spend you will get a $5.00 coupon that you can redeem when you place orders in August.

This great deal on the Starter Kit continues to run through August 31st. Spend $99 and select $155 worth of products, which is an additional $30 more than the regular cost of the kit. You will also get free shipping and a $10 coupon that can be redeemed on a future order. Now is a great time to join Stampin’ Up and become a happy discount shopper! You can get your hands on the new 2019 Holiday Catalog early and place pre-orders beginning on August 1! Here’s a sneak peek of the catalog image.

Place an online order with me between $50 and $149 and use this code to receive a free gift. DO NOT use this code if hour order is $150 or more as you will qualify for Stampin’ Rewards

Thanks for stopping by today!

 Product List  

Wonderful Romance Wedding Card

I was recently asked by a business colleague to create a card for a wedding she will be attending in early June so I finally got a chance to use the beautiful Wonderful Romance stamp set from the Occasions catalog before it retires on June 3rd! The coordinating Wonderful Floral Framelits Dies have sold out and are no longer available.

This card was actually quite easy to put together. Here is how I made it.

  • Cut piece of Whisper White Thick Card Stock at 4 1/4″ x 11″ and fold in half.
  • Cut piece of Whisper White card stock at 4″x 5 1/4″ and emboss with the Lace Dynamic Textured Impressions Embossing Folder. This folder will be available in the new annual catalog. Attach to card base with Stampin’ Dimensionals.
  • Cut circle with the die in the Wonderful Flower Framelits Dies. Stamp greeting with Mint Macaron ink. I used a greeting from the Floral Phrases stamp set. Attach to card.
  • Stamp large floral image in Tuxedo Black Memento Ink on Shimmery White card stock. Color the leaves and flowers with these Stampin’ Blends: Petal Pink, Mint Macaron, Soft Sea Foam, Pool Party, Pineapple Punch. I used dark and light blends for all except Pineapple Punch. Die cut image and attach to card front with multipurpose liquid glue.
  • Make double bow with white ribbon of your choice. I used 1/8″ Sheer Whisper White ribbon and attached to the flower stems with glue dot. This ribbon retired last year and I was so sorry to see it go because I think it is was one of the best white ribbons we ever had.

Before I made the final card I did a practice piece for the floral image to see how the blends would look together. I was so happy with how it looked that I did another one and used the practice piece to make a 10th wedding anniversary card for a dear friend and her husband.


I followed most of the steps listed above, adding these changes.

I used a greeting from the Your Perfect Day stamp set, which retired a few years ago. I added a white flower from the Frosted Flower Embellishments. These pretty embellishments will be available in the new annual catalog. I positioned the greeting and floral piece differently and also eliminated a bow for this card.

Place an online order between $50-$149 with me and receive a free gift. This month’s gift is a package of clear rhinestones.

Thanks for stopping by today!

 Product List  
Glue Dots
[103683]
$5.25
Big Shot
[143263]
$110.00


Country Lane Suite

Today I’m featuring the first two cards I’ve made using products from the new 2018 Holiday Catalog.  I’ve had many new products sitting, waiting to be used in the last few weeks but other things kept getting in the way and it was hard for me to find creative time.  Hopefully I am back on track now!  These cards feature products from the Country Lane Suite pictured on pages 42-43 in the catalog.  I love the images and greetings in this set because they are very versatile.  While they make lovely autumn or Thanksgiving cards when used with the coordinating designer series paper, they  can also be used for general cards as well by changing  up the different designer series papers and pulling different colors from the papers you choose.

This first card is done in a portrait layout, using Rich Razzleberry cardstock cut at 4 1/4″ x 11″.  A piece of Country Lane designer series papers was cut at 3 3/4″ x 5″ and attached to a piece of Crushed Curry cardstock cut at 4″ x 5 1/4″ and then attached to the Rich Razzleberry.

I stamped the images of the pitcher and flowers in black Memento ink on a piece of Whisper White cardstock cut to 2 3/4″ x 3 7/8″, using the Stamparatus to position the stamps.  I colored the pitcher with Smoky Slate Stampin’ Blends and used Blackberry Bliss, Old Olive, Cajun Craze and Mango Melody Stampin’ Blends and the Crushed Curry Stampin’ Write marker.  I adhered the image to the front of the card and added small and medium Blackberry Bliss Faceted Dots for a finishing touch.  I inadvertently used Rich Razzleberry cardstock for the base of the card, when I meant to use Blackberry Bliss, but I like how it looked, so kept it as is!

The next card is also done in the portrait layout and uses the stunning Tin Tile Dynamic Textured Impressions Embossing Folder.  Stampin’ Up! is right on trend with this folder, as tin tiles are making a resurgence in home and commercial decor these days.

The Cajun Craze card base is cut at 4 1/4″ x 11″.  I ran a piece of the new Galvanized Metallic Paper cut at 4″ x 5 1/4″ through the Big Shot using the embossing folder.  This paper is metallic on both sides, unlike our other foil papers which are white on one side, so you can choose to use either the embossesd or debossed side.

I stamped the images of the jug and flowers in black Memento ink on a piece of Whisper White cardstock cut to 2 3/8″ x 4 1/2″, using the Stamparatus to position the stamps. First I colored the bands and handles on the jug with Crumb Cake Stampin’ Blends.  I wanted a very soft, faded look for the rest of the jug so I did a light watercolor wash using Crumb Cake ink with an aqua painter.  To color the flowers I used the Crushed Curry Stampin’ Write marker and Cajun Craze, Old Olive, Mango Melody and Granny Apple Green Stampin’ Blends.  Next, I cut a strip of Cajun Craze cardstock at 1″ x 4 1/2″, ran the long framelit with the stitched edge from the Stitched Labels Framelits through the Big Shot and attached it to the image as an accent.  I stamped the greeting in Cajun Craze ink on Crushed Curry cardststock, used the banner from the Petals & More Thinlits to die cut  the greeting, and used three dimensionals to pop it up.  For a final touch I added a small Gold Faceted Gem to the upper right corner of the image.

Since I was using the Tin Tile embossing folder I decided to try out other papers.  Here are photos showing all of the foil sheets, with item numbers, shown on page 192 in the annual catalog, along with vellum and a piece of dsp from Nature’s Poem. 

Thanks for stopping by today!

Stampin’ Blends New Colors Are Available

The Stampin’ Blends new colors are now available – yay!!  You may order single markers, light or dark, for $4.50 each or combo packs that include both for $9.00 a pair.  There are also markers in bronze and ivory to use for skin tones, as well as a color lifter, and those are also $4.50 each.  A complete list of colors can be found on page 205 in the catalog.


The new combo packs are pictured here.

Check out these Stampin’ Up! videos for some coloring techniques.

Basics of blending

Blending with Multiple Colors

How to Use the Color Lifter and Skin Tone Blends

You can purchase the Blends by going to my online store or contacting me directly for assistance.

Thanks for stopping by today!

Accented Blooms

Today I’m sharing a card I made using the lovely new Accented Blooms stamp set pictured on page 19 in the new catalog.  I used Blueberry Bushel, one of the 2018-2020 In Colors.  It is a bright blue so I paired it with a Daffodil Delight mat for the stamped image.  I used Old Olive, Daffodil Delight, Calypso Coral, Night of Navy and Cherry Cobbler Stampin’ Blends to color the image.  For the hello greeting I stamped it with Blueberry  Bushel ink and punched it out with the Tailored Tag punch, which was carried over from the recently retired Occasions catalog and popped it up with Stampin’ Dimensionals.


This image could also be watercolored with pencils or an aquapainter for a soft look or by stamping the image with one of our fabulous colors instead of using black ink, simply leaving it as a line image without coloring it in. Cut the cardstock sized to fit the image and add a piece of coordinating designer paper and some ribbon or other embellishments for a different look.  You can also choose to use different greetings that would fit the Tailored Tag punch, making this a very versatile stamp set.  Thanks for stopping by today!