Spotlight on Nature Card

Hello!

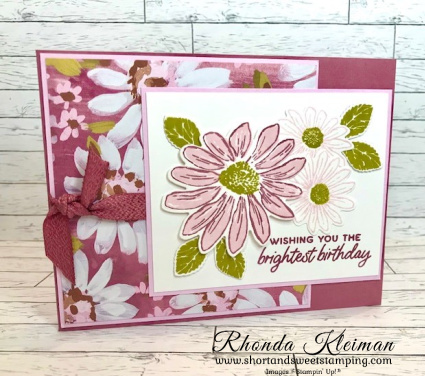
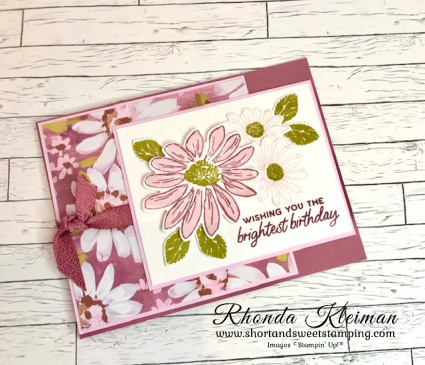
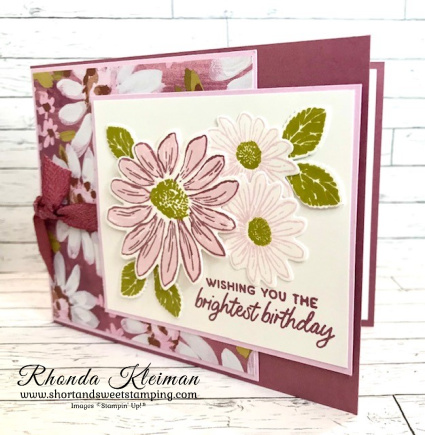
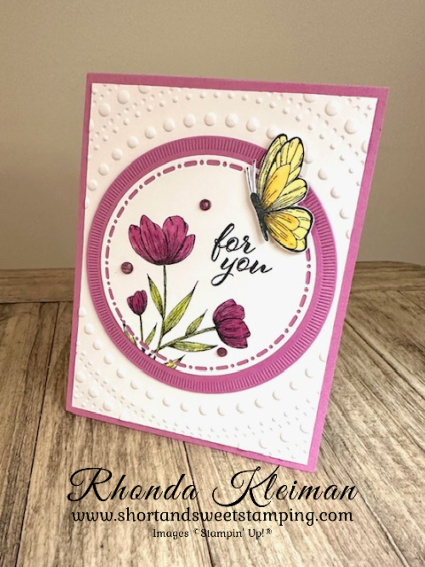
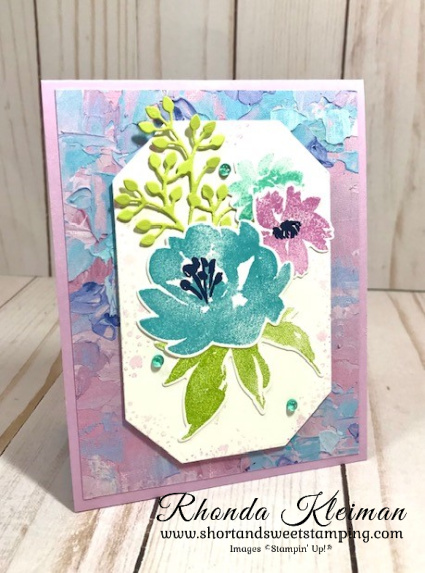
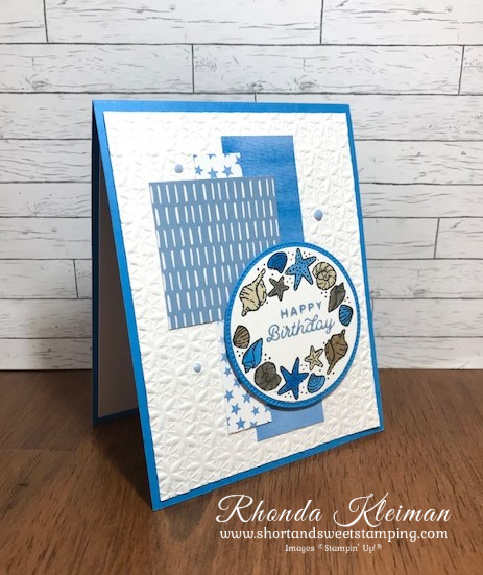
Today’s card features the Spotlight on Nature bundle in the annual catalog. The images in the stamp set are lovely and the circle dies are fabulous! The card also features the new Dotted Circles 3D embossing folder. This folder measures 6″ x 8 1/2″, making it much larger than most of our embossing folders. The folder is currently unavailable and is expected to be back in stock by August 12.

Here is how I made the card.

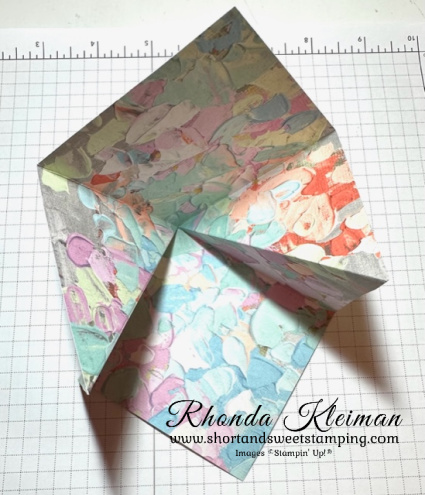
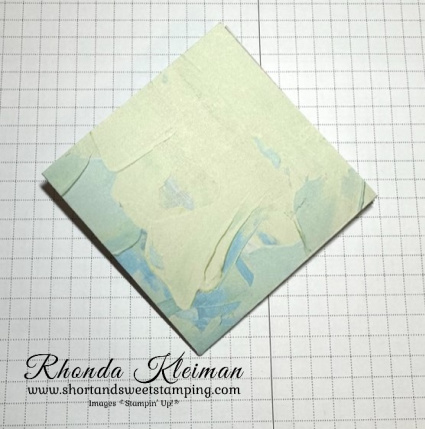
  • Card base – cut piece of Petunia Pop cardstock at 4 1/4″ x 11″, score at 5 1/2″, fold and crease with bone folder.
  • Cut piece of Basic White cardstock at 4″ x 5 1/4″ and run through die cutting and embossing machine with the Dotted Circles 3D embossing folder. Adhere to card front.
  • Cut piece of Petunia Pop cardstock at 4 1/2″ square. Run through die cutting machine with the largest Spotlight on Nature Die with the straight line border.
  • Cut piece of Basic White cardstock at 3 3/4″. Run through die cutting machine with the next to largest die with the slot design.
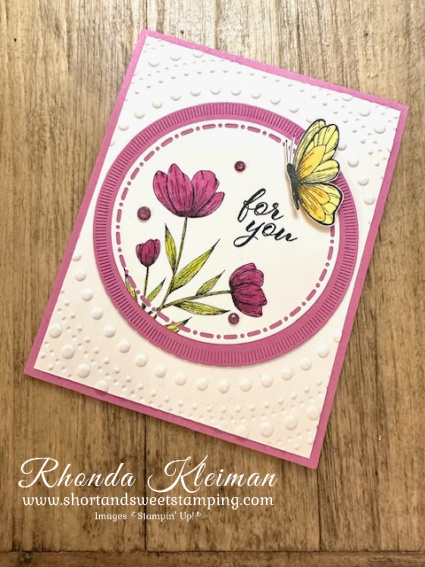
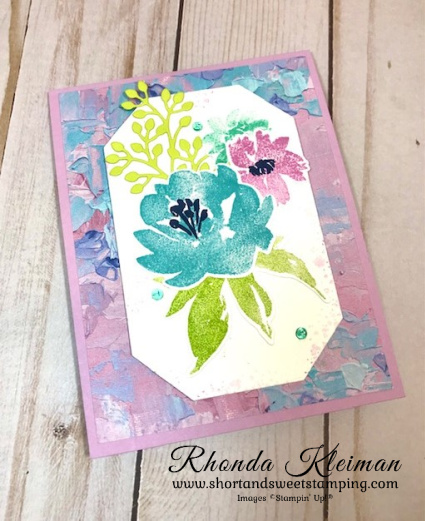
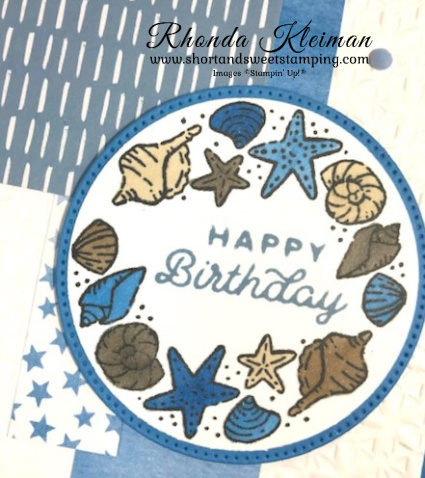
  • Stamp partial floral image on the Basic White circle with Memento Black ink.
  • Color the flowers with the light and dark Petunia Pop Stampin’ Blends. Color the leaves with the light and dark Lemon Lime Twist Stampin’ Blends. Stamp greeting with the black ink. I used a greeting from Layering Leaves, one of my “go to” stamp sets. Adhere to Petunia Pop circle piece. Adhere to card front.
  • Stamp the butterfly on a scrap piece of Basic White cardstock. Color the outer wings with the dark Lemon Lolly Stampin’ Blend. Color the inner wings with the light and dark Daffodil Delight Stampin’ Blends. Fussy cut the image. Pop the butterfly up with Stampin’ Dimensionals. Adhere to upper right edge of the circle piece.
  • Adhere several Purple Fine Shimmer Gems around the stamped image for a touch of bling.
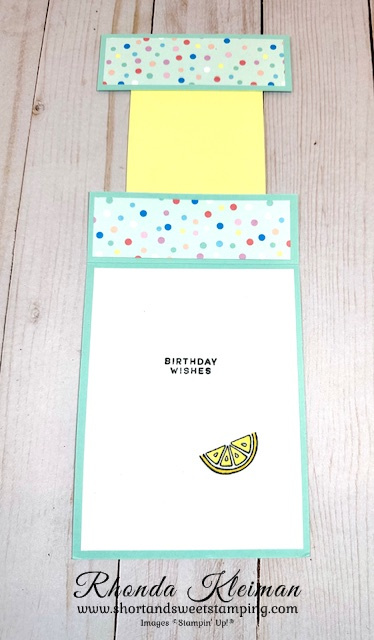
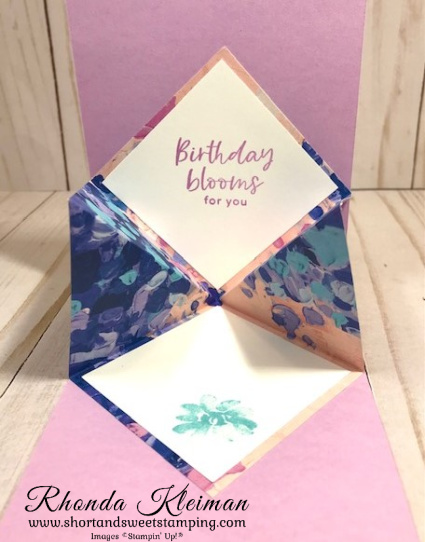
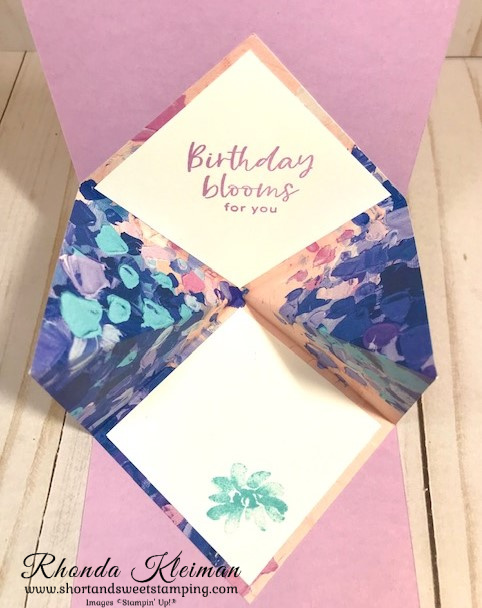
  • Cut a piece of Basic White cardstock at 4″ x 5 1/4″. Stamp partial leaf image in the bottom left corner. Color leaves with light and dark Lemon Lime Twist Stampin’ Blends. Stamp birthday greeting from the Unbounded Love stamp set with black ink. Adhere to inside of card.

Thanks for stopping by today!

New Card Kits Added to Collection
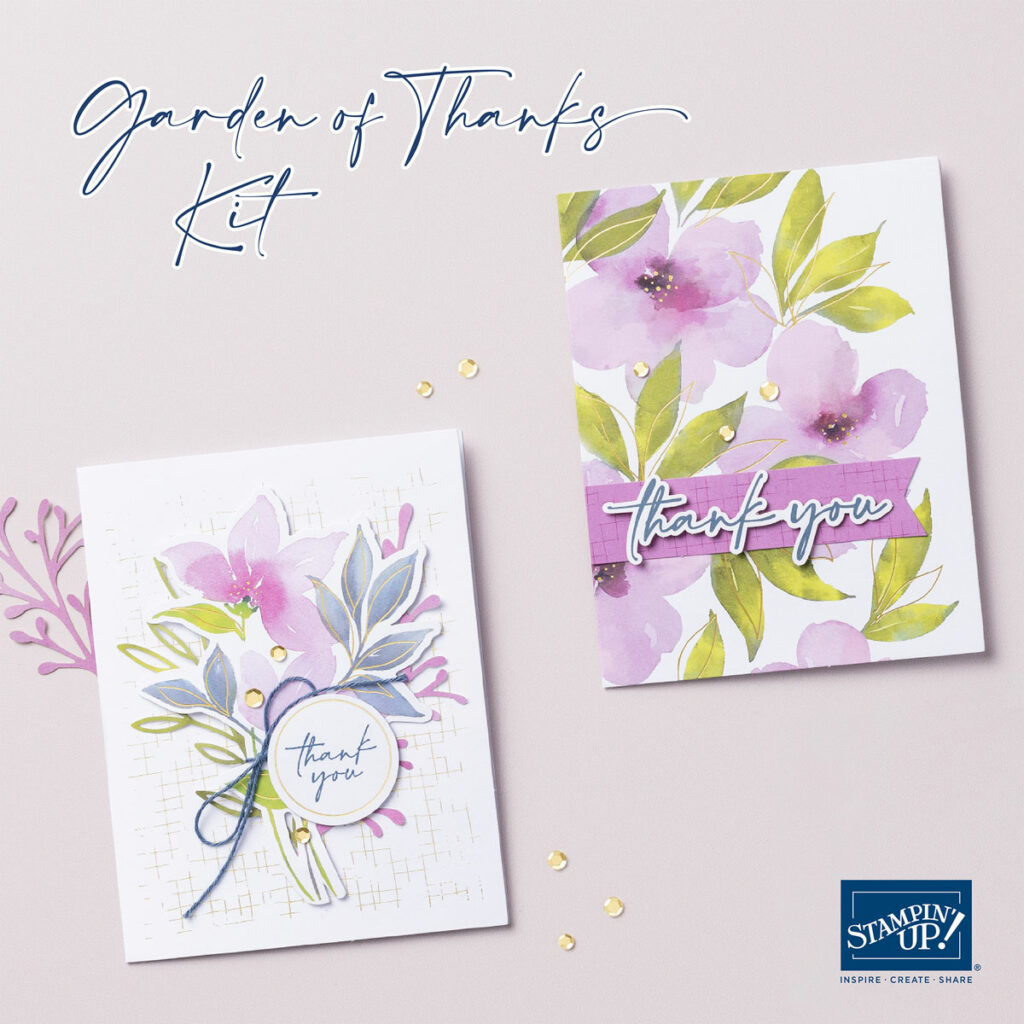
Item #164374 $23.00

Make your gratitude gorgeous with the Garden of Thanks Kit! This DIY card making kit is centered around saying thanks in the most beautiful way. You can create three thank you cards each in three purple watercolor floral designs. Make 9 cards, 3 each of 3 different designs. Includes a photopolymer stamp set and clear block, precut pieces, Misty Moonlight Stampin’ Spot, Misty Moonlight bakers twine, specialty gold foil, gold sequins, preprinted envelopes, adhesives. Coordinating colors are Berry Burst, Boho Blue, Bubble Bath, Lemon Lime Twist, Misty Moonlight, Old Olive, Petunia Pop.
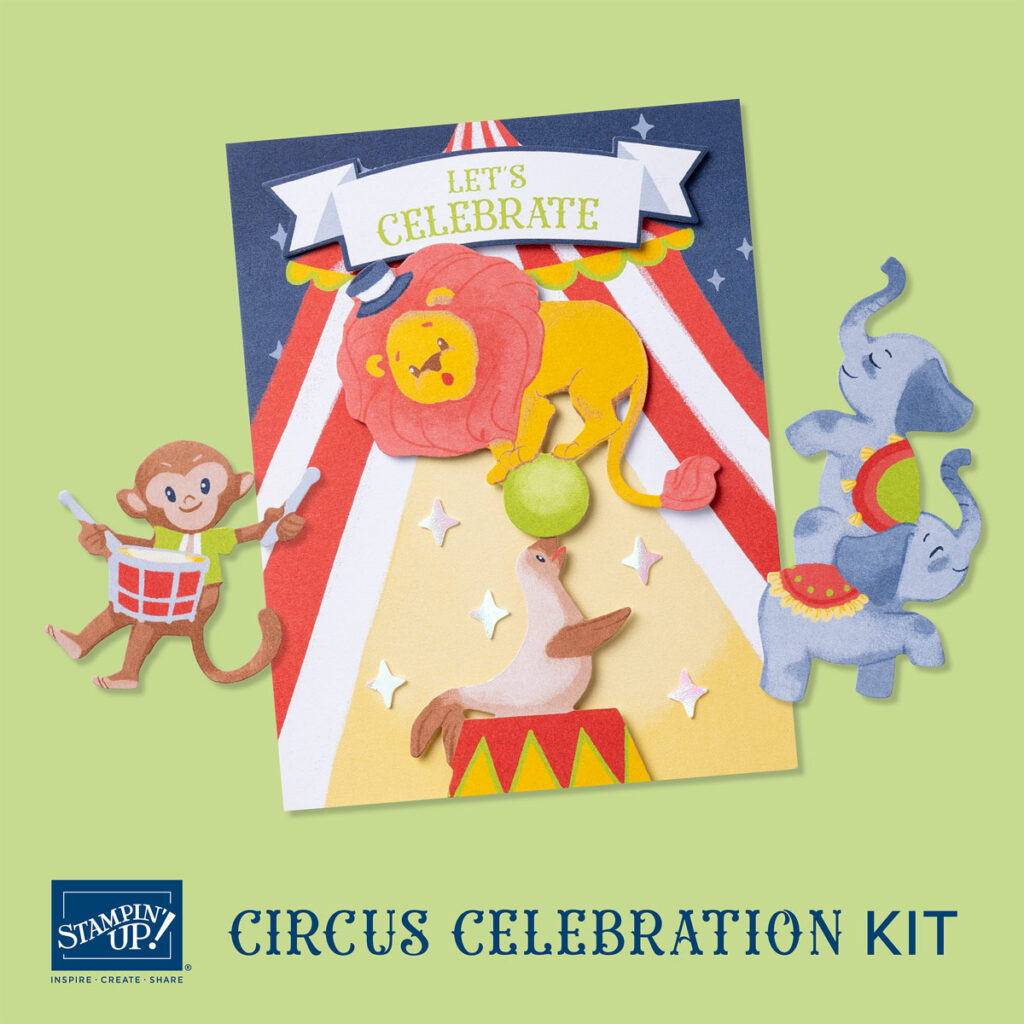
Item #164374 $14.00

Make magical birthday cards with the Circus Celebrations Kit! This DIY card making kit has all the pieces you need to create four birthday cards in two circus-themed designs. This is a stamp-free kit making it easy for beginners! The kit includes precut pieces, 8 cards, 4 each of 2 different designs, 8 preprinted envelopes, adhesives, printed die cuts. Coordinating colors are Copper Clay, Crushed Curry, Granny Apple Green, Night of Navy, Poppy Parade.

Place an online order between $50 and $149 and use this host code for July. You will receive a free gift from me the following month.  If your order is $150 or more DO NOT use the host code. You will qualify for Stampin’ Rewards.

Product List
Paper Snips
[103579]
$12.00

Lily Pond Lane Suite

Hello!

Today’s card features the adorable Lily Pond Lane Suite. This is one of my favorite suites in the new 2024-2025 Annual Catalog. I especially love the Designer Series Paper. This is one of two cards we made using this suite in my monthly class, where I introduced the new 2024-2026 In Colors. This card uses Peach Pie. I got the layout idea from a card I saw on Pinterest.

Here is how I made the card.

  • Card base: Cut a piece of Peach Pie cardstock at 4 1/4″ x 11″, score at 5 1/2″, fold and crease with a bone folder.
  • Cut piece of Basic White cardstock at 4″ x 5 1/4″ and adhere to card front. Cut piece of Peach Pie DSP from the 2024-2026 In Color Designer Series Paper at 3 3/4″ x 5″ and adhere to Basic White piece.
  • Cut piece of Basic White cardstock at 3 1/8″ square. Cut a piece of the cattail pattern paper from the Lily Pond Lane DSP at 3″ square and adhere to Basic White square.
  • Cut piece of Granny Apple Green cardstock at 2 1/4″ x 5″ and flag one end. I used one of the dies from the retired Banners Framelits Dies and altered the width. I always keep retired die sets that are basic shapes! Adhere the banner to the center of the front of the card. Adhere the square DSP piece over the banner.
  • Cut piece of Basic White cardstock at 2 1/4″ square and run through die cutting machine with the fourth smallest Deckled Circle die. Adhere to center of square piece. Stamp birthday greeting from the Charming Duck Pond stamp set with Peach Pie ink and run through die cutting machine with the angled die from Something Fancy Dies. Adhere to bottom of circle with Stampin’ Dimensionals.
  • There are several pieces of DSP with duck images that coordinate with the duck dies in the Charming Duck Pond dies. Cut one out and run through die cutting machine. Adhere to upper part of circle with Stampin’ Dimensionals. Adhere three Gray Granite Dappled Dots to focal piece.
  • Cut piece of Basic White cardstock at 4″ x 5 1/4″. Stamp leaf image with Granny Apple Green ink in left corner. Stamp cattails over leaf image with Pretty in Pink ink. Adhere to inside of the card.

Thanks for stopping by today!

New Kits Added to Collection

Hello Hollyhocks
Item #164458
Price  $14.00
  Send a friendly hello or a note of thanks.  The kit includes nine card bases and coordinating envelopes, pre-cut pieces, printed die cut images and labels, adhesive-backed sparkle gems, adhesives.  Finished card size is 5 1/2″ x 4 1/4″.  Coordinating colors are: Calypso Coral, Daffodil Delight, Flirty Flamingo, Old Olive, Petal Pink, Pretty Peacock.

City Sights
Item # 163885
Price $21.00
  Artistic cityscape designs in neutral colors.  Kit includes supplies to make eight cards, four each of two different designs, with eight printed card bases and envelopes, printed shaped die cuts and printed sentiments, corrugated cardstock accent pieces, photopolymer stamp set and Pebbled Path Stampin’ Spot.  Coordinating colors are Basic Beige, Basic Black, Boho Blue, Copper Clay, Misty Moonlight, Pebbled Path.

Place an online order between $50 and $149 and use this host code for May. You will receive a free gift from me the following month.  If your order is $150 or more DO NOT use the host code. You will qualify for Stampin’ Rewards.

Product List
Paper Snips
[103579]
$12.00

Simply Sparkling Fun Fold Card

Hello!

Today’s card is one of two cards we made in one of my recent classes and it features the Simply Sparkling Bundle. This fun stamp set and dies were introduced as Online Exclusives in November. There are so many ways to get creative with the stamps and I think it works well for both feminine and masculine cards. You can use it either as a soda can or a beer can.

Here is how I made the card.

  • Card base – cut a piece of Pool Party cardstock at 4 1/4″ x 11″ and score at 5 1/2″. Cut 4″ off one side and fold at the score line. With the remaining 4″ piece, cut one piece at 1 1/2″. This will be used for the bottom of the card.
  • Cut four strips of the polka dot pattern paper from the Lighter Than Air DSP at 1 1/4″ x 4″. I was looking through my DSP for something that would look like bubbles and thought this looked great. Adhere to the card fronts and inside pieces.
  • Cut a piece of Lemon Lolly cardstock at 2 7/8″ x 4 1/4″. Cut a piece of Basic White cardstock at 2 5/8″ x 4″. Run through embossing folder with the circle folder from the Cheery Patterns Embossing Folder. This set of folders was in the September-December 2023 Mini Catalog and was still current when I made the card, however, it is now retired. You can substitute it with the dot folder in the Basics 3D Embossing Folder set which is still available as an Online Exclusive. Adhere to Lemon Lolly piece.
  • Run the can die through your die cutting machine with a piece of the Lemon Lolly and white flower pattern paper from the Bright and Beautiful DSP cut at 2 1/2″ x 3″. Cut a 2″ square piece of the holographic paper from the Holographic Trio Specialty Paper in the annual catalog. Run through die cutting machine with the top and bottom can dies. Adhere to the can piece.
  • Stamp greeting on can with Memento Black Ink. Adhere can to Lemon Lolly piece.
  • Stamp the lemon image with Memento Black ink onto a scrap piece of Basic White cardstock. Color with Dark Lemon Lolly, Dark Daffodil Delight and Light and Dark Lemon Lime Twist Stampin’ Blends. Run through die cutting machine with the lemon die.
  • Stamp straw with Flirty Flamingo ink on scrap piece of Basic White cardstock and run through die cutting machine with the straw die. Adhere the lemon and straw to the can. Add a bit of bling. I used the Adhesive-Backed Glitter Sequins, also recently retired, but any sparkly gems would work just fine!
  • Cut a piece of Basic White cardstock at 4″ x 5 1/4″. Stamp birthday greeting and lemon image with Memento Black ink. Make sure that both the greeting (no matter what greeting you use) and lemon images are stamped so that they don’t stick out when the front flap is closed. Color the lemon with the Lemon Lolly and Daffodil Delight Stampin’ Blends. Adhere to inside of card.

Thanks for stopping by today!

Kits Collection

Two new kits have been added to the Kits Collection and are available for purchase in my online store.

Rock Legend $14.00 Item #163272

Kit contains supplies to make 8 cards, 4 each of two different designs. Finished card size is 4 1/4″ x 5 1/2″. Coordinating colors are: Basic Black, Coastal Cabana, Crumb Cake, Crushed Curry, Real Red.

Panda Friends $14.00 Item #163273

Kit contains supplies to make 8 cards, 4 each of two different designs. There are two finished card sizes, 4 1/4″ x 5 1/2″ and 8 1/2″ x 3 1/2″. Coordinating colors are: Basic Black, Flirty Flamingo, Lemon Lime Twist, Pool Party, Poppy Parade. So cute! we had a panda bear stamp set as part of Sale-A-Bration a few years ago and it was way popular, so it is nice to see this kit!

Paper Pumpkin

Sweet Springtime is the February Paper Pumpkin Kit. The kit includes 9 projects, 3 each of 3 different designs. It includes printed cards, coordinating envelopes, gift boxes, precut paper pieces, bakers twine embellishments and an Early Espresso ink spot. The coordinating colors are: Petal Pink, Daffodil Delight, Granny Apple Green, Berry Burst, Crumb Cake. You can also purchase a coordinating die set, Love of Spring, $12.00, Item #164396 in the online store. You can purchase a subscription to Paper Pumpkin in my online store.

Place an online order between $50 and $149 and use this host code for January. You will receive a free gift from me the following month.  If your order is $150 or more DO NOT use the host code. You will qualify for Stampin’ Rewards.

Product List

Softly Sophisticated Fun Fold

Hello!

Today’s card features several new Sale-A-Bration products. Sale-A-Bration runs through February 29. For every $50 or $100 purchase you make you get to select exclusive free items. I used the Softly Sophisticated Bundle which includes a stamp set and an embossing folder, free with a $100 purchase. I also used the Flight & Airy Designer Series Paper, free with a $50 purchase. I have used this fun fold many times because it is a nice way to feature smaller stamped images as well as embossing folders.

Here is how I made the card.

  • Card base – cut a piece of Pretty Peacock cardstock at 5 1/2″ x 8 1/2″. Score at 4 1/4″, fold and crease with a bone folder. Cut off a 1 1/2″ piece from the front side of the cardstock and trim it down to 1 1/2″ x 5 1/4″. You will use this strip for the embossing.
  • Cut a piece of DSP at 2 1/2″ x 5 1/4″ and adhere to card front.
  • Run the 1 1/2″ strip through a die cutting & embossing machine with the Softly Sophisticated embossing folder.
  • Cut a piece of Basic White cardstock at 4″ x 5 1/4″. Adhere the embossed piece to the right edge.
  • Cut a piece of Lost Lagoon cardstock at 3 1/2″ x 3″ and score at 1/2″ with the long side at the top of your trimmer. Fold on score line and give a sharp crease with a bone folder. Run a line of liquid glue or adhesive along the 1/2″ side. Center this piece in the middle on the back side of the Basic White cardstock piece and adhere.
  • Cut a piece of Basic White cardstock at 2 3/4″ square. Stamp the leaf image with Parakeet Party ink. Stamp the flowers with Lost Lagoon ink. I decided to stamp a few speckled images to fill in some of the blank white spaces so I used a stamp from the Queen Bee stamp set and stamped with Pretty Peacock ink. Stamp the birthday greeting from the Go To Greetings stamp set with Pretty Peacock ink. Adhere to the Lost Lagoon front flap.
  • For the inside greeting I used one of the greetings from the Layering Leaves stamp set and stamped with Pretty Peacock ink. I stamped a leaf image from this set with Parakeet Party ink in the lower left corner. Adhere to inside of card and close the card so that the flap overlaps the front of the card.
  • Add a bit of bling to the front of the card. I used a few of the green sequins from the Adhesive Backed Glitter Sequins which were in the September-December 2023 Mini Catalog. They are now retired.

Thanks for stopping by today!

During Sale-A-Bration, when you join Stampin’ Up! you can choose $125 of products for only $99, which includes shipping. You get to choose from two FREE bonus options – either this Glass Mat Studio (a $60 value) or your choice of an additional $30 in FREE products. The Glass Mat Studio has been creating quite a buzz!

The Stampin’ Glass Mat Studio is a paper crafter’s dream! The heavy-duty glass mat comes printed with a ruler and grid lines for easy measuring, while the large surface space gives ample room for spreading out while paper crafting. The safety-tempered glass has a heat and scratch resistant surface that wipes clean with the included cloth and water—no chemicals needed. The reusable cloth also cleans ink off your stamps! The nonslip, heat resistant, waterproof silicone mat features four palette squares for mixing custom ink colors or for holding small ink spots in place while crafting. Each component can be used separately or you can use all three items together for a multipurpose paper crafting studio that’s both functional and elegant.

The Stampin’ Glass Mat Studio includes:

GLASS MAT
* 5 mm thick
* 17″ x 14″ (43.2 x 35.6 cm)
* Safety-tempered
* Heat and scratch resistant
* Wipes clean with water or alcohol

SILICONE MAT
* 8-3/8″ x 6″ (21.3 x 15.2 cm)
* Multiuse, nonslip
* Waterproof, heat resistant
* 4 palette squares for custom-color mixing or holding Stampin’ Spots
* Product color: white CLEANING CLOTH
* 8-1/4″ x 8-1/4″ (21 x 21 cm)
* Durable, reusable
* Lint free
* Cleans stamps and other surfaces with only water
* Product color: dark gray

Place an online order between $50 and $149 and use this host code for January. You will receive a free gift from me the following month.  If your order is $150 or more DO NOT use the host code. You will qualify for Stampin’ Rewards.

Product List

Textured Floral Explosion Card

Today’s card features the Textured Floral Bundle. I’ve been wanting to make an explosion card for quite some time and decided to give it a go with this project. I used the Fancy Flora Designer Series Paper which was in the January-April Mini Catalog and is now retired. I try not to use many retired products in my projects, however I thought it would make a pretty background for the flowers as well as the explosion piece inside the card.

Here is how I made the card.

  • Card base – cut a piece of Fresh Freesia cardstock at 4 1/4″ x 11″, score at 5 1/2″, fold and crease with a bone folder.
  • Cut a piece of the Fancy Flora DSP at 4″ x 5 1/4″ and adhere to card front.
  • Cut a piece of Basic White cardstock at 3 1/2″ x 5″ and run through the Stampin’ Cut & Emboss Machine with the 2nd largest Countryside Corners die. Use the stamp with splotches to stamp around the edges with Fresh Freesia ink. Stamp off each time before stamping onto the cardstock.
  • Stamp flowers and leaves on piece of Basic White cardstock with Fresh Freesia, Balmy Blue, Pool Party and Lemon Lime Twist inks. Stamp stamens with Orchid Oasis ink. Run through Stampin’ Cut & Emboss Machine with coordinating Textured Florals Dies. Cut a scrap piece of Lemon Lime Twist cardstock and run through machine with the leaf die. Adhere all die cut pieces to the Countryside Corners piece.
  • To make the inside explosion piece, either cut a 6″x6″ piece from a 12″x12″ piece of DSP or use a piece from a 6″x6″ pack of DSP. Score at 3″ horizontally and vertically. Score diagonally from the upper right corner to the lower left corner. Fold along score lines, creasing with a bone folder. Fold the diagonal creases out (mountain) and then fold the entire piece into a square, as shown in the photos.

Adhere the explosion piece to the inside of the card. The square should have the folds at the top and the open edges at the bottom. Add adhesive to the top and bottom square. Center the top of the folded piece up against the inside of the card score line. The left and right corners of the square should be touching the edges of the card base. Close the card to adhere the piece to the inside panels.

  • Cut two Basic White squares at 2 3/4″ square. Stamp greeting on one of the squares and stamp small flower image on the other square. Adhere to the DSP.
  • Adhere Countryside Corners collage piece to card front with Stampin’ Dimensionals.
  • Add a few gems from the Tinsel Gems Three Pack for a bit of bling.

Thanks for stopping by today!

In honor of SU’s 35th anniversary, this month there are two amazing options for joining!

  • Option 1- Get 35% off the regular cost of the Starter Kit.  Receive $125 in merchandise for only $64.35.
  • Option 2 – Get 35% more product with the Starter Kit. You will receive $168.75 worth of product by spending only $99.
  • Both kits include free business supplies and free shipping.

In addition, if you sign up by the October 31st deadline, you will also be automatically registered for FREE to our virtual OnStage event on November 11th, a $77 value!

For further details and to join, click here.

Place an online order between $50 and $149 and use this host code for October. You will receive a free gift from me the following month.  If your order is $150 or more DO NOT use the host code. You will qualify for Stampin’ Rewards.

Product List

Circle Sayings Cards

Hello!

Today’s cards feature the new Circle Sayings bundle, which includes a very versatile stamp set and a circle punch. I’m so happy to see that Stampin’ Up! has been bringing back circle punches – yay! As I was deciding on a layout for the two cards, last week I came across a card sketch that Dawn Griffiths had on her blog. Dawn’s Stamping Thoughts, that I knew would be perfect. You can click here to view the sketch. It was fun using some of our new colors. The Lemon Lolly is such a soft and pretty color-it put a smile on my face as I was making one of the cards! Here is how I made the cards.

Celebrate Card

  • Card base -Cut a piece of Lemon Lolly cardstock at 4 1/4″ x 11″, score at 5 1/2″, fold and crease with a bone folder.
  • Cut two pieces of Basic White cardstock at 4″ x 5 1/4″. Emboss one piece with the cross-hatch embossing folder from the Basics 3D Embossing Folder set, which is available as an Online Exclusive Product. Adhere to card front. Use the other piece for the inside of the card.
  • Cut three pieces from the Bright and Beautiful Designer Series Paper: 2″ x 2″. 3/4″ x 4″, 1 1/4″ x 4 1/2″ and adhere to card front.
  • Cut piece of Basic White cardstock at 3″ x 3″. Stamp “celebrate” image and cupcake image with Memento Black Ink. Color the cupcake with Lemon Lolly and Berry Burst Stampin’ Blends. Punch out with the 2 3/8″ circle punch.
  • Cut piece of Lemon Lolly cardstock at 3″ x 3″ and run through die cutting machine with the second largest Stylish Shapes circle die. Adhere to stamped image. Adhere to card front with Stampin’ Dimensionals.
  • Embellish with Lemon Lime gems from the Tinsel Gems Four-Pack.
  • For the inside of the card, stamp a cupcake in the lower left on the remaining piece of Basic White cardstock. Color with the light Lemon Lolly and Berry Burst Stampin’ Blends and adhere.

Happy Birthday Card

  • Card base -Cut a piece of Azure Afternoon cardstock at 4 1/4″ x 11″, score at 5 1/2″, fold and crease with a bone folder.
  • Cut two pieces of Basic White cardstock at 4″ x 5 1/4″. Emboss one piece with the flower embossing folder from the Basics 3D Embossing Folder set, which is available as an Online Exclusive Product. Adhere to card front. Use the other piece for the inside of the card.
  • Cut two pieces from the Bright and Beautiful Designer Series Paper: 3/4″ x 4″, 1 1/4″ x 4 1/2″. Cut one piece of Boho Blue paper from the 2023-2024 In Color Designer Series Paper at 2″ x 2″. Adhere to card front.
  • Cut piece of Basic White cardstock at 3″ x 3″. Punch circle out from the 2 3/8″circle punch. Stamp two seashell images with Memento Black Ink. Color the shells with light and dark Azure Afternoon, Boho Blue, Crumb Cake and Pecan Pie Stampin’ Blends. Stamp birthday greeting with Boho Blue ink.
  • Cut piece of Azure Afternoon cardstock at 3″ x 3″ and run through die cutting machine with the second largest Stylish Shapes circle die. Adhere to stamped image. Adhere to card front with Stampin’ Dimensionals.
  • Embellish with Boho Blue Adhesive-Backed Solid Gems.
  • For the inside of the card, stamp the seashell image with Boho Blue ink in the upper right corner on the remaining piece of Basic White cardstock. Adhere.

Thanks for stopping by today!

The Confetti Birthday Kit is the newest addition to the Kits Collection.  It comes with everything you need to quickly create confetti shaker cards—a total of 9 cards in 3 lively designs. The kit includes: coordinating envelopes; stamp set; Blueberry Bushel ink spot; printed card bases, card fronts, self-adhesive cellophane shaker bags, die cut pieces, holographic foil labels, adhesive, embellishments and a clear block. Coordinating colors are: Blueberry Bushel, Coastal Cabana, Crushed Curry, Flirty Flamingo, Lemon Lime Twist, Poppy Parade.  Cost of the kit is $23.00 and the item number is 162390. To purchase the kit, go to my online store by clicking here.

A reminder that Online Exclusive Products are available for purchase.  New products will be added to the Online Store three times a year – March, July and November.  These products will be available online only and will not appear in any catalog.  There will be no end date to the sales period.  Some products will be re-ordered when inventory is low and others will only be available while supplies last.  To see all of the new Online Exclusive Products, including the Kits Collection and SU branded merchandise you can visit my online store.

Place an online order between $50 and $149 and use this host code for May. You will receive a free gift from me the following month.  If your order is $150 or more DO NOT use the host code. You will qualify for Stampin’ Rewards.

Product List

New Product Preview-Cheerful Daisies

Hello!

I finally had some time to sit down yesterday to make my first card with brand new products from the 2023-2024 Annual Catalog that goes “live” tomorrow! I used the Cheerful Daisies bundle and the coordinating Fresh as a Daisy Designer Series Paper, along with three new colors: Moody Mauve, Bubble Bath and Wild Wheat. I’ve been wishing for a light pink and Bubble Bath is a new color that has been added to the Subtles Collection. I’m loving it! The layout for this card is one that has been my “go to” for many years because it works really well to show off both Designer Series Papers, stamps and dies.

Here is how I made the card.

  • Card base – cut a piece of Moody Mauve cardstock at 4 1/4″ x 11″, score at 5 1/2″, fold and crease with a bone folder.
  • Cut two pieces of Bubble Bath cardstock, one at 4 1/8″ square and one at 3 1/4″ x 4″. Cut a piece of Fresh as a Daisy DSP at 4″ and adhere to the square piece of Bubble Bath cardstock.
  • Cut a piece of Basic White cardstock at 3 1/8″ x 3 7/8″. Stamp birthday greeting in lower right corner with Moody Mauve ink.
  • Cut another piece of Basic White cardstock to stamp the flowers and leaves. Cheerful Daisies is a two-step stamp set. Stamp the largest daisy image outline stamp with Moody Mauve ink. Stamp the fill-in with Bubble Bath ink. Stamp the smaller daisy outline stamp twice with Bubble Bath ink. Stamp flower centers with Wild Wheat ink. Stamp five single leaves with Wild Wheat ink. Run all images through Stampin’ Cut & Emboss Machine with coordinating Cheerful Daisies dies.
  • Adhere the large daisy to the smaller Basic White cardstock piece with Stampin’ Dimensionals. Adhere the two smaller daisies with either mini glue dots or liquid glue, tucking them under the larger daisy. Arrange leaves around the three flowers and adhere with mini glue dots. Adhere piece to the smaller piece of Bubble Bath cardstock.
  • Cut a length of Moody Mauve 3/8″ Textured Ribbon and tie in a knot around the piece with the DSP. Trim the tails. Adhere piece to card base. Adhere the piece with the stamped images to the DSP piece.
  • Cut a piece of Basic White cardstock at 4″ x 5 1/4″. Stamp the small triple daisy image in the lower left corner with Moody Mauve ink and color in the centers of the flowers with the Wild Wheat Stampin’ Write Marker. Adhere to inside of card.

I am unable to link to the new products until tomorrow. Here are the products, item numbers and prices.

  • Cheerful Daisies Bundle – Item #161297 $53.00
  • Fresh as a Daisy Designer Series Paper – Item # 161289 $12.50
  • Moody Mauve Cardstock – Item # 161723 $10.00
  • Bubble Bath Cardstock – Item # 161718 $10.00
  • Moody Mauve Classic Stampin’ Pad – Item #161649 $9.00
  • Bubble Bath Classic Stampin’ Pad – Item # 161664 $9.00
  • Wild Wheat Classic Stampin’ Pad – Item # 161651 $9.00
  • Moody Mauve 3/8″ Textured Ribbon – Item #161630 $8.00

Thanks for stopping by today!

Today is your last chance to order products from the retiring 2022-2023 Annual Catalog and the January 2023-April 2023 Mini Catalog! As of midnight tonight they will no longer be available.

Click here for the retired products list from the 2022-2023 Annual Catalog.

Click here for the retired products list from the January 2023-April 2023 Mini Catalog.

Place an online order between $50 and $149 and use this host code for May. You will receive a free gift from me the following month.  If your order is $150 or more DO NOT use the host code. You will qualify for Stampin’ Rewards.