Love & Happiness

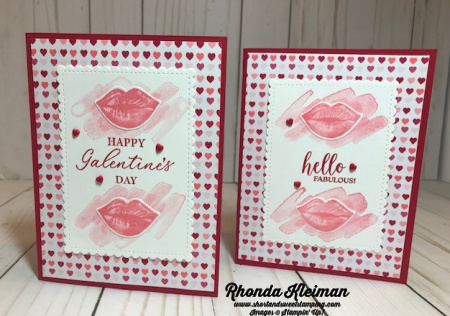
Hello and Happy Valentine’s Day! Today’s card features the Love & Happiness Bundle in the January-June 2022 Mini Catalog. I used the more traditional colors for the card – red, white, and black. I CASE’d this card from Mary Fish and you can see her card here.

Here is how I made the card.

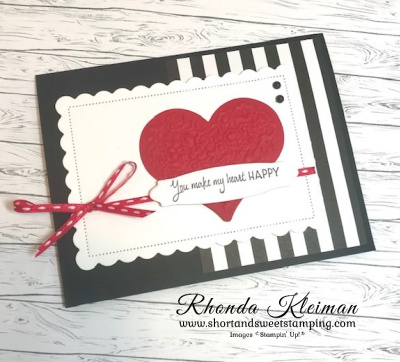
  • Card base – cut piece of Basic Black cardstock at 5 1/2″ x 8 1/2″, score at 4 1/4″, fold and crease with a bone folder.
  • Cut a piece of the black and white stripe paper from the Pattern Party Designer Series Paper at 3″ x 4″ and adhere to right side of card front.
  • Cut piece of Basic White cardstock at 3 1/2″ x 4 3/4″ and run through the die cutting machine with the next-to-largest die from the Scalloped Contours Dies.
  • Cut a piece of the red and white Playful Pets ribbon at 15″, wrap around scalloped piece and tie in a bow.
  • Cut a piece of Real Red cardstock at 2 3/4″ x 3 1/4″ and run through the Bouquet of Love Hybrid Embossing Folder, centering the cardstock in the center of the folder so that it covers the entire heart in the middle of the folder. Don’t forget to place the heart die from the hybrid folder die set inside the folder. Adhere to the scalloped rectangle. Adhere rectangle to card front.
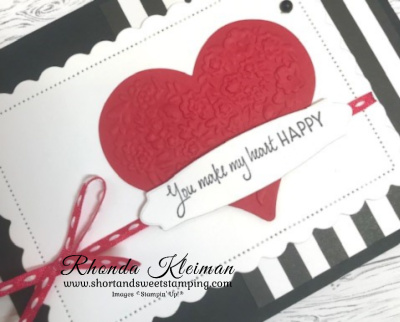
  • Stamp greeting from Catching Butterflies stamp set with Memento ink on scrap piece of Basic White cardstock and run through die cutting machine with the larger label die from the hybrid embossing folder set. Adhere over the embossed heart with Stampin’ Dimensionals.
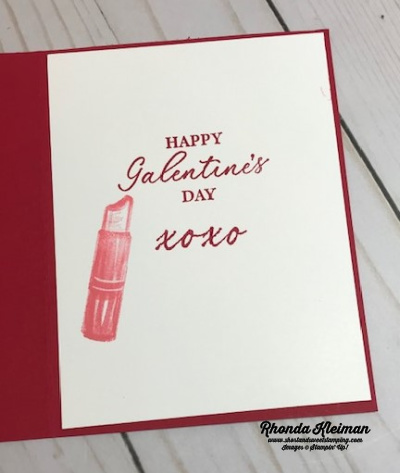
  • Stamp greeting from the Love & Happiness stamp on a 4″ x 5 1/4″ piece of Basic White cardstock with Memento ink. Adhere to inside of card.
  • Adhere two Matte Black Dots to card as shown.

Thanks for stopping by today!

Sale-A-Bration runs through February 28th and is a great time to join Stampin’ Up!  Select $125 worth of products for only $99 and you will also get two FREE stamp sets (excluding host sets and SAB sets) of your choice! The kit ships for free. As a demonstrator you will enjoy a 20% discount on all future orders. Become a happy discount shopper or build a business – the choice is yours. I’d love to have you join my team! Click here to learn more about the benefits of joining Stampin’ Up! 

The All Together Collection includes early-release products from the 2022–2023 Annual Catalog—an exciting new range of natural Stampin’ Blends.  There are six different combo packs ranging from light to deep skin tones.  These packs can be purchased separately or as a collection.  In addition to using these blends for skin tones, they will work beautifully for coloring animals, tree trunks and other nature images.  Note that these blends do not have color names – they are numbered, and they are different colors than the browns and neutrals in our current collection of Stampin’ Blends. Click here for detailed information in my online store.

Place an online order between $50 and $149 and use this host code for February. You will receive a free gift from me the following month.  If your order is $150 or more DO NOT use the host code. You will qualify for Stampin’ Rewards.

Product List
Paper Snips
[103579]
$10.00

Forever Blossoms Wedding Card

Hello! My cousin’s daughter was married two weeks ago so I needed to make a wedding card. It’s been a few years since I’ve had to make a wedding card! All of the wedding stamp sets I have are retired so I turned to Pinterest for some inspiration and saw a number of ideas for cards that use the Forever Blossoms stamp set. I own this beautiful stamp set and haven’t used it recently so decided to give it a little love.

Here’s how I made the card.

  • Card base – Cut a piece of Thick Basic White cardstock at 5 1/2″ x 8 1/2″, score at 4 1/4″, fold and crease with a bone folder.
  • Cut a piece of Pool Party cardstock at 4 1/8″ x 5 3/8″ and a piece of coordinating Designer Series Paper at 4″ x 5 1/4″. I used the Parisian Blossoms Specialty Designer Series Paper, which is now retired. It was part of the Parisian Blossoms Suite in the January-June 2020 Mini Catalog. Adhere the two pieces together. Cut a 24″ length of Pool Party Sheer Ribbon and tie in a bow around the piece. Adhere piece to card front.
  • Run a 4″ x 5″ piece of Pool Party cardstock through your die cutting machine with the next-to-largest die in the Ornate Layers die set. Stamp the “Always and Forever” greeting from the Forever Blossoms stamp set with Tuxedo Black Memento ink in bottom right corner.
  • Stamp the large floral image from the stamp set with Memento ink on piece of Basic White cardstock. Color the flowers with the light and dark Pool Party Stampin’ Blends and color the leaves with the light and dark Old Olive Stampin’ Blends. Run through your die cutting machine with the coordinating die from the Cherry Blossoms Dies.
  • Adhere the Pool Party Ornate Layer piece to card front. Adhere the floral piece over the Ornate Layer piece with Stampin’ Dimensionals.
  • Add a bit of bling to accent the floral piece by adhering three Night of Navy Blue Adhesive-Backed Gems.
  • For the inside of the card I stamped another greeting from the Forever Blossoms stamp set with Memento ink. I also stamped a blossom in the lower left corner and colored it in with the Pool Party Stampin’ Blends.

Thanks for stopping by today!

Place an online order between $50 and $149 and use this host code for September. You will receive a free gift from me the following month.  If your order is $150 or more DO NOT use the host code. You will qualify for Stampin’ Rewards.

Join Stampin’ Up! now through September 30th. You get to select $125 worth of products for only $99 and will also get a FREE bundle from the Holiday Catalog! The kit ships for free. I’d love to have you join my team. Become a happy discount shopper or build a business – the choice is yours! Click here for the benefits of joining Stampin’ Up!

Here is a list of bundles you can select from.

Experience everything the autumn season has to offer with the Haunts & Harvest Paper Pumpkin Kit! This month’s kit includes enough supplies to create 12 treat boxes—4 each of 3 designs. That means you can take your pick of apple, pumpkins, or jack-o-lantern treat boxes! Plus, the Paper Pumpkin box is designed to easily transform into a vintage wheelbarrow for you to display your harvest! The kit contains enough supplies to create 12 treat packages—4 each of 3 designs. The all-inclusive kit includes printed die-cut boxes, die-cut sheets, adhesive, and more! Finished treat box size: 2-1/2″ x 2″ (6.4 x 5.1 cm). Coordinating colors are Basic Black, Pale Papaya, Poppy Parade, Pumpkin Pie, Soft Succulent. Subscribe now through September10th. The kit will arrive in your mailbox around the 20th of the month. For further information and to subscribe, click here to visit my Paper Pumpkin website.

Product List
Paper Snips
[103579]
$10.00

Happy Galentine’s Day!

Hello! Today’s cards feature the Hearts & Kisses Bundle. When I saw this bundle in the mini catalog, as a woman that loves lipstick and feels naked when I’m not wearing it, I knew I had to purchase it! I also thought that it would make great cards to send to my gal pals to celebrate Galentine’s Day! As I’m writing this post, I’ve already heard back from a few of them to say how much they loved receiving their cards! One of my friends has a Valentine’s Day birthday and another has a birthday on February 17 so I used a birthday greeting for those two cards.

Here is how I made the cards.

  • Card base – cut a piece of Real Red cardstock at 5 1/2″ x 8 1/2″, score at 4 1/4″, fold and crease with a bone folder.
  • Cut piece of DSP at 4″ x 5 1/4″. I used From My Heart Specialty DSP from the 2020 Spring Mini Catalog, now retired. Adhere to card front.
  • Cut a piece of Basic White cardstock at 3 1/4″ x 4 1/2″ and run through your die cutting machine with the largest rectangle from the Stitched So Sweetly dies.
  • Stamp the lipstick streak image from the Hearts & Kisses stamp set with Flirty Flamingo ink at the top and bottom of the die cut piece, stamping off first, before stamping onto the cardstock. For the birthday card I stamped the Galentine’s Day greeting with Real Red ink in between the stamped streaks. For the Galentine’s Day card I used the Hello Fabulous greeting from the Dressed to Impress stamp set.
  • Stamp two lips with Flirty Flamingo ink, punch out with the Kiss Punch and adhere on top of the streaks. Embellish with three Resin Hearts. Adhere piece to card front.
  • For the inside of the card, cut a piece of Basic White cardstock at 4″ x 5 1/4″. For the birthday card I stamped it with the Happy Birthday greeting from the Happy Thoughts stamp set and I used the Happy Galentine’s Day greeting for the rest of the cards. I stamped the greetings and the xoxo with Real Red ink. Stamp the lipstick with Flirty Flamingo ink. Adhere to inside.

Thanks for stopping by today!

Sale-A- Bration is a great time to consider joining Stampin’ Up! During this promotion you can purchase the starter kit for only $99 and select $125 worth of merchandise from the current annual catalog or the new mini catalog. This is the BEST deal! You will also get a FREE 200 6″ x 6″ sheet assortment of our newest Designer Series Papers for five current color families, a $57.50 value! This paper will not be available for purchase until May 2021. Free shipping is also included. Become a happy shopper and enjoy a 20% discount on future orders. Click here to join.

Product List
Kiss Punch
[154238]
$18.00
Paper Snips
[103579]
$10.00

Daisy Lane- Kylie’s International Blog Highlights

Hello and Happy New Year! I hope that 2021 will be brighter for everyone. Today I’m participating in Kylie Bertucci’s International Blog Highlights. Readers get to vote on their top five favorites in the gallery and the top 10 winners will get to participate in an International Blog Hop later this month. The theme is “thank you” and is a way for us to show our appreciation to someone that has inspired, helped or supported us in some way.

This card uses the Flowers and Field Designer Series Paper, one of the free products you will be able to earn with a $50 purchase during Sale-A-Bration, which begins tomorrow, January 5th. I paired it with the Daisy Lane stamp set and coordinating daisy punches. The second I laid eyes on this paper in the SAB brochure it immediately brought me back to the first dress I made in my Junior High School sewing class back in the mid-1960’s! I grew up in Brooklyn, New York so my mother and I took the subway to 34th Street in Manhattan to go to Macy’s department store. At the time they had an entire floor devoted to sewing and fabrics, now long gone. After perusing thousands of bolts of fabrics, many which had flowers on black backgrounds, I selected one with a daisy print. The dress was a simple shift with a tie belt, which was very in-style at the time. I saved the dress and went up to my attic this weekend to take a few pictures. The yellow in the fabric is an exact match to the Bumblebee In Color. Everything old is new again!

Here is how I made the card.

  • Card base – Cut a piece of Bumblebee cardstock at 5 1/2″ x 8 1/2″, score at 4 1/4″, fold and crease with a bone folder.
  • Cut piece of daisy print from the Flower & Field DSP at 4 1/8″ x 5 3/8″ and adhere to card front.
  • Cut piece of Basic Black cardstock at 3″ x 4″. Cut piece of Bumblebee polka dot print DSP at 2 7/8″ x 3 7/8″ and adhere to cardstock.
  • Stamp the daisy images from the Daisy Lane stamp set. On scrap piece of Whisper White cardstock, use Bumblebee ink to stamp the large daisy image twice and stamp the small daisy image three times. Punch out with the large and medium daisy punches. For the large flower, adhere two of the large daisies together and then adhere one small daisy. For the small flower adhere the two remaining small daisies together. Adhere with either glue dots or a small amount of liquid glue on the flower centers. Curl the tips of the large daisy with a bone folder. Add a champagne rhinestone to the center of each flower.
  • Stamp the greeting with Memento Tuxedo Black ink on scrap piece of Pool Party cardstock. Cut out with one of the dies from the Tasteful Labels die set. This is one of my “go to” sets for cutting out greetings.
  • Cut an 18″ piece of Bumblebee gingham ribbon and tie into a bow around the polka dot piece. Adhere piece to center of card front. Adhere large daisy with Stampin’ Dimensionals in upper left corner and adhere smaller daisy under the larger flower. Adhere greeting with Stampin’ Dimensionals.

I’d be so appreciative if you would vote for my card! Click on the vote image below. Once you are in the gallery, click on the heart at the top right hand side of the picture as the hearts appear.

Thanks for stopping by today!

This is the last day you will be able to place orders for items in the August-December 2020 Mini Catalog. The new January-June Mini Catalog goes live tomorrow!

 Product List  
Daisy Punch
[143713]
$18.00
Paper Snips
[103579]
$10.00

Forever Blossoms Valentine’s Day Card

Hello! Today’s card features products from the beautiful Parisian Blossoms suite and is another card that we recently made in my Valentine’s Day class. This is such an elegant suite of products, so soft looking and pretty too!

Here is how I made the card.

  • Card base – cut piece of Petal Pink cardstock at 4 1/4″ x 11″, score and fold in half.
  • Cut 4″ x 5 1/4″ piece of paper from the Parisian Blossoms Specialty Designer Series papers and adhere to cardbase.
  • Stamp blossom image from the Forever Blossoms stamp set with Tuxedo Black Memento Ink on piece of Whisper White cardstock. Color image with Stampin’ Blends. I used Petal Pink and Cherry Cobbler Blends for the flowers and Soft Sea Foam Blends for the leaves. Die cut with coordinating die from the Cherry Blossoms Dies set.
  • Stamp the “love” sentiment with Cherry Cobbler ink on a small scrap piece of Whisper White cardstock. Cut heart image with one of the elongated dies from the Stitched Be Mine Dies, pictured on page 195 in the Annual Catalog.
  • Die cut large Petal Pink scalloped heart frame from the Stitched Be Mine Die set. You can save the heart piece from the inside of the frame for use in another project.
  • To finish off the front of the card, use either Multipurpose Liquid Glue or the Fine Tip Glue Pen to add adhesive to the scalloped heart and adhere to card. Center the heart with the “love” greeting inside the frame and adhere. Position the floral piece along the left side of the frame and adhere.

For the inside of the card, cut a piece of Whisper White cardstock at 4″ x 5 1/4″. Cut piece of Parisian Blossoms DSP at 3/4″ x 5 1/4″ and adhere to left side. Stamp the two sentiments from the Forever Blossoms stamp set with Cherry Cobbler ink and adhere piece to card.

Thanks for stopping by today!

 Product List  

Tea Together

I love tea! I’m a lifelong tea drinker so every time Stampin’ Up! comes out with a tea-themed stamp set, I have to have it! I was so happy to see the Tea Room Suite in the 2018-2019 annual catalog and as nice as the images in the stamp set are, when I laid eyes on the Tea Together stamp set in the 2019 Occasions catalog, I was even more excited because these images are what I think of when I think of afternoon tea or tea parties – oh so lovely and feminine!

Last week I held a class with tea-themed projects using these products along with the Tea Time Framelits Dies, which is a Sale-A-Bration item that you can get for free with a $100 purchase. I was delighted to learn that these dies will be carried over into the 2019-2020 annual catalog! Today I am featuring the first of two cards using the Tea Together and Tea Time products and will post my other projects next week. I CASEd one of the cards shown on page 49 in the Occasions catalog for this project.

Here is how I made the card.

  • Card base – cut a piece of Crushed Curry cardstock at 5 1/2″ x 8 1/2 ” and fold in half.
  • Using the Delightfully Detailed Laser-Cut Specialty Paper, select one of the 3 1/2″ x 5″ designs and trim with the Stampin’ Trimmer. Note that one side of the paper is Whisper White and the other is Very Vanilla so you can choose either side.
  • Cut a piece of the large Crushed Curry floral patterned paper from the Tea Room Specialty Designer Series Paper at 3 1/2″ x 5″ and adhere to the laser-cut piece.
  • Stamp the teapot from the Tea Together stamp set on watercolor paper with black StazOn ink. Stamp flowers onto the teapot. I stamped three flowers but you can also do one or two – your preference!
  • Watercolor the teapot using an aqua painter and Calypso Coral ink. For the flowers and leaves I used a blender pen, which I found to give more depth of color. I used Crush Curry ink for the flowers and Garden Green for the leaves. Stamp greeting on watercolor paper with black StazOn ink.
  • Die cut the teapot using the coordinating die from the Tea Time Framelits. Die cut greeting using the one of the hearts from the Be Mine Stitched Framelits Dies
  • Tie a piece of Old Olive linen thread around laser-cut piece. I wrapped the thread around the piece twice before tying the bow. Add pearls to centers of flowers. Attach this piece to card base and then attach the teapot and heart greeting.


To order any of the supplies I used to make these cards click here to shop my online store or contact me directly.

Thanks for stopping by today!

 Product List