New Horizons Meets Inspiring Canopy

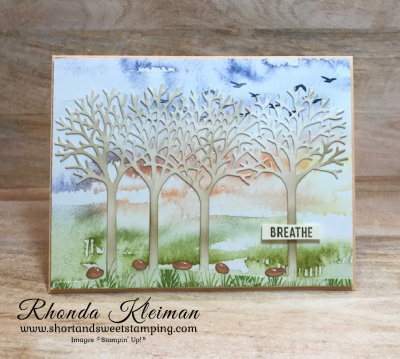
Hello! Today’s card features products from the New Horizons Suite in the January-June 2022 Mini Catalog, along with Inspiring Canopy, one of my favorite dies from the annual catalog.

This suite was the first thing that caught my eye in the new mini catalog, especially the stunning designer series paper. You can make simple and beautiful cards with just the DSP alone and a greeting, however the fun comes in when using the DSP as a backdrop to incorporate die cuts, stamped images, and accessories.

Here is how I made the card.

  • Card base – cut a piece of Pale Papaya cardstock at 5 1/2″ x 8 1/2″, score at 4 1/4″, fold and crease with a bone folder.
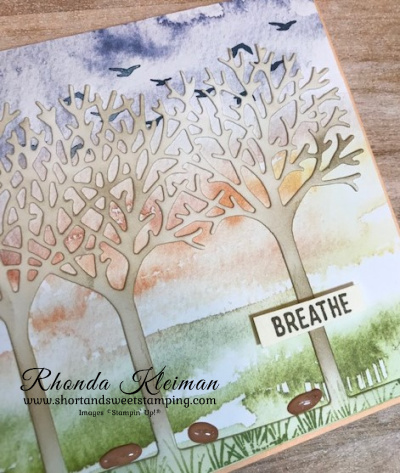
  • Select a piece of paper from the New Horizons Designer Series Papers and trim to 5 3/8″ x 4 1/8″. I chose a paper that had more subtle sections of grass and sky to get the look I wanted. In the upper right corner of the DSP, stamp the seagulls from the On the Horizon stamp set with Misty Moonlight ink once at full strength. Stamp the image again, moving slightly down and to the left of the first image, and stamping off once before stamping onto the paper.
  • Cut a piece of Very Vanilla cardstock at 4″ x 5 3/4″ and run it through the Cut & Emboss Machine with the trees from the Inspiring Canopy dies.
  • Color the trees using blending brushes. I used Old Olive as the primary color for the grass, adding a bit of Soft Succulent. For the tree trunks and branches I started with Soft Suede for the tree trunks, Crumb Cake for the bottom portion of the branches and Sahara Sand for the tops of the branches, going over each section to build up the color. I also stamped the grass part with the smallest grass image from the Oceanfront stamp set. I used Old Olive ink and randomly stamped the image across the area, some at full strength and some stamping off first.
  • Adhere the die cut to the DSP with liquid glue. You can also use adhesive sheets but you have to prep the cardstock with the sheet prior to die cutting.
  • Adhere the DSP piece to card front with Stampin’ Dimensionals.
  • Stamp “Breathe” with Soft Suede ink on a scrap piece of Very Vanilla cardstock and trim with Paper Snips Scissors. Adhere to card front with Mini Stampin’ Dimensionals. My strip of cardstock was narrow so I cut the dimensionals in half.
  • I added some Cinnamon Cider embellishments from the Pebbles Enamel Shapes right above the grassy area for an added accent.
  • For the inside of the card, cut a piece of Very Vanilla cardstock at 4″ x 5 1/4″.
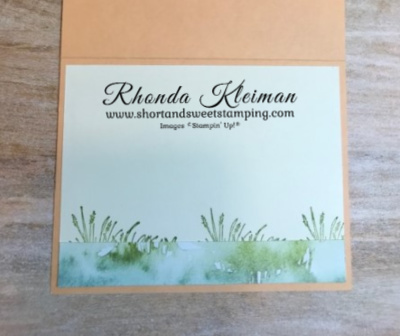
  • Stamp the large grass image from the On the Horizon stamp set with Old Olive ink several times approximately 1 1/2″ from the bottom of the piece. Alternate stamping at full strength and stamping off. I used one of the strips of DSP that was left over from the piece I used for the card front, cutting it down to 3/4″ x 5 1/4″ and adhered it to the bottom of the piece, covering up the bottoms of the stamped leaves, leaving just the top of the leaves showing.

Thanks for stopping by today!

Sale-A-Bration is a great time to join Stampin’ Up!  Select $125 worth of products for only $99 and you will also get two FREE stamp sets (excluding host sets and SAB sets) of your choice! The kit ships for free. As a demonstrator you will enjoy a 20% discount on all future orders. Become a happy discount shopper or build a business – the choice is yours. I’d love to have you join my team! Click here to learn more about the benefits of joining Stampin’ Up! 

Place an online order between $50 and $149 and use this host code for January. You will receive a free gift from me the following month.  If your order is $150 or more DO NOT use the host code. You will qualify for Stampin’ Rewards.

Product List
Paper Snips
[103579]
$10.00

Slice of Happiness Rosh Hashanah Card

Hello! I made today’s card to send to my friends and relatives for the Jewish New Year, Rosh Hashanah. Stampin’ Up! hasn’t had a Jewish holiday stamp set for many years so every year I take on the challenge of using SU products to create my holiday cards. It is amazing what you can come up with! I can usually adapt one of our packages of Designer Series Papers from the holiday catalog, or sometimes there are stamp sets that contain images that are symbols of the Jewish New Year. When I saw the gorgeous Blackberry Beauty Specialty Designer Series Paper in the July-December 2021 Mini Catalog, the rich purples made me think of grapes, which is one of the symbols. I thought immediately of the retired stamp set, Slice of Life from the 2019-2020 Annual Catalog, because one of the images is grapes. I used this stamp set to make my holiday card in 2019 and used the pomegranate image on that card. You can see it in this blog post. I used a set of Jewish holiday greetings from a retired Papertrey Ink stamp set. I also used one of my favorite fun-folds, which is a great way to showcase a stamped image.

Here is how I made the card.

  • Card base – cut a piece of Rich Razzleberry cardstock at 5 1/2″ x 6 1/2″. Score at 2 1/4″. Fold and crease sharply with a bone folder.
  • Cut two strips of Blackberry Beauty DSP at 2″ x 5 1/4″. I used two different papers, one for the front fold and one for the inside fold. Adhere to both sides of the fold.
  • Smaller card base – cut a piece of Cinnamon Cider cardstock at 6 1/2″ x 4 1/4″ and score at 3 1/4″. Fold and crease sharply with a bone folder. Cut a piece of Very Vanilla cardstsock at 3″ x 4″, stamp greeting with Cinnamon Cider ink and adhere to the inside left side of the card base. Cut a scrap piece of Gold Foil and run it through your die cutting machine with one of the small leaf dies from the Beautiful Leaves Dies. Adhere with small dots of liquid glue to bottom left of the greeting piece.
  • Cut piece of Very Vanilla cardstock at 3 1/2″ x 4 1/2″ and run through your die cutting machine with the largest rectangle from the Stitched so Sweetly dies.
  • Use the direct-to-rubber coloring technique to color the grape image with Stampin’ Write Markers. I used Old Olive for the leaves, Cinnamon Cider for the branches and Rich Razzleberry for the grapes. Stamp onto the Very Vanilla cardstock, leaving room to stamp the greeting at the bottom. Stamp the greeting with Cinnamon Cider ink. Add some sparkle to the grapes with Wink of Stella.
  • Adhere the piece to the front of the Cinnamon Cider card base. Note that the folded base will open from left to right so make sure the opening is in the right direction before you adhere the stamped image!
  • Adhere the smaller card to the Rich Razzleberry card base so that the front of the smaller card overlaps the front fold of the larger card.

Thanks for stopping by today!

Place an online order between $50 and $149 and use this host code for September. You will receive a free gift from me the following month.  If your order is $150 or more DO NOT use the host code. You will qualify for Stampin’ Rewards.

Christmas Kit Now Avaliable!

Christmas Whimsy is an adorably festive card kit with a modern design! In this all-inclusive kit, the hard work is done for you! All pieces are printed, die cut, and ready for you to craft. The simple steps of this kit are perfect for beginner crafters and kids, too! Grab a kit or two and gather around for a simple Christmas activity that everyone will enjoy. The kit contains everything you need to create eight elf-centric Christmas cards including printed card bases, die cuts, embellishments, an exclusive stamp set, a Night of Navy Classic Stampin’ Spot, and more! Create two each of four designs, finished size of cards is 5 1/2″ x 4 1/4″. Coordinating colors: Balmy Blue, Basic Gray, Crumb Cake, Evening Evergreen, Gray Granite, Misty Moonlight, Poppy Parade, Real Red, So Saffron, Soft Succulent, Soft Suede. You can order this kit, Item # 158155, in my online store. Cost of the kit is $19.00.

Product List
Paper Snips
[103579]
$10.00

Nature’s Harvest with Blending Brush Background

Hello! Today’s card features products from the beautiful new Harvest Meadow Suite in the July-December 2021 Mini Catalog. It uses the Nature’s Harvest stamp set, Harvest Dies and Harvest Meadow Designer Series Paper. This is another one of the cards we made in my class on using blending brushes last week. It is an easy card to put together.

Here is how I made the card.

  • Card base – cut a piece of Calypso Coral cardstock at 4 1/4″ x 11″, score at 5 1/2″, fold and crease with a bone folder.
  • Cut two pieces of paper from the Harvest Meadow DSP pack. Cut the Calypso Coral piece at 2 1/2″ x 5 1/4″ and the Soft Succulent piece at 1 1/2″ x 5 1/4″ and adhere both pieces to card front.
  • Cut a piece of Soft Succulent cardstock at 3 3/4″ x 4 3/4″ and run through your die cutting machine with the 3rd largest Stitched Rectangle die.
  • Cut a piece of Very Vanilla cardstock at 3″ x 4 1/2″ and run through your die cutting machine with the 4th largest Stitched Rectangle die.
  • To do the blended ink background, first apply Bumblebee ink with a blending brush to the top third of the piece. Gradually build the color to the depth you like, a little bit at a time. Next, apply Calypso Coral ink, making this section more narrow than the Bumblebee section. Since Calypso Coral is the main color on the card I wanted to use it as more of an accent in the background piece. Last, apply Soft Succulent ink to the bottom third of the piece, again building up the color to the depth you like.
  • Stamp the coneflower image from the Nature’s Harvest stamp set on the background piece with Tuxedo Black Memento ink.
  • Stamp greeting on scrap piece of Very Vanilla cardstock with the Memento ink and cut out with the small label die from the Harvest Dies set.
  • Wrap a piece of linen thread three times around bottom portion of the blended background piece and secure on the back with a piece of tape. Adhere the greeting over the wrapped thread with Mini Stampin’ Dimensionals.
  • Adhere blended background piece to the Soft Succulent cardstock piece.
  • Adhere the entire piece to the card front with Stampin’ Dimensionals.

Thanks for stopping by today!

Place an online order between $50 and $149 and use this host code for August. You will receive a free gift from me the following month.  If your order is $150 or more DO NOT use the host code. You will qualify for Stampin’ Rewards.

Join Stampin’ Up! now through September 30th. You get to select $125 worth of products for only $99 and will also get a FREE bundle from the Holiday Catalog! The kit ships for free. I’d love to have you join my team. Become a happy discount shopper or build a business – the choice is yours! Click here for the benefits of joining Stampin’ Up!

Here is a list of bundles you can select from.

Experience everything the autumn season has to offer with the Haunts & Harvest Paper Pumpkin Kit! This month’s kit includes enough supplies to create 12 treat boxes—4 each of 3 designs. That means you can take your pick of apple, pumpkins, or jack-o-lantern treat boxes! Plus, the Paper Pumpkin box is designed to easily transform into a vintage wheelbarrow for you to display your harvest! The kit contains enough supplies to create 12 treat packages—4 each of 3 designs. The all-inclusive kit includes printed die-cut boxes, die-cut sheets, adhesive, and more! Finished treat box size: 2-1/2″ x 2″ (6.4 x 5.1 cm). Coordinating colors are Basic Black, Pale Papaya, Poppy Parade, Pumpkin Pie, Soft Succulent. Subscribe now through September10th. The kit will arrive in your mailbox around the 20th of the month. For further information and to subscribe, click here to visit my Paper Pumpkin website.

Product List
Harvest Dies
[156504]
$38.00
Paper Snips
[103579]
$10.00

The Raven – Another Idea

Hello! Today I’m sharing another card using the awesome The Raven stamp set. This was another one of the cards that we made recently in my Halloween card class. It is a gatefold and features the Monster Bash Designer Series papers and the new Shimmer Black Stampin’ Emboss Powder.

Here is how I made the card.

  • Card base – cut piece of Crushed Curry cardstock at 4 1/4″ x 11″. Score at 3 1/4″ and 8 3/4″ on the long edge. Fold on both score lines and run bone folder along both edges.
  • Cut two pieces of DSP at 3″ x 4″ and two pieces at 2″ x 4″. Adhere to front and inner flaps of the card.
  • Cut piece of Whisper White cardstock at 4″ x 5 1/4″. Stamp greeting of your choice from the stamp set With Memento black ink. Stamp tree branch with black ink in corner. Adhere to center of the card.
  • Cut piece of Whisper White cardstock at 3 1/4″ x 4 1/2″. When I looked at the raven and branch stamps I thought that the shimmer embossing powder would work great on these images and I love how it it looks! Run the Embossing Buddy over the cardstock and then stamp the raven and branch with Versamark. Pour the embossing powder over the stamped images, shake off excess powder and use a heat tool to emboss. Use the 5th largest Stitched Rectangle die and run through your die cutting machine.
  • Cut piece of Basic Black cardstock at 3 1/2″ x 4 3/4″. Use the 6th largest Stitched Rectangle die and run through your die cutting machine. Adhere to embossed piece. Apply glue to the left side only on this piece and adhere to left front card flap.
  • Stamp “Beware” greeting with Memento black ink on scrap piece of Crushed Curry cardstock. Select one of the dies from the Ornate Frame Dies set and run through your die cutting machine. Adhere to the embossed piece.

Thanks for stopping by today!

 Product List