Cheerful Daisies-Kylie’s International Blog Highlights

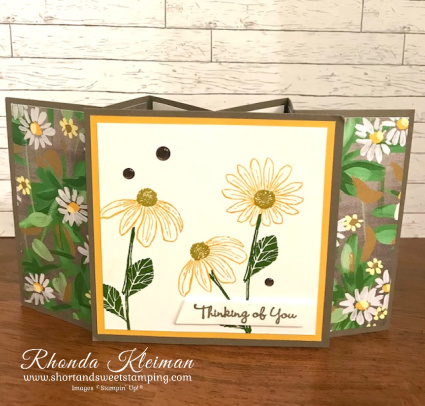
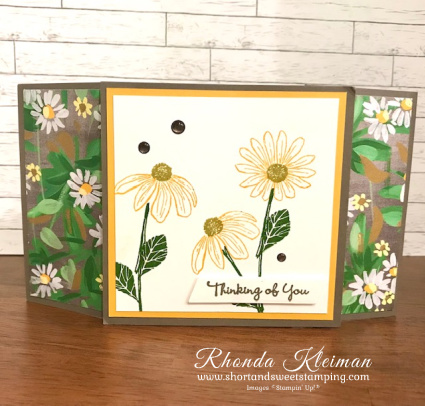
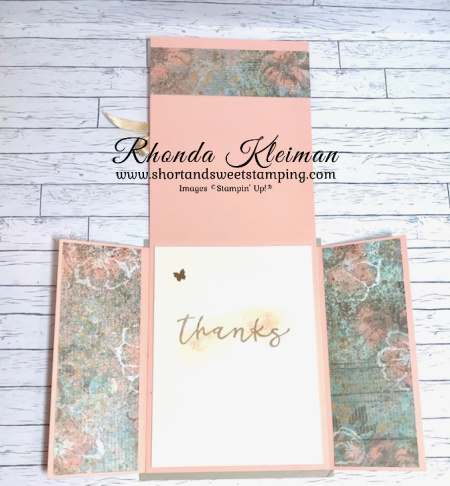
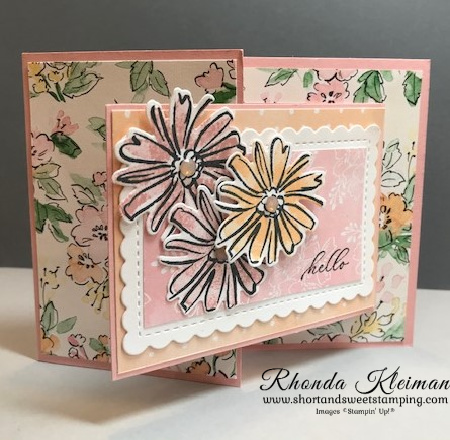
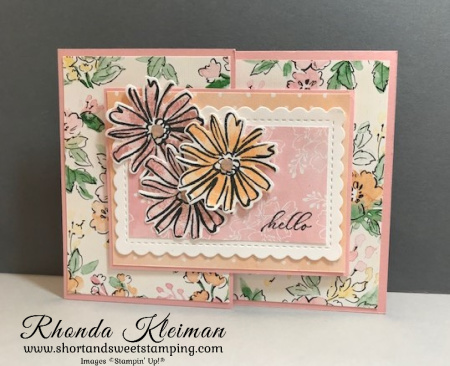
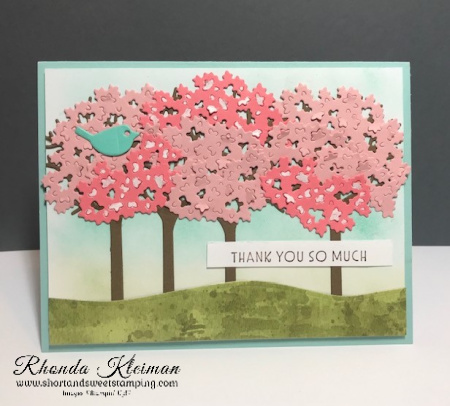
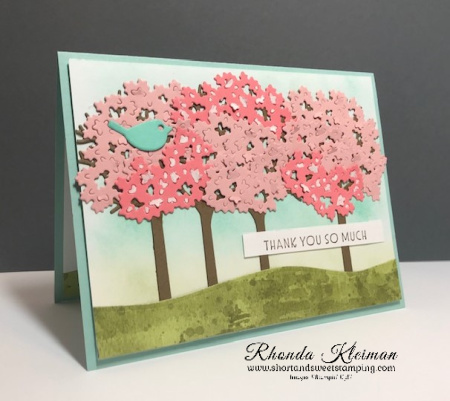
Hello! It’s been a long time since I last participated in Kylie Bertucci’s International Blog Highlights. Readers get to vote on their top five favorites in the gallery and the top 10 winners will get to participate in an International Blog Hop later this month. The theme is “thank you”. This card uses products from the the Fresh as a Daisy Suite. I stumbled onto the Flying Seagull fun fold on Susan Campfield’s blog and couldn’t wait to try it out and this is what I came up with. It looks hard to do but is actually not that difficult!

Here is how I made the card.

  • Card base – cut two pieces of Pebbled Path cardstock at 8 1/4″ x 4 1/4″ and score them at 2 1/4″, 4″, 6 1/4″.
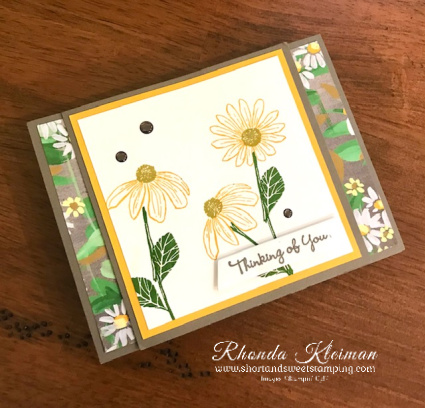
  • Pop-up piece – cut one 4 1/4″ square Pebbled Path cardstock, one 4″ square of Crushed Curry cardstock and one 3 3/4″ square of Basic White cardstock. Adhere the Pebbled Path and Crushed Curry squares together.
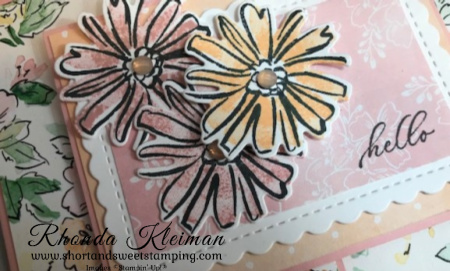
  • Stamp daisy images on the 3 3/4″ Basic white square. Stamp the stems and leaves with Garden Green ink. Stamp the daisy outline images with Crushed Curry ink. Stamp the flower centers with Wild Wheat ink. Adhere to the larger square piece.
  • Stamp greeting from the Go to Greetings stamp set with Peppled Path ink on scrap piece of Basic White cardstock and cut out with the label die from the Something Fancy Dies. Adhere to stamped image with Mini Stampin’ Dimensionals. Embellish with a few 2023-2025 In Color Dots.
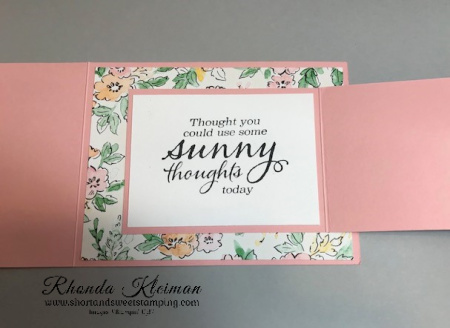
  • Fresh as a Daisy DSP – cut two pieces of the daisy print at 2″ x 4″ for the outer side panels and cut two pieces of the Pebbled Path woodgrain print at 1 1/2″ x 4. Cut two pieces of Basic White cardstock at 2″ x 4″ to write a message or stamp a greeting on the inside panels.
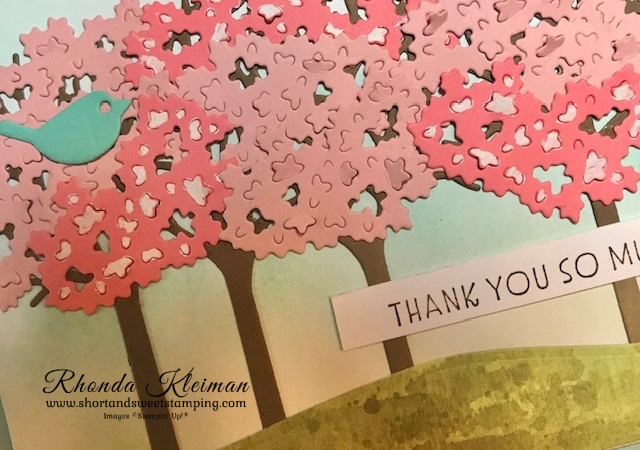
  • With the widest portion of the card bases on the left, fold it up, mountain fold. Fold the two other score lines down, valley folds. Be sure to give a good sharp crease to each of the folds.
  • Adhere the two card bases to the stamped image. Place it down and with the second valley fold, right side of base, adhere to the back of the stamped image, leaving a scant 1/4″ border. Repeat with second card base. The folds should be butting up to each other on the back.
  • Adhere DSP and Basic White cardstock strips to the wings. Tuck the outer wings under the stamped image.

I’d be so appreciative if you would vote for my card! Click on the vote image below. Once you are in the gallery, click on the heart at the top right hand side of the picture as the hearts appear.

Thanks for stopping by today!

Aa select group of Designer Series Papers are on sale at 15% off from June 1-30th. Stock up on your favorites or purchase a few from your wish list. There is no limit on how many packages you can purchase. Click here to download a flyer that shows all of the papers.

Place an online order between $50 and $149 and use this host code for June. You will receive a free gift from me the following month.  If your order is $150 or more DO NOT use the host code. You will qualify for Stampin’ Rewards.

Product List

Texture Chic Fun Fold-Kylie’s International Blog Highlights

Hello! For those of you in the US, I hope you have been enjoying the Labor Day weekend. I can’t believe it’s been almost a year since I last participated in Kylie Bertucci’s International Blog Highlights! Readers get to vote on their top five favorites in the gallery and the top 10 winners will get to participate in an International Blog Hop later this month. The theme is “thank you”.

My card features the Texture Chic Suite from the annual catalog. It is my most favorite suite and is the first one I purchased when the new catalog was introduced. The card is a fun fold that really shows off the beautiful Designer Series Papers to their fullest. I found this fold when I was browsing through Connie Stewart’s blog and decided to give it a try for a class project I was working on last month.

Here is how I made the card.

  • Card base – Cut a piece of Sahara Sand cardstock at 4 1/4″ x 5 1/2″.
  • Cut a piece of Petal Pink cardstock at 4″ x 10 1/2″ and score at 5 1/4″. Fold and crease sharply with a bone folder
  • Cut two pieces of Petal Pink cardstock at 2 1/2″ x 5 1/2″ and score both pieces lengthwise at 1/2″. Fold and crease sharply with a bone folder. Adhere pieces to both sides to the back of the bottom half of the larger piece of Petal Pink cardstock. Adhere entire piece to the Sahara Sand card base.
  • Cut a piece of Texture Chic Specialty Designer Series paper at 3 3/4″ x 5″. Cut a piece of Gold 1/4″ Shimmer Ribbon and tie into a bow around the DSP. Adhere to card front.
  • Prepare pieces for the card front collage. Cut a piece of Distressed Gold paper to fit the grid die from the Chic Dies. Cut a piece of an Adhesive Sheet to fit and adhere to paper. Run though the Stampin’ Cut & Emboss Machine. Adhere to card front over the ribbon. This piece will be the base for the collage.
  • Die cut two different leaf shapes from scrap pieces of Soft Succulent cardstock. Back the cardstock with Adhesive Sheet before running through die cutting machine.
  • Die cut three flower bases with scrap pieces of Texture Chic Specialty Designer Series Paper. Die cut three open flower accent pieces from scrap pieces of Petal Pink cardstock. Before die cutting, adhere pieces of Adhesive Sheet to each piece. Adhere the accent pieces to the flower bases.
  • Adhere leaf pieces to top part of the Distressed Gold grid piece. Arrange the three flowers and adhere with liquid glue . Add a Champagne Rhinestone to the center of each flower.
  • Cut four pieces of DSP at 1 3/4″ x 5″ for the fun fold side flaps. Select two different pieces of DSP. Adhere one set to the front of the flaps and the other set to the inside of the flaps.
  • Cut another piece of the DSP used for the inside flaps at 1 1/4″ x 4″ and adhere to inside upper part of the Petal Pink card flap.
  • Cut a piece of Very Vanilla cardstock at 3 3/4″ x 5″. Stamp the swoosh image from the Season of Chic stamp set with Petal Pink ink, stamping off once before stamping onto the cardstock. Stamp the greeting with Sahara Sand over the swoosh image. Adhere a large Brushed Brass Butterfly to the upper left corner. Adhere piece to inside.

I’d be so appreciative if you would vote for my card! Click on the vote image below. Once you are in the gallery, click on the heart at the top right hand side of the picture as the hearts appear.

Thanks for stopping by today!

Place an online order between $50 and $149 and use this host code for September. You will receive a free gift from me the following month.  If your order is $150 or more DO NOT use the host code. You will qualify for Stampin’ Rewards.

Product List
Chic Dies
[158815]
$37.00
Paper Snips
[103579]
$11.00

Pretty Pumpkins-Kylie’s International Blog Highlights

Hello! Today I’m participating in Kylie Bertucci’s International Blog Highlights. Readers get to vote on their top five favorites in the gallery and the top 10 winners will get to participate in an International Blog Hop later this month. The theme is “thank you”. This is the thank you card I sent out to my customers in October and it uses products from the Pretty Pumpkin Bundle and the Harvest Meadow Suite.

Here is how I made the card.

  • Card base – Cut a piece of Calypso Coral cardstock at 5 1/2″ x 8 1/2″, score at 4 1/4″, fold and crease with a bone folder.
  • Cut a piece of Calpyso Coral paper from the Harvest Meadow Designer Series Paper at 4″ x 5 1/4″ and adhere to card front.
  • Cut a piece of Basic White cardstock at 3 3/4″ x 5 1/4″ and run through the Stampin’ Cut & Emboss Machine with the largest Stitched Rectangle Die.
  • Stamp greeting from the Pretty Pumpkins stamp set with Crumb Cake ink.
  • Cut piece of Crumb Cake cardstock at 1 3/4″ x 5″. Cut out with the thin wildflower die from the Harvest Dies.
  • Cut piece of Be Dazzling Specialty Paper at 2″ x 2 1/2″. Cut a piece of an adhesive sheet to the same size and adhere. Cut out with the small pumpkin die from the Detailed Pumpkin Dies. Note: The Be Dazzling Specialty Paper was a Sale-A-Bration item and is no longer available. You can substitute any other metallic paper in its place.
  • Cut a piece of the Crumb Cake paper that looks like willows from the Harvest Meadow Designer Series Paper at 2 1/4″ x 4″. Cut a piece of an adhesive sheet to the same size and adhere . Cut out with the large filigree pumpkin die from the Detailed Pumpkin Dies.
  • Die cut a leaf from a scrap piece of a Gold Foil sheet.
  • Before adhering the Crumb Cake wildflower piece, trim the bottom of the stems to fit the Basic White cardstock piece. Adhere with Multipurpose Liquid Glue.
  • Peel backing off the adhesive sheet on the filigree pumpkin and adhere to Basic White cardstock piece. Adhere the gold leaf under the pumpkin stem with liquid glue.
  • Peel backing off the adhesive sheet on the small pumpkin and adhere, overlapping the bottom of the wildflower piece and filigree pumpkin.

I’d be so appreciative if you would vote for my card! Click on the vote image below. Once you are in the gallery, click on the heart at the top right hand side of the picture as the hearts appear.

Thanks for stopping by today!

Stampin’ Up! is offering the Start With Savings promotion, an excellent opportunity to join from November 4-30. You can choose to join either as a “happy discount shopper” or build a business. Instead of the standard $99 USD Starter Kit—which is already a steal of a deal— you can get a completely custom Starter Kit for only $75 USD. What an absolutely unbeatable bargain for a box with a value of $125 USD. In addition, SHIPPING IS FREE!  You can select any items from the Annual Catalog or the current Mini Catalog.  If you’ve been thinking about purchasing a new Stampin’ Cut & Emboss Machine or the Mini Stampin’ Cut & Emboss Machine you can even add those to your kit! The benefits speak for themselves. You get personal discounts of 20%-25%, early access to new catalogs and products, exclusive access to events, and the opportunity to earn additional income and other rewards. You are under no obligation to commit to making this a business, you are not required to host workshops or parties, and you can drop at anytime without penalties!  Stampin’ Up! has never had such an amazing deal!  For further information and to join, click here.  I’d love to have you as a team member!

Place an online order between $50 and $149 and use this host code for November. You will receive a free gift from me the following month.  If your order is $150 or more DO NOT use the host code. You will qualify for Stampin’ Rewards.

Product List
Harvest Dies
[156504]
$38.00

Color & Contour-Kylie’s International Blog Highlights

Hello! Today I’m participating in Kylie Bertucci’s International Blog Highlights. Readers get to vote on their top five favorites in the gallery and the top 10 winners will get to participate in an International Blog Hop later this month. The theme is “thank you”. This is one of the cards we made in one of my classes last month, where the projects featured the Hand-Penned Suite and the Color & Contours bundle. While the greeting doesn’t say “thank you,” I’m using this card to send out a special thanks to a friend.

Here’s how I made the card.

  • Card base – cut a piece of Blushing Bride cardstock at 4 1/4″ x 8 1/2″, score at 3″, fold and crease with a bone folder.
  • Smaller card base – cut a piece of Blushing Bride cardstock at 3″ x 8″, score at 4″, fold and crease with a bone folder.
  • Cut one piece of Hand-Penned Designer Series Paper at 4″ x 5 1/4″ and adhere to inside of card base, cut another piece at 2 3/4″ x 4″ and adhere to front fold of card base.
  • Using the third largest scalloped rectangle from the Scalloped Contours dies, cut a piece from Basic White cardstock.
  • Cut coordinating piece of DSP at 2 3/8″ x 3 7/8″ and adhere to front of smaller card base. Adhere the Basic White scalloped rectangle . Cut another piece of DSP at 1 7/8″ x 3 1/4″. Stamp hello greeting from Timeless Tropical stamp set with Tuxedo Black Memento Ink in lower right corner. Adhere to scalloped rectangle.
  • Stamp three flower outlines from the Color & Contour stamp set on scrap piece of Basic White cardstock with Memento ink. Use the fill stamp to stamp two of the flowers with Blushing Bride ink and one flower with Pale Papaya ink. Cut out with the coordinating die from the Scalloped Contoured dies. Adhere the two Blushing Bride flowers with liquid glue and adhere the Pale Papaya flower with a Stampin’ Dimensional.
  • Adhere the smaller card to the inside card base, making sure that the opening of the smaller card base is to the left and the fold is to the right.
  • Cut a piece of Basic White cardstock at 2 3/4″ x 3 3/4″. Stamp greeting from the Sunny Sentiments stamp set with Memento ink and adhere to inside of smaller card.
  • Adhere Petal Pink gems from the Elegant Faceted Gems to the center of each flower.

I’d be so appreciative if you would vote for my card! Click on the vote image below. Once you are in the gallery, click on the heart at the top right hand side of the picture as the hearts appear.

Thanks for stopping by today!

Delayed products are now available!

  • 156326 – Gingerbread & Peppermint Memories & More Card Pack
  • 156327 – Gingerbread & Peppermint Memories & More Cards & Envelopes
  • 156275 – Gingerbread & Peppermint Suite Collection
  • 156458 – Blackberry Beauty Specialty Designer Series Paper
  • 156278 – Blackberry Beauty Suite Collection

It’s Sale-A-Bration time! This is the first time ever that Stampin’ Up! is running a second SAB in the same year! Earn FREE products at the $50 or $100 level. There are no limits on how many items you can earn with every $50 you spend on products from the Annual Catalog or Holiday Mini Catalog. Among the products are some fun holiday Designer Series Papers for you to choose from. Click here to view the brochure.

Place an online order between $50 and $149 and use this host code for July. You will receive a free gift from me the following month.  If your order is $150 or more DO NOT use the host code. You will qualify for Stampin’ Rewards.

Product List
Paper Snips
[103579]
$10.00

Inspired Thoughts-Kylie’s International Blog Highlights

Hello! Today I’m participating in Kylie Bertucci’s International Blog Highlights. Readers get to vote on their top five favorites in the gallery and the top 10 winners will get to participate in an International Blog Hop later this month. The theme is “thank you”. Today’s card features the Inspired Thoughts bundle. I had planned to use the Beauty of the Earth DSP, but changed my mind and went with a totally different look to reflect springtime rather than the autumn hues of the DSP, however I did use a small strip of the paper for the grass. I love going to Washington, DC in April during the Cherry Blossom Festival. It is spectacular to see these beautiful trees as they bloom!

Here is how I made the card.

  • Card base – cut piece of Pool Party cardstock at 5 1/2″ x 8 1/2″, score at 4 1/4″, fold and crease with a bone folder.
  • Cut piece of Basic White cardstock at 4″ x 5 1/4″. Use blender brushes to add Pool Party, Coastal Cabana and Pear Pizzazz inks to create the background. Start at the top with Pool Party, getting a little darker as you work down. Then add the Coastal Cabana, blending it in with the Pool Party and going darker towards the middle. Then lightly blend the Pear Pizzazz.
  • Cut the tree branches with the die from the Inspiring Canopy Dies from piece of Soft Suede cardstock. Adhere with the bottom of this piece close to the bottom of the background piece.
  • Cut piece of the Old Olive DSP from the Beauty of the Earth DSP at 1 1/4″ x 5 1/4″. Die cut using the curved die. Adhere to bottom of background piece, covering over the bottom of the tree trunks .
  • Cut two sets each of the four different size leaf dies with Blushing Bride and Flirty Flamingo cardstock. I used a white gel pen to color some of the leaves on the Flirty Flamingo pieces to give the effect of some of the blossoms that are white. Arrange the pieces to cover the tree branches and adhere with liquid glue.
  • Die cut a bird with Coastal Cabana cardstock and adhere to left side of tree. You can use any set of dies (or a punch) that includes a bird image. I used the recently retired Well Written dies.
  • Stamp thank you greeting from the Inspired Thoughts stamp set with Soft Suede ink on piece of Basic White cardstock cut at 3/8″ x 2 3/4″. Adhere to card.
  • Adhere the background piece to the card base with Stampin’ Dimensionals.
  • Cut piece of Basic White cardstock at 4″ x 5 1/4″ for inside of card. I used the leftover piece from the piece of Old Olive DSP that I used to cut the grass with and adhered it to the bottom. Adhere to inside of card and stamp a greeting or leave blank.

I’d be so appreciative if you would vote for my card! Click on the vote image below. Once you are in the gallery, click on the heart at the top right hand side of the picture as the hearts appear.

Thanks for stopping by today!

The January-June 2021 Mini Catalog is retiring on June 30th. Starting tomorrow, June 1st, many products will be available at reduced prices from 10%-50% off! If you still have items on your wish list, now is the time to shop because these products will only be available while supplies last. Click here to see the retiring list.

Place an online order between $50 and $149 and use this host code for June. You will receive a free gift from me the following month.  If your order is $150 or more DO NOT use the host code.  Click here for instructions on using the host code.

Product List