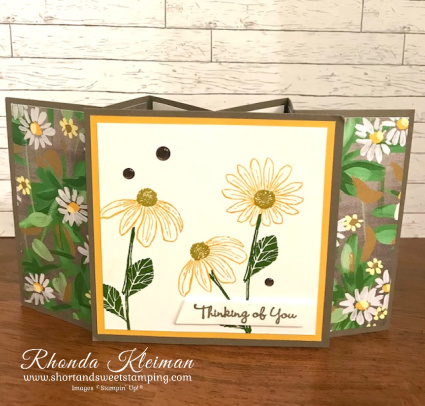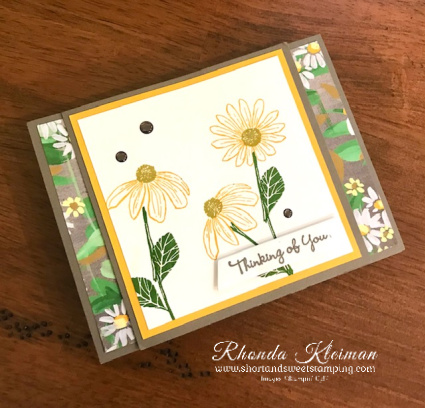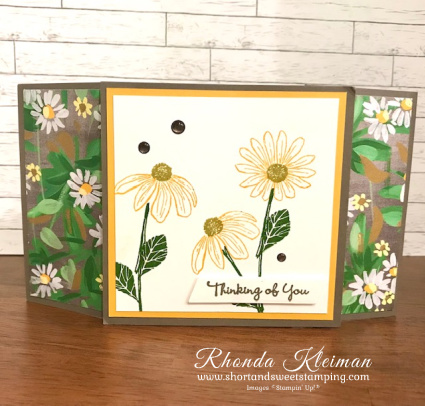
Hello! It’s been a long time since I last participated in Kylie Bertucci’s International Blog Highlights. Readers get to vote on their top five favorites in the gallery and the top 10 winners will get to participate in an International Blog Hop later this month. The theme is “thank you”. This card uses products from the the Fresh as a Daisy Suite. I stumbled onto the Flying Seagull fun fold on Susan Campfield’s blog and couldn’t wait to try it out and this is what I came up with. It looks hard to do but is actually not that difficult!

Here is how I made the card.
- Card base – cut two pieces of Pebbled Path cardstock at 8 1/4″ x 4 1/4″ and score them at 2 1/4″, 4″, 6 1/4″.
- Pop-up piece – cut one 4 1/4″ square Pebbled Path cardstock, one 4″ square of Crushed Curry cardstock and one 3 3/4″ square of Basic White cardstock. Adhere the Pebbled Path and Crushed Curry squares together.
- Stamp daisy images on the 3 3/4″ Basic white square. Stamp the stems and leaves with Garden Green ink. Stamp the daisy outline images with Crushed Curry ink. Stamp the flower centers with Wild Wheat ink. Adhere to the larger square piece.
- Stamp greeting from the Go to Greetings stamp set with Peppled Path ink on scrap piece of Basic White cardstock and cut out with the label die from the Something Fancy Dies. Adhere to stamped image with Mini Stampin’ Dimensionals. Embellish with a few 2023-2025 In Color Dots.
- Fresh as a Daisy DSP – cut two pieces of the daisy print at 2″ x 4″ for the outer side panels and cut two pieces of the Pebbled Path woodgrain print at 1 1/2″ x 4. Cut two pieces of Basic White cardstock at 2″ x 4″ to write a message or stamp a greeting on the inside panels.

- With the widest portion of the card bases on the left, fold it up, mountain fold. Fold the two other score lines down, valley folds. Be sure to give a good sharp crease to each of the folds.
- Adhere the two card bases to the stamped image. Place it down and with the second valley fold, right side of base, adhere to the back of the stamped image, leaving a scant 1/4″ border. Repeat with second card base. The folds should be butting up to each other on the back.
- Adhere DSP and Basic White cardstock strips to the wings. Tuck the outer wings under the stamped image.

I’d be so appreciative if you would vote for my card! Click on the vote image below. Once you are in the gallery, click on the heart at the top right hand side of the picture as the hearts appear.
Thanks for stopping by today!


Aa select group of Designer Series Papers are on sale at 15% off from June 1-30th. Stock up on your favorites or purchase a few from your wish list. There is no limit on how many packages you can purchase. Click here to download a flyer that shows all of the papers.

Place an online order between $50 and $149 and use this host code for June. You will receive a free gift from me the following month. If your order is $150 or more DO NOT use the host code. You will qualify for Stampin’ Rewards.
Product List


Pretty card. I love this fold too, and the taller “Flying Finch” version that I used on my card this month. I’m glad Susan Campfield shared these fun folds with us!
Thanks, Kelley! I love your card too and I will give the Flying Finch version a try!
Love the Daisy DSP and the stamped daisies. This card is gorgeous Rhonda! Thanks for being part of my International Blog Highlights this month and all the best with voting!
Thanks so much, Kylie! Thanks for continuing to host the Blog Highlights!
Great funfold and beautiful colour and DSP display!
Thanks, Rebecca!
Lovely fun fold card design. Such pretty daisies.
Thank you, Tricia!
What a great fun-fold card, Rhonda!