Festive Post for Halloween

Hello and Happy Halloween! Today’s card features the Festive Post stamp set. This is a versatile set because it has images for Halloween, Christmas and Valentines Day and they can be punched out with either the Rectangular Postage Stamp punch or other punches and dies you might have in your collection. Here is how I made the card.

  • Card base – cut piece of Basic Black cardstock at 5 1/2″ x 8 1/2″, score at 4 1/4″ and crease with a bone folder.
  • Cut piece of Cajun Craze cardstock at 4 1/8″ x 5 3/8″.
  • Select two different pieces of Magic in the Night Designer Series Paper. Cut one piece at 2 1/2″ x 5 1/4″ and another at 1 1/2″ x 5 1/4″. Adhere both pieces to the Cajun Craze piece.
  • Cut three pieces of Whisper White cardstock at 1 1/4″ x 1 7/8″. Stamp the three images from the Festive Post stamp set. Stamp the October 31 image with Tuxedo Black Memento ink. Stamp the brooms with Cajun Craze ink. Stamp the greeting with Blackberry Bliss ink. Stamp the small spider from the Hallows Night Magic stamp set under the greeting.
  • Punch three of the Rectangular Postage Stamps from scrap pieces of Basic Black cardstock. Adhere to the stamped images.
  • Wrap a piece of Metallic Mesh Ribbon twice around the Cajun Craze/DSP piece and tape on the back. Adhere this piece to the card front. Use Tear and Tape or Stampin’ Seal+ to adhere the postage stamp pieces to the card front so that they stick well to the ribbon
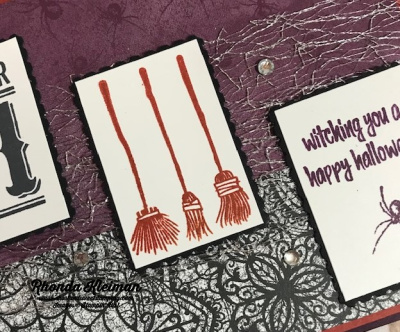
  • Adhere five rhinestone basic jewels all around the card for some extra bling.
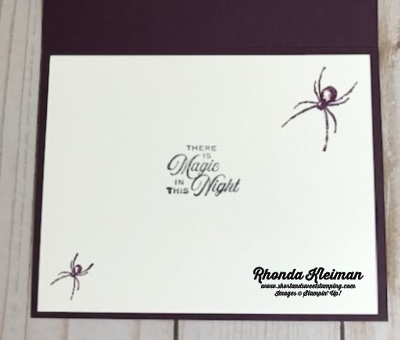
  • Cut piece of Whisper White cardstock at 4″ x 5 1/4″ and stamp a greeting from the Hallows Night Magic stamp set with Tuxedo Black Memento ink. Stamp large and small spider images from the set with Blackberry Bliss ink. Adhere to inside of card.

Thanks for stopping by today!

 Product List  
November 5-7

Hallows Night Magic – Another Card Idea

Hello! Here’s another card I created with the Hallows Night Magic Bundle. It was fun and easy to put it together. Here is how I made the card.

  • Card base – cut piece of Basic Black cardstock at 5 1/2″ x 8 1/2″, score at 4 1/4″ and crease with a bone folder.
  • Cut piece of Whisper White cardstock at 3 1/4″ x 5″.
  • Select three different papers from the Magic in this Night Designer Series Paper and cut at 1 1/2″ x 3″. Adhere to Whisper White cardstock and adhere piece to card front.
  • Stamp label image from the Hallows Night Magic stamp set on scrap piece of Whisper White cardstock with Tuxedo Black Memento ink. Color the flowers with Pumpkin Pie and Cajun Craze Stampin’ Blends and color the leaves with Old Olive Stampin’ Blends. Stamp greeting with black ink. Run through die cutting machine with the smaller label die from the Halloween Magic dies.
  • Die cut larger label from scrap piece of Basic Black cardstock and adhere to stamped label piece.
  • Cut piece of Glittered Organdy Ribbon at 6″, trim ends at an angle and adhere across the center of the card front. I used Scotch Tape to hold it down in the center. Adhere label over the ribbon.
  • Cut piece of Whisper White cardstock at 4″ x 5 1/4″. Stamp greeting with black ink. Cut strip of Basic Black cardstock at 1 1/2″ x 4 3/4″ and run it through the die cutting machine using the filigree edge die. Adhere to bottom of the cardstock. Adhere piece to inside of card.

Thanks for stopping by today!

There are just a few days left for the 15% discount on Designer Series Paper!

 Product List  
 

Hallows Night Magic

Today’s card features products from the Magic in this Night suite. When I saw this suite in the August-December 2020 mini catalog I knew right away that I would purchase some of the products because as much as I enjoy the more traditional Halloween stamps and papers, the ones this year are more sophisticated or elegant and it is a nice change of pace! I decided to showcase the die cut labels by making a gatefold card. It is one of the cards we made in my stamping club this month.

Here is how I made the card.

  • Card base – cut piece of Basic Black cardstock at 5 1/2″ x 8 1/2″. Score at 2 1/8″ on both ends, fold and crease sharply with a bone folder.
  • Cut four strips of Magic in the Night Designer Series Paper at 1 7/8″ x 5 1/4″. Adhere two of the strips to the front flaps and the remaining two strips to the inside flaps.
  • Stamp “Happy Halloween” greeting from the Hallows Night Magic stamp set with Cajun Craze ink on scrap piece of Whisper White cardstock. Run through die cutting machine with the smaller label die from the Halloween Magic dies.
  • Cut piece of Black Glitter paper with the larger die from the Halloween Magic dies. Adhere the stamped greeting to this piece with either Tear and Tape or Stampin’ Seal+. Adhere entire label piece to the left flap on the card front. Make sure that you only apply glue to the left part of the label so that the card can be opened!
  • From the sheet of Magic in the Night DSP with the bats, cut out both the large and small bats with the coordinating die from the Halloween Magic dies. Both shapes are included on the one die. Adhere bats to label.
  • Cut piece of Whisper White cardstock at 4″ x 5 1/4″. Stamp another greeting from the Hallows Night Magic stamp set with Cajun Craze ink. Stamp small bat images with Memento Tuxedo Black ink in opposite corners. Adhere to inside of card.
  • Cut length of Metallic Mesh ribbon, tie into a bow and adhere to corner of label with a glue dot.

Thanks for stopping by today!

 Product List