Sweet Strawberry Thank You

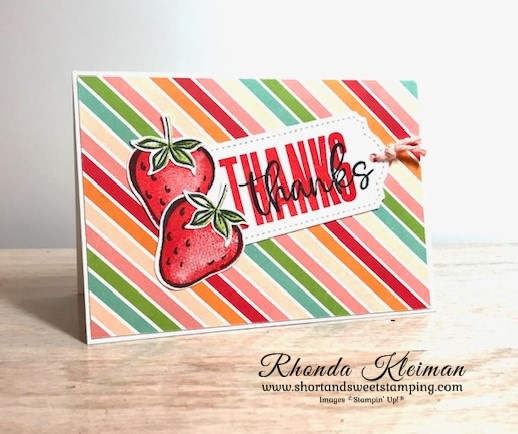
Hello! Today I’m sharing the note card I made to send to customers that placed orders with me in July. It features the very popular Sweet Strawberry bundle and Pattern Party Designer Series Paper, which you can earn as a free Stampin’ Reward host item. I used the Stampin’ Up! Basic White Note cards and envelopes. I always have a few packages in my stash, as they come in handy when you need to make quick cards. You get 20 note cards and 20 envelopes for $7.00 so it is a great buy!

Here is how I made the cards,

  • Cut a piece of the striped paper from the Pattern Party DSP pack at 3 3/8″ x 4 7/8″ and adhere to card front.
  • The Sweet Strawberry stamp set is a two-step stamp set, so first, stamp two strawberry outlines and leaf outlines with Tuxedo Black Memento ink on scrap piece of Basic White cardstock. For the second step, use the coordinating fill stamps. Stamp the strawberries with Poppy Parade ink and stamp the leaves with Granny Apple Green ink.
  • Punch out the shapes with the Strawberry Builder Punch. Adhere the leaves to the tops of the strawberries with a few small dots of liquid glue.
  • For the thank you tag, I used the Tailor Made Tag dies and stamped the greetings with the Biggest Wish stamp set. First, stamp the block letter “thanks” with Poppy Parade ink. then stamp the script”thanks” over it with Memento ink. Run through your die cutting machine with the next-to-largest die with the rounded top.
  • To finish off the card, I used a piece of retired Blushing Bride bakers twine to make a slip knot through the tag opening. You can use any ribbon or twine you have on hand. Adhere the tag to the card front at an angle. Adhere the strawberries so that they are partially on the end of the tag and partially on the DSP, slightly overlapping them.

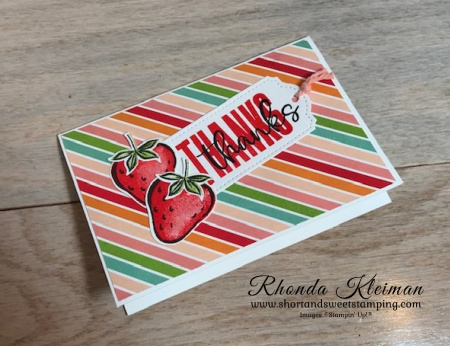
The DSP helped make this a colorful summertime card. Give this idea a try with other stamps and DSP when you need to make a quick and easy card.

Thanks for stopping by today!

Place an online order between $50 and $149 and use this host code for August. You will receive a free gift from me the following month.  If your order is $150 or more DO NOT use the host code. You will qualify for Stampin’ Rewards.

Join Stampin’ Up! now through September 30th. You get to select $125 worth of products for only $99 and will also get a FREE bundle from the Holiday Catalog! The kit ships for free. I’d love to have you join my team. Become a happy discount shopper or build a business – the choice is yours! Click here for the benefits of joining Stampin’ Up!

Here is a list of bundles you can select from.

Product List
Paper Snips
[103579]
$10.00

Berry Delightful Note Cards and Gift Box

Hello! Today’s project is a set of four note cards and a coordinating gift box that features the yummy Berry Delightful Designer Series Paper. This paper is part of a Sale-A-Bration bundle that also includes the Berry Blessings stamp set. You can earn this bundle for free with a $100 order, but time is running out because Sale-A-Bration ends tomorrow, February 28th. This will be your last chance to earn these products. This is one of the projects we did in my stamping club this month.

Here is how to make the note cards.

  • This project uses the Basic White Note Cards & Envelopes in the annual catalog. Use four cards and envelopes. Cards measure 5″ x 3 1/2″ folded.
  • Fold note cards and crease with bone folder.  Select four different sheets of the Berry Delightful DSP and cut them at 3 1/4″ x 4 3/4″. Adhere DSP to card fronts.
  • Cut four pieces of contrasting DSP at 3/4″ x 4 3/4″ and adhere them to the to card fronts, slightly below the middle.
  • Stamp greetings from the Sweet Strawberry stamp set. Select four ink colors that coordinate with the DSP. These cards use Poppy Parade, Blackberry Bliss, Garden Green and Pacific Point. I used two different greetings and stamped each of the two in a different color to coordinate with the cardstock for the scalloped circles.  Die cut the smaller “Just for You” greeting with the smallest circle in the Layering Circles die set.  Die cut the larger “Hello There” greeting with the second smallest circle in the die set.
  • I used the same colors of cardstock as the inks. Die cut the scalloped circles from each of the four different colors of cardstock.  For the smaller circle use the second smallest scalloped circle and for the larger circle use the third smallest scalloped circle.
  • Adhere the stamped greetings to the coordinating scalloped circle pieces and adhere to right side of card front.

The box is made with one of the Mini Paper Pumpkin Boxes from the annual catalog. Here is how I made it.

  • Make box by folding along all score lines. These boxes are food safe so one side is shiny and the other side is matte.  You want the shiny side to be the inside of the box.
  • Cut piece of DSP at 3 ¾” x 5 ½” and adhere to top of box.  Using the same sheet of DSP, cut two strips at 1″ x 5 3/4″ and two strips at 1″ x 3 3/4″. Adhere the strips to the sides of the boxes.  Cut a contrasting strip of DSP at 1″ x 5 1/2″ and adhere to the center of the top of the box.
  • Stamp greeting from the Berry Best stamp set with Garden Green Ink on a 3″ square piece of Basic White cardstock.  Die cut with the second largest circle in the Layering Circles dies, with the greeting closer to the bottom of the circle in order to leave space above to adhere punched out strawberries.  You can also punch out the circle if you own the 2 ½” circle punch, which is now retired. Adhere to right side of the top of the box.
  • From the 12” x 12” sheet of DSP with the multi-colored strawberries and flower blossoms, punch out the Poppy Parade and Rich Razzleberry strawberries with the Strawberry Builder punch.  This will cut off the stem part of the strawberry.  To add stems back, punch out from scraps of Garden Green cardstock using the Strawberry Builder punch and adhere to strawberries.  Using the builder punch, punch out the Pacific Point flower blossoms. Arrange strawberries and flower blossoms around the circle and adhere.
  • Add the four note cards and envelopes to the inside of the box and voila! You have a beautiful gift to give to someone special!

Thanks for stopping by today!

Sale-A- Bration is a great time to consider joining Stampin’ Up! This is your last opportunity to take advantage of this special promotion. During this promotion you can purchase the starter kit for only $99 and select $125 worth of merchandise from the current annual catalog or the new mini catalog. This is the BEST deal! You will also get a FREE 200 6″ x 6″ sheet assortment of our newest Designer Series Papers for five current color families, a $57.50 value! This paper will not be available for purchase until May 2021. Free shipping is also included. Become a happy shopper and enjoy a 20% discount on future orders. Click here to join.

Product List