International Highlights Winners Blog Hop-Layering Leaves

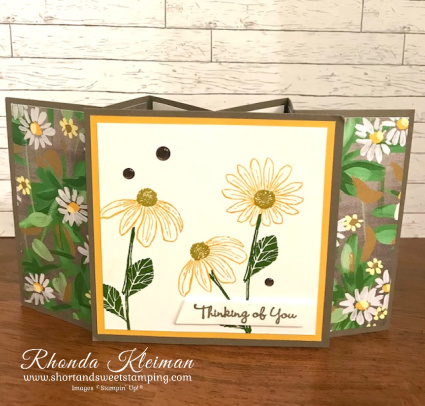
I’m very excited to be participating in Kylie Bertucci’s International Highlights Top 10 Winners Blog Hop this month! Thanks so much to everyone that voted for my card in the International Blog Highlights. It is an honor to be included in this group of talented designers from around the world! This Cheerful Daisies card won me a spot in this Blog Hop. Click here to see full directions on how to make the card.

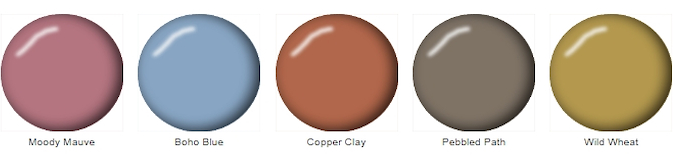
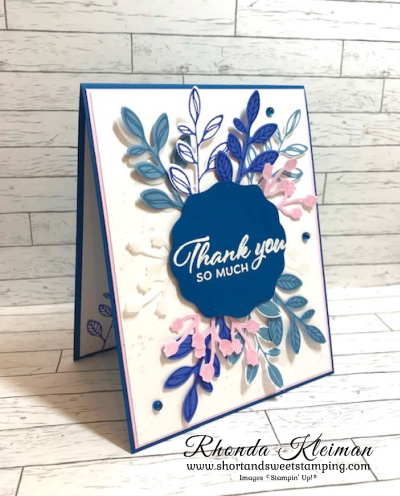
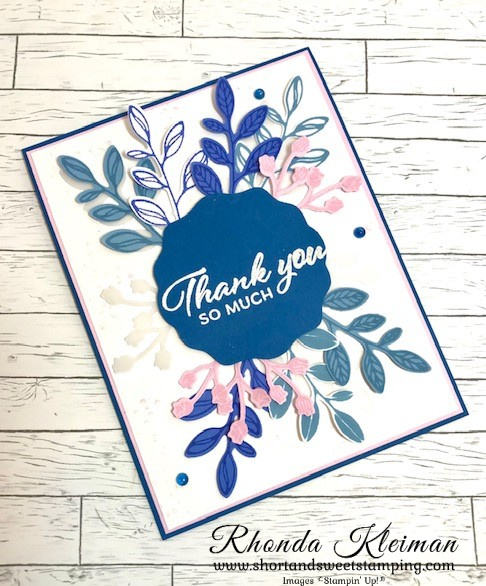
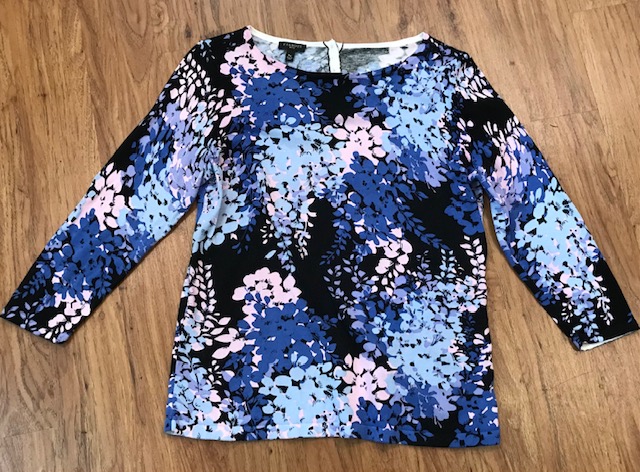
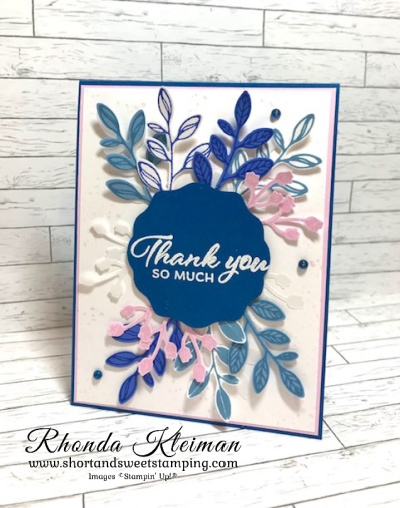
Today’s card features the Layering Leaves stamp set. It is one of the first sets I purchased from the new annual catalog because of its versatility and the fabulous greetings and font. The color palette was inspired by one of my favorite Talbots spring sweaters! The pink flowers were calling out Bubble Bath and I also selected Blueberry Bushel, Boho Blue and Orchid Oasis.

Here is how I made the card.

  • Card base – cut piece of Blueberry Bushel cardstock at 4 1/4″ x 11″, score at 5 1/2″, fold and crease with a bone folder.
  • Cut piece of Bubble Bath cardstock at 4 1/8″ x 5 3/8″ and adhere to card front.
  • Stamp seven large leaves as follows: two Boho Blue tone on tone; two Orchid Oasis tone on tone, two Boho Blue stamped with Boho Blue ink on Basic White cardstock; one Orchid Oasis stamped with Orchid Oasis ink on Basic White cardstock. Punch out with the Boughs Punch.
  • Stamp five of the smaller leaves with Bubble Bath tone on tone and punch them out.
  • Punch out three large vellum leaves and three small vellum leaves.
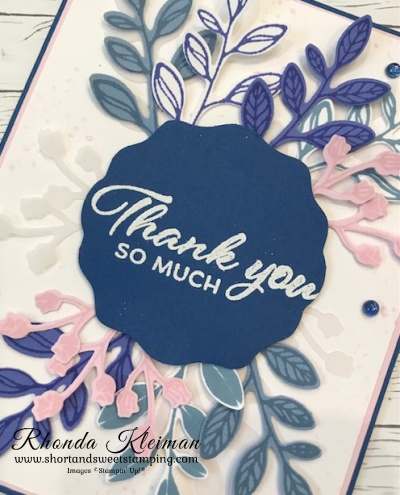
  • Punch Blueberry Bushel circle with the Decorative Circle punch. Stamp greeting with Versamark ink and heat emboss with white embossing powder. The embossing powder is one in a set of three basic Stampin’ Emboss Powders.
  • Arrange the leaves on a piece of Basic White cardstock cut at 4″ x 5 1/4″. Adhere the vellum leaves first with either a few dots of liquid glue or glue dots. I placed two large leaves at the top and one at the bottom, two small leaves at the middle left side and one at the middle right side. Adhere four large stamped leaves at the top and three at the bottom. Adhere two pink leaves at the top and three at the bottom.
  • Using the speckles stamp, fill in some of the white space around the leaves by lightly stamping with Bubble Bath ink . Adhere piece to the card front.
  • Adhere the embossed greeting with Stampin’ Dimensionals in the middle of the leaf arrangement. Embellish with a few Blueberry Bushel gems from the Tinsel Gem Four-Pack.

Please click on the links below to check out all of the projects from this month’s winners!

Thanks for stopping by today!

Product List
Bough Punch
[157711]
$22.00

Place an online order between $50 and $149 and use this host code for June. You will receive a free gift from me the following month.  If your order is $150 or more DO NOT use the host code. You will qualify for Stampin’ Rewards.

Layering Leaves Quick & Easy Card

Hello!

Today’s card features the Layering Leaves stamp set and coordinating Bough Punch. This is the customer thank you card I sent out in May. It was also one of the class projects I recently did for a group of women that had never stamped before. Layering Leaves is one of the first stamp sets I purchased when the new annual catalog went live. The lovely images and greetings are so versatile! I used the Hello, Irresistible Designer Series Paper, which is an Online Exclusive product.

Here is how I made the cards.

  • Card base: Cut a piece of Lost Lagoon cardstock at 5 1/2″ x 8 1/2″, score at 4 1/4″, fold and crease with a bone folder.
  • Cut a piece of Basic White cardstock at 4 1/8″ x 5 3/8″ and adhere to card front. Cut piece of Hello Irresistible Designer Series Paper at 4″ x 5 1/4″.
  • Stamp one of the large leaf designs with Lost Lagoon ink and one of the small leaf designs with Soft Sea Foam ink on a scrap piece of Basic White cardstock and punch out with the Boughs punch.
  • Cut a piece of Soft Sea Foam cardstock at 2″ x 3 1/2″. Stamp greeting with Lost Lagoon ink. Run through die cutting machine with the smaller oblong shaped die from the Something Fancy dies.
  • Cut a piece of Lost Lagoon 1/4″ Bordered Ribbon at 5″ and wrap sides around the DSP piece. This ribbon is so pretty when you see it in person and it is very easy to work with!
  • Adhere the leaves to the card front with mini glue dots. Slide the leaves under the ribbon. Adhere the greeting with Stampin’ Dimensionals.
  • Cut a piece of Basic White cardstock at 4″ x 5 1/4″. With the 3/4″ leftover strip of DSP, cut the width to 4″ and adhere to cardstock as a way to decorate the inside of the card. Stamp greeting of your choice and adhere to card.

Thanks for stopping by today!

There is still one week left to join Stampin’ Up! Purchase the Starter Kit for $99 and get $155 worth of the products of your of your choice. This is $56 in free product, which $30 more than usual. The kit ships for free. You will get a discount of 20%-25% on all future orders as long as you remain active as a demonstrator. As a demonstrator you get to see the annual and mini catalogs one month before they to live to customers and youget to place pre-orders in advance of the catalogs going live. You also get the opportunity to attend virtual and in-person events just for demonstrators. Become a happy discount shopper – you do not have to do this as a business! Enjoy your discount and as long as you meet the $300 quarterly minimum in sales, you will remain active. If you miss the quarterly minimum or decide you no longer wish to be a demonstrator, there is absolutely no penalty for dropping and you can go back to being a customer! To join, click here. I’d love to have you on my team!

Place an online order between $50 and $149 and use this host code for June. You will receive a free gift from me the following month.  If your order is $150 or more DO NOT use the host code. You will qualify for Stampin’ Rewards.

Product List
Bough Punch
[157711]
$22.00

Cheerful Daisies-Kylie’s International Blog Highlights

Hello! It’s been a long time since I last participated in Kylie Bertucci’s International Blog Highlights. Readers get to vote on their top five favorites in the gallery and the top 10 winners will get to participate in an International Blog Hop later this month. The theme is “thank you”. This card uses products from the the Fresh as a Daisy Suite. I stumbled onto the Flying Seagull fun fold on Susan Campfield’s blog and couldn’t wait to try it out and this is what I came up with. It looks hard to do but is actually not that difficult!

Here is how I made the card.

  • Card base – cut two pieces of Pebbled Path cardstock at 8 1/4″ x 4 1/4″ and score them at 2 1/4″, 4″, 6 1/4″.
  • Pop-up piece – cut one 4 1/4″ square Pebbled Path cardstock, one 4″ square of Crushed Curry cardstock and one 3 3/4″ square of Basic White cardstock. Adhere the Pebbled Path and Crushed Curry squares together.
  • Stamp daisy images on the 3 3/4″ Basic white square. Stamp the stems and leaves with Garden Green ink. Stamp the daisy outline images with Crushed Curry ink. Stamp the flower centers with Wild Wheat ink. Adhere to the larger square piece.
  • Stamp greeting from the Go to Greetings stamp set with Peppled Path ink on scrap piece of Basic White cardstock and cut out with the label die from the Something Fancy Dies. Adhere to stamped image with Mini Stampin’ Dimensionals. Embellish with a few 2023-2025 In Color Dots.
  • Fresh as a Daisy DSP – cut two pieces of the daisy print at 2″ x 4″ for the outer side panels and cut two pieces of the Pebbled Path woodgrain print at 1 1/2″ x 4. Cut two pieces of Basic White cardstock at 2″ x 4″ to write a message or stamp a greeting on the inside panels.
  • With the widest portion of the card bases on the left, fold it up, mountain fold. Fold the two other score lines down, valley folds. Be sure to give a good sharp crease to each of the folds.
  • Adhere the two card bases to the stamped image. Place it down and with the second valley fold, right side of base, adhere to the back of the stamped image, leaving a scant 1/4″ border. Repeat with second card base. The folds should be butting up to each other on the back.
  • Adhere DSP and Basic White cardstock strips to the wings. Tuck the outer wings under the stamped image.

I’d be so appreciative if you would vote for my card! Click on the vote image below. Once you are in the gallery, click on the heart at the top right hand side of the picture as the hearts appear.

Thanks for stopping by today!

Aa select group of Designer Series Papers are on sale at 15% off from June 1-30th. Stock up on your favorites or purchase a few from your wish list. There is no limit on how many packages you can purchase. Click here to download a flyer that shows all of the papers.

Place an online order between $50 and $149 and use this host code for June. You will receive a free gift from me the following month.  If your order is $150 or more DO NOT use the host code. You will qualify for Stampin’ Rewards.

Product List

Designer Series Paper Sale – 15% Off!

Hello!

If you are like me and you can’t get enough of Stampin’ Up! Designer Series Papers, a select group of papers are on sale at 15% off from June 1-30th. Stock up on your favorites or purchase a few from your wish list. There is no limit on how many packages you can purchase. Here is a flyer that shows all of the sale papers. You can also download the flyer by clicking here. Scroll down to the end of this post to view a product list. Click on the image of the paper you would like to purchase and it will take you directly to my online store.

Join Stampin’ Up! now through June 30th. Purchase the Starter Kit for $99 and get $155 worth of the products of your of your choice. This is $56 in free product, which $30 more than usual. The kit ships for free. You will get a discount of 20%-25% on all future orders as long as you remain active as a demonstrator. As a demonstrator you get to see the annual and mini catalogs one month before they to live to customers and you can also place pre-orders in advance of the catalogs going live. You also get to attend virtual and in-person events just for demonstrators. Become a happy discount shopper – you do not have to do this as a business! Enjoy your discount and as long as you meet the $300 quarterly minimum in sales, you will remain active. If you miss the quarterly minimum or decide you no longer wish to be a demonstrator, there is absolutely no penalty for dropping and you can go back to being a customer! To join, click here. I’d love to have you on my team!

Thanks for stopping by today!

Place an online order between $50 and $149 and use this host code for June. You will receive a free gift from me the following month.  If your order is $150 or more DO NOT use the host code. You will qualify for Stampin’ Rewards.

Product List

Earthen Elegance Step Card

Hello!

Today’s card is one that we made at my monthly in-person class this past Saturday and it showcases the awesome Earthen Elegance Suite. Of all of the suites in the new annual catalog this is the one that immediately got my attention. The earth tones are rich and the textures in the images are so realistic. This is a great suite for making masculine cards as well. The fun fold is a step card that I learned how to make at a recent Creative Retreat held by Kylie Bertucci and Lisa Curcio and while it might look complicated, is actually very easy to make.

Here is how I made the card.

  • Card base – cut a piece of Copper Clay cardstock at 5 1/2″ x 5 1/2″ and score at 3/4″, 1 1/2″ and 3 1/2″. Crease sharply with a bone folder.
  • Steps – For the large step cut a piece of Copper Clay cardstock at 3″ x 8 1/2″ and score at 4 1/4″ and 8″. For the small step cut a piece of the cardstock at 2″ x 7″ and score at 3 1/2″ and 6 1/2″. Fold both of the steps in half on the score line and crease with a bone folder. Lightly crease the 1/2″ score lines.
  • For the steps cut one piece of Basic White cardstock at 2/7/8″ x 4 1/8″ and one piece at1 7/8″ x 3 3/8″. Adhere to fronts of step pieces. Cut one piece of the Earthen Elegance DSP at 2 3/4″ x 4″ and one piece at 1 3/4″ x 3 1/4″. Adhere to Basic White pieces.
  • On scrap pieces of Basic White cardstock, use the Earthen Textures stamp set to stamp large vase and branch image with Pecan Pie ink and stamp the basket with Pretty Peacock ink. Run through die cutting machine with coordinating Earthen Textures dies.
  • Cut a piece of Pretty Peacock cardstock at 3″ x 4 1/2″ and run through die cutting machine with the large leaf die. Cut a piece of Pretty Pecan cardstock at 1 1/2″ x 4″ and run through die cutting machine with the fern die.
  • Adhere the large and small steps to the bottom front of the card base fold, leaving a small margin on both sides. Adhere the backs of the large and small steps to the back of the card, aligning the bottom of each to the bottom of the back fold.
  • Cut 7″ piece of Natural Wavy Trim, adhere one end at the back of the long vase and wrap it around three times, adhering the remaining end at the back. Adhere large vase to large step, cut off the stem from the large Pretty Peacock leaf and adhere with mini glue dots under the top of the vase. Adhere basket to small step and adhere the fern and branch pieces.
  • Cut piece of Basic White cardstock at 1 7/8″ x 5 3/8″ for the inside greeting. I used the Biggest Wish stamp set, as the greetings fit perfectly on this narrow strip. I stamped “Happy” (block letters) with Pretty Peacock ink at the left side of the strip and then stamped “Birthday” (cursive letters) with Pecan Pie ink, staggering it to the bottom center. Adhere to card.
  • Add several Pretty Peacock gems from the Tinsel Gems 4-Pack to the large step.

Thanks for stopping by today!

The Welcome Inn Paper Pumpkin Kit perfectly coordinates with the Countryside Inn Suite Collection (item number 161474) from the 2023–2024 Annual Catalog! You can use the stamps and paper from both the suite and kit to create cards that are stylish and refined. Create these elegant hospitality cards using the suite’s Countryside Inn 12″ x 12″ (30.5 x 30.5 cm) Designer Series Paper and the kit’s beautiful floral cards. You can purchase a set of coordinating add-on dies that include a vase, flower and leaf, while supplies last. Item number 163192, Price $6.00. Click here to purchase the kit on my Paper Pumpkin website.

The kit includes all supplies needed to create nine cards, three each of three different designs; coordinating stamp set; Night of Navy Stampin’ Spot; embellishments; floral details and precut vases. Coordinating Stampin’ Up! colors: Balmy Blue, Boho Blue, Calypso Coral, Daffodil Delight, Early Espresso, Misty Moonlight, Night of Navy, Old Olive.

Place an online order between $50 and $149 and use this host code for May. You will receive a free gift from me the following month.  If your order is $150 or more DO NOT use the host code. You will qualify for Stampin’ Rewards.

Product List

Circle Sayings Cards

Hello!

Today’s cards feature the new Circle Sayings bundle, which includes a very versatile stamp set and a circle punch. I’m so happy to see that Stampin’ Up! has been bringing back circle punches – yay! As I was deciding on a layout for the two cards, last week I came across a card sketch that Dawn Griffiths had on her blog. Dawn’s Stamping Thoughts, that I knew would be perfect. You can click here to view the sketch. It was fun using some of our new colors. The Lemon Lolly is such a soft and pretty color-it put a smile on my face as I was making one of the cards! Here is how I made the cards.

Celebrate Card

  • Card base -Cut a piece of Lemon Lolly cardstock at 4 1/4″ x 11″, score at 5 1/2″, fold and crease with a bone folder.
  • Cut two pieces of Basic White cardstock at 4″ x 5 1/4″. Emboss one piece with the cross-hatch embossing folder from the Basics 3D Embossing Folder set, which is available as an Online Exclusive Product. Adhere to card front. Use the other piece for the inside of the card.
  • Cut three pieces from the Bright and Beautiful Designer Series Paper: 2″ x 2″. 3/4″ x 4″, 1 1/4″ x 4 1/2″ and adhere to card front.
  • Cut piece of Basic White cardstock at 3″ x 3″. Stamp “celebrate” image and cupcake image with Memento Black Ink. Color the cupcake with Lemon Lolly and Berry Burst Stampin’ Blends. Punch out with the 2 3/8″ circle punch.
  • Cut piece of Lemon Lolly cardstock at 3″ x 3″ and run through die cutting machine with the second largest Stylish Shapes circle die. Adhere to stamped image. Adhere to card front with Stampin’ Dimensionals.
  • Embellish with Lemon Lime gems from the Tinsel Gems Four-Pack.
  • For the inside of the card, stamp a cupcake in the lower left on the remaining piece of Basic White cardstock. Color with the light Lemon Lolly and Berry Burst Stampin’ Blends and adhere.

Happy Birthday Card

  • Card base -Cut a piece of Azure Afternoon cardstock at 4 1/4″ x 11″, score at 5 1/2″, fold and crease with a bone folder.
  • Cut two pieces of Basic White cardstock at 4″ x 5 1/4″. Emboss one piece with the flower embossing folder from the Basics 3D Embossing Folder set, which is available as an Online Exclusive Product. Adhere to card front. Use the other piece for the inside of the card.
  • Cut two pieces from the Bright and Beautiful Designer Series Paper: 3/4″ x 4″, 1 1/4″ x 4 1/2″. Cut one piece of Boho Blue paper from the 2023-2024 In Color Designer Series Paper at 2″ x 2″. Adhere to card front.
  • Cut piece of Basic White cardstock at 3″ x 3″. Punch circle out from the 2 3/8″circle punch. Stamp two seashell images with Memento Black Ink. Color the shells with light and dark Azure Afternoon, Boho Blue, Crumb Cake and Pecan Pie Stampin’ Blends. Stamp birthday greeting with Boho Blue ink.
  • Cut piece of Azure Afternoon cardstock at 3″ x 3″ and run through die cutting machine with the second largest Stylish Shapes circle die. Adhere to stamped image. Adhere to card front with Stampin’ Dimensionals.
  • Embellish with Boho Blue Adhesive-Backed Solid Gems.
  • For the inside of the card, stamp the seashell image with Boho Blue ink in the upper right corner on the remaining piece of Basic White cardstock. Adhere.

Thanks for stopping by today!

The Confetti Birthday Kit is the newest addition to the Kits Collection.  It comes with everything you need to quickly create confetti shaker cards—a total of 9 cards in 3 lively designs. The kit includes: coordinating envelopes; stamp set; Blueberry Bushel ink spot; printed card bases, card fronts, self-adhesive cellophane shaker bags, die cut pieces, holographic foil labels, adhesive, embellishments and a clear block. Coordinating colors are: Blueberry Bushel, Coastal Cabana, Crushed Curry, Flirty Flamingo, Lemon Lime Twist, Poppy Parade.  Cost of the kit is $23.00 and the item number is 162390. To purchase the kit, go to my online store by clicking here.

A reminder that Online Exclusive Products are available for purchase.  New products will be added to the Online Store three times a year – March, July and November.  These products will be available online only and will not appear in any catalog.  There will be no end date to the sales period.  Some products will be re-ordered when inventory is low and others will only be available while supplies last.  To see all of the new Online Exclusive Products, including the Kits Collection and SU branded merchandise you can visit my online store.

Place an online order between $50 and $149 and use this host code for May. You will receive a free gift from me the following month.  If your order is $150 or more DO NOT use the host code. You will qualify for Stampin’ Rewards.

Product List

2023-2024 Annual Catalog Begins

The 2023-2024 Annual Catalog is now live! Click on the cover to view the catalog online.

To view a digital version of the catalog, click here.

To purchase products from the new catalog, visit my online store.

You can now stock up on the new 2023-2025 In Colors and the brand new and returning colors.

Thanks for stopping by today!

Place an online order between $50 and $149 and use this host code for May. You will receive a free gift from me the following month.  If your order is $150 or more DO NOT use the host code. You will qualify for Stampin’ Rewards.