Let’s Set Sail Meets Oceanfront

Hello!

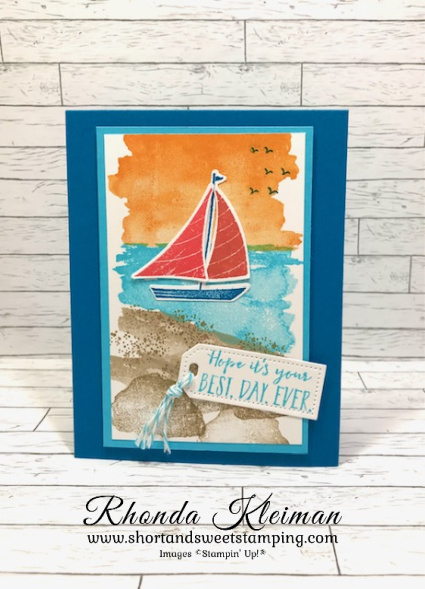
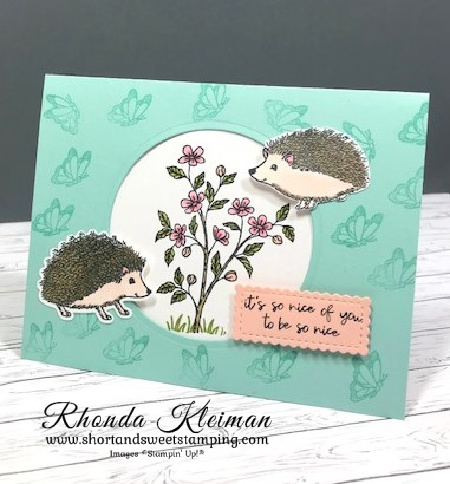
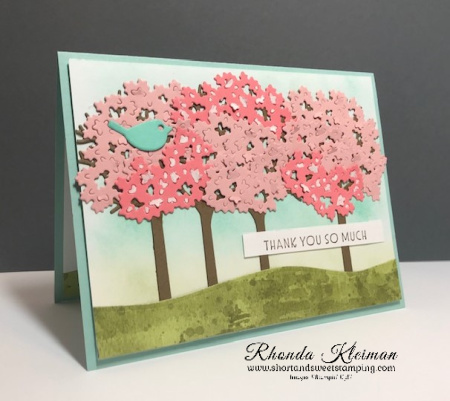
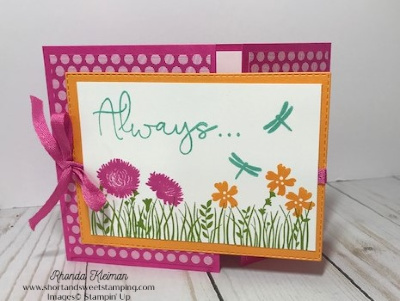
Today’s card uses the Oceanfront and Let’s Set Sail stamp sets and is a departure for me from my usual floral cards! This is one one of the projects we made in my classes this month.

Here is how I made the card.

  • Card base – cut a piece of Pacific Point cardstock at 4 1/4″ x 11″, score at 5 1/2″, fold and crease with a bone folder.
  • Cut a piece of Tahitian Tide cardstock at 3 1/4″ x 5″ and set aside.
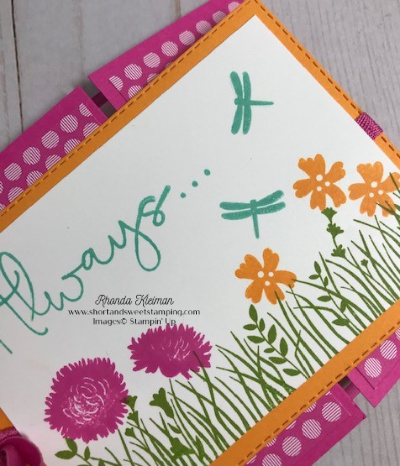
  • Cut a piece of Basic White cardstock at 3″ x 4 3/4″. Stamp the sky image from the Oceanfront stamp set with Mango Melody ink. Stamp the gulls from Let’s Set Sail with Pacific Point ink in upper right corner over the Mango Melody ink. Stamp the sky image withTahitian Tide ink. Next, use the narrow angled stamp for the sand. Use Sahara Sand ink and stamp with the wider point to the left and then stamp a second time underneath it with the narrower point to the left. Use both of the rock images and stamp them at the bottom of the card with Sahara Sand ink. Stamp the sand grains with Crumb Cake ink.
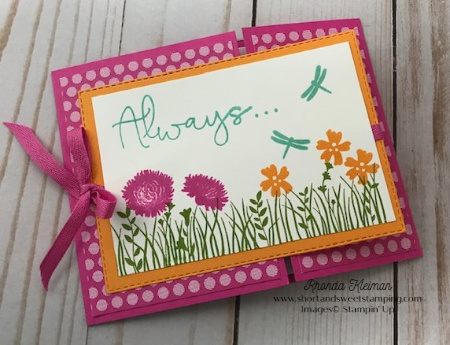
  • To make the sailboat, stamp the base of the boat with Pacific Point ink. Stamp the sails with Calypso Coral ink. Punch out with the sailboat punch. Adhere base of boat with a thin line of liquid glue. Adhere the sails with mini glue dots on either side of the mast.
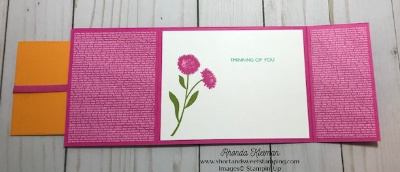
  • For the greeting, use a scrap piece of Basic White cardstock. Run through the Mini Stampin’ Cut and Emboss Machine with the smallest die with the straight edge top from the Tailor Made Tags. Stamp greeting from Let’s Set Sail with Tahitian Tide ink.
  • Cut two pieces of the Tahitian Tide Bakers Twine from the 2022-2024 In Color Pack at 5 1/2″. Thread through hole in top of tag and tie in a slip knot. Trim ends and adhere tag to card front. Adhere stamped piece to the Tahitian Tide cardstock. Adhere piece to card base with Stampin’ Dimensionals.

Thanks for stopping by today!

Sale-A-Bration! runs through August 31st and is going strong! Select free items with every $50 or $100 purchases. There is no limit on the number of times you can get free items. Please note that all SAB products are only available while supplies last. The Pool Party & Soft Sea Foam Cards & Envelopes (item #159940) are no longer available.

Place an online order between $50 and $149 and use this host code for July. You will receive a free gift from me the following month.  If your order is $150 or more DO NOT use the host code. You will qualify for Stampin’ Rewards.

Product List
Paper Snips
[103579]
$11.00

Pansy Patch Card

Hello!

I’m finally back to posting after an absence of over two months! In the next two weeks I will be featuring a backlog of cards I’ve made during that time, mixed in with projects featuring products from the new annual catalog. Today’s card features the Pansy Patch bundle, which has carried over into the new catalog. Pansies are one of my favorite flowers so when the Pansy Petals Suite was introduced in the current catalog, I was very excited! As excited as I was, the stamp set and dies can be a little intimidating to figure out how to use them, so I didn’t do much with them until recently, when Kylie Bertucci offered a creative retreat that featured this suite. After the retreat, attendees received a tutorial with 21 exclusive projects. I CASE’d today’s card from one of Bruno Bertucci’s projects. I kept the design but totally changed up the Designer Series Paper and ink colors for a springtime feel.

Here is how I made the card.

  • Card base – cut a piece of Polished Pink cardstock at 4 1/4″ x 11″, score at 5 1/2″, fold and crease with a bone folder.
  • Cut a piece of Pansy Petals Designer Series Paper at 4 1/4″ x 5 1/2″ and adhere to card front. (This DSP is not carrying over into the new catalog and is now sold out.)
  • Die cut a piece of Basic White cardstock at 3 1/2″ x 4 1/2″ and run through the Stampin’ Cut and Emboss Machine with the next-to-largest rectangle from the Scalloped Contours Dies. Adhere to card front with Stampin’ Dimensionals.
  • This is a two-step stamp set. Stamp two of the large pansies. Stamp the base with Blushing Bride ink, stamping off once before stamping onto a piece of Basic White cardstock. Stamp the detailed stamp over the base with Polished Pink ink. Stamp the center of the flower with Blushing Bride ink, stamping off once. Stamp the beard with Tuxedo Black Memento ink. Cut out with the large pansy from the Pansy Dies.
  • Stamp three of the smaller pansies. Stamp the base with Pale Papaya ink. Stamp the detailed stamp over the base with Calypso Coral ink. Stamp the beard with Tuxedo Black Memento ink. Cut out with the smaller pansy from the Pansy Dies.
  • Stamp the pansy bud base with Pale Papaya ink and stamp the detailed stamp with Calypso Coral ink. Cut out with the bud from the Pansy Dies.
  • Stamp one bud stem and two long stems with Evening Evergreen ink and cut out with Pansy Dies.
  • Stamp three leaves from the base stamp with Soft Sea Foam ink and stamp the detail stamp with Soft Succulent ink. Stamp two leaves with Soft Succulent ink for the base and Evening Evergreen ink with the detail stamp. Use both leaf shapes. Cut out with the two different leaf dies.
  • Stamp greeting with Memento ink on a 5/8″ x 3/4″ piece of Polished Pink cardstock and flag one end. I needed a small greeting to fit into the space where I wanted the greeting go, so I chose one of the greetings from the Hydrangea Haven stamp set.
  • To assemble the flowers and leaves, first adhere the leaves to the flowers with Mini Glue Dots. Adhere the bud to the bud stem with a drop of liquid glue. Adhere the stems to the Basic White scalloped rectangle with Mini Stampin’ Dimensionals. Adhere the flowers to the stems with Stampin’ Dimensionals, as shown.
  • Finish off the card by adding some bling. I used the 2021-2023 In Color Jewels for the centers of the flowers. (These jewels are on the last chance list.)

Thanks for stopping by today!

2022-2023 Annual Catalog goes live on May 3, 2022!

There are just a few days left to purchase items that will be retiring from the 2021-2022 Annual Catalog. May 2nd is the last day to order from this catalog. Click here to view the Last Chance list. Everything on the list is while supplies last, so a number of products are now sold out.

$99 Starter Kit Promotion Begins on May 3, 2022

Join Stampin’ Up! from May 3-May 31. Choose $125 worth of products for $99 plus get $66.50 in bonus 2022-2024 In Color Products for free! This includes the Ink Pad Color Collection, In Color Cardstock Collection, In Color 6″ x 6″ Designer Series Paper Collection and In Color Grid Paper. In addition, you will receive a free Paper Pumpkin Kit and free shipping. You do not have to build a business! Become a happy discount shopper and enjoy a minimum 20% discount on all future orders. For further information about joining my team, click here.

Product List
Pansy Dies
[155680]
$32.00
Paper Snips
[103579]
$10.00

Happy Hedgehogs

Hello! Today’s card is a sneak peek of the Happy Hedgehogs stamp set and Hedgehog Builder Punch from the new January-June 2022 Mini Catalog. You will be able to purchase these items beginning on January 4th. This is not the type of stamp set I normally purchase but I couldn’t resist working with these darling images – they are too cute!

Here is how I made the card.

  • Card base – cut a piece of Pool Party cardstock at 5 1/2″ x 8 1/2″, score at 4 1/4″, fold and crease with a bone folder.
  • Place the largest circle die from the Layering Circles dies in the center of the card front and run through the Stampin’ Cut and Emboss Machine.
  • Randomly stamp the butterfly with Pool Party ink all around the card front.
  • Cut a 3 1/2″ square of Basic White cardstock and stamp the tree image with Tuxedo Black Memento ink. Color with these Stampin’ Blends: Light Soft Suede, Light and Dark Old Olive, Light and Dark Flirty Flamingo, Dark Petal Pink. When I stamped the image, I left off the bottom part of the tree trunk and stamped the grass with the little grass stamp and Old Olive ink. Adhere to the back of card front, making sure to center the image in the circle opening.
  • Since I used Stampin’ Blends to color the image, the colors bled through to the back of the cardstock, so I cut a 4″ x 5 1/4″ piece of Pattern Party Designer Series Paper and adhered it over the back of the image in order to cover it up.
  • Stamp a large and small hedgehog on scrap pieces of Basic White cardstock. These are the Stampin’ Blends I used to color in the images. Light Petal Pink for the bodies, Dark Flirty Flamingo for the ears. Light Soft Suede for the top part of the larger Hedgehog, Dark Crumb Cake for the smaller hedgehog. I also colored around the bottom of each body, following the little lines.
  • Punch out the larger hedgehog with the builder punch and adhere to bottom left of card front as shown. I used liquid glue on the part that is adhered outside the circle and placed two Mini Stampin’ Dimensionals underneath the part that is inside the circle. Fussy cut the smaller hedgehog and adhere in the same manner at the upper right of card front.
  • Stamp the greeting on a scrap piece of Petal Pink cardstock with the Memento ink. Run through the Stampin’ Cut and Emboss Machine with the smallest rectangle scallop die from the Stitched So Sweetly dies. Adhere with Mini Stampin’ Dimensionals to card as shown.
  • Cut a piece of Basic White cardstock at 4″ x 5 1/4″. Stamp the mushroom image with the Memento ink in bottom left. Color the image with Dark Petal Pink, Dark Flirty Flamingo, Light Crumb Cake and Light and Dark Old Olive Stampin’ Blends. Adhere to inside of card.

I had such fun making this card and it brought a smile to my face as I was working on it!

Thanks for stopping by today! Wishing you a very Happy and Healthy New Year!

There are just a few days remaining for the July-December Mini Catalog sales period. Here are links to the Retiring Products List and the Carryover List. A number of products have been discounted from 10%-50% so be sure to check out those items. As of today, many items are no longer available. Note that any items on the Carryover list with an asterisk next to them indicates that they will not be orderable again until the July-December 2022 Mini Catalog is released.

RETIRED PRODUCTS LIST

CARRYOVER LIST

Place an online order between $50 and $149 and use this host code for December. You will receive a free gift from me the following month.  If your order is $150 or more DO NOT use the host code. You will qualify for Stampin’ Rewards.

Product List
Paper Snips
[103579]
$10.00

Inspired Thoughts-Kylie’s International Blog Highlights

Hello! Today I’m participating in Kylie Bertucci’s International Blog Highlights. Readers get to vote on their top five favorites in the gallery and the top 10 winners will get to participate in an International Blog Hop later this month. The theme is “thank you”. Today’s card features the Inspired Thoughts bundle. I had planned to use the Beauty of the Earth DSP, but changed my mind and went with a totally different look to reflect springtime rather than the autumn hues of the DSP, however I did use a small strip of the paper for the grass. I love going to Washington, DC in April during the Cherry Blossom Festival. It is spectacular to see these beautiful trees as they bloom!

Here is how I made the card.

  • Card base – cut piece of Pool Party cardstock at 5 1/2″ x 8 1/2″, score at 4 1/4″, fold and crease with a bone folder.
  • Cut piece of Basic White cardstock at 4″ x 5 1/4″. Use blender brushes to add Pool Party, Coastal Cabana and Pear Pizzazz inks to create the background. Start at the top with Pool Party, getting a little darker as you work down. Then add the Coastal Cabana, blending it in with the Pool Party and going darker towards the middle. Then lightly blend the Pear Pizzazz.
  • Cut the tree branches with the die from the Inspiring Canopy Dies from piece of Soft Suede cardstock. Adhere with the bottom of this piece close to the bottom of the background piece.
  • Cut piece of the Old Olive DSP from the Beauty of the Earth DSP at 1 1/4″ x 5 1/4″. Die cut using the curved die. Adhere to bottom of background piece, covering over the bottom of the tree trunks .
  • Cut two sets each of the four different size leaf dies with Blushing Bride and Flirty Flamingo cardstock. I used a white gel pen to color some of the leaves on the Flirty Flamingo pieces to give the effect of some of the blossoms that are white. Arrange the pieces to cover the tree branches and adhere with liquid glue.
  • Die cut a bird with Coastal Cabana cardstock and adhere to left side of tree. You can use any set of dies (or a punch) that includes a bird image. I used the recently retired Well Written dies.
  • Stamp thank you greeting from the Inspired Thoughts stamp set with Soft Suede ink on piece of Basic White cardstock cut at 3/8″ x 2 3/4″. Adhere to card.
  • Adhere the background piece to the card base with Stampin’ Dimensionals.
  • Cut piece of Basic White cardstock at 4″ x 5 1/4″ for inside of card. I used the leftover piece from the piece of Old Olive DSP that I used to cut the grass with and adhered it to the bottom. Adhere to inside of card and stamp a greeting or leave blank.

I’d be so appreciative if you would vote for my card! Click on the vote image below. Once you are in the gallery, click on the heart at the top right hand side of the picture as the hearts appear.

Thanks for stopping by today!

The January-June 2021 Mini Catalog is retiring on June 30th. Starting tomorrow, June 1st, many products will be available at reduced prices from 10%-50% off! If you still have items on your wish list, now is the time to shop because these products will only be available while supplies last. Click here to see the retiring list.

Place an online order between $50 and $149 and use this host code for June. You will receive a free gift from me the following month.  If your order is $150 or more DO NOT use the host code.  Click here for instructions on using the host code.

Product List

Arrange a Wreath-Kylie’s Training Blog Hop

Hello! Welcome to Kylie Bertucci’s Demonstrator Training Blog Hop for July. I’m part of a group of Stampin’ Up! demonstrators from around the world that participate in Kylie’s program for building our businesses. Please be sure to click on the names in the list at the end of this post to hop around and view the beautiful cards posted by so many talented stampers.

Today I’m sharing a card I made with the new Arrange a Wreath bundle. I love that this set is very versatile and can be used for so many different occasions. Without any holidays coming up right now I decided to make something with a summer feel to it and picked blue and yellow for my color palette.

Here is how I made the card.

  • Card base – cut a piece of Daffodil Delight cardstock at 4 1/4″ x 11″, score at 5 1/2″ and fold in half.
  • Cut a piece of one of the woodgrain papers from the In Good Taste Designer Series Papers at 3 1/4″ x 5 1/2″ and adhere to card front.
  • Cut piece of Whisper White cardstock at 3 3/4″ square. Cut piece of Balmy Blue cardstock at 3 7/8″ for the layering piece.
  • Stamp wreath image from the Arrange a Wreath stamp set in Old Olive ink. Stamp greeting with Misty Moonlight ink in center of wreath. Because the wreath image is large I used the Stamparatus to get good ink coverage, and it also helped to line up the greeting.
  • Stamp two flowers with Balmy Blue ink and run through die cutting machine with coordinating dies.
  • Die cut the rest of the pieces for the wreath as follows:
    • Leaf circle – Old Olive cardstock
    • Large flowers – cut three from Misty Moonlight cardstock
    • Medium flowers – cut three from Balmy Blue cardstock
    • Small flowers – cut three from Daffodil Delight cardstock
    • Bow – cut one from Daffodil Delight cardstock
  • Adhere leaf circle on top of stamped wreath image and then arrange the flowers and bow around the wreath. I layered the blue flowers together.
  • Adhere image to Balmy Blue layer and adhere to card front with Stampin’ Dimensionals.
  • For some extra bling I added Champagne Rhinestones to the centers of the flowers, using the smallest size or the yellow flowers and the medium size for the blue flowers.
  • For the inside of the card, cut a piece of Whisper White cardstock at 4″ x 5 1/4″. Stamp a cluster of flowers with Balmy Blue ink at bottom left corner of piece and adhere.

Bonus Days are back once again! From July 1 through August 3rd, for every $50 you spend (before shipping & tax) you will receive a $5 Bonus Day coupon code that can be used from August 4th – 31st.

  • You must have an email address in order to participate because the codes can only be delivered electronically.
  • If you earn multiple coupons in a single order, all of the codes will be sent in one email. If you earn multiple coupons for multiple orders they will be sent in separate emails for each code earned.
  • There is no limit on the number of coupon codes you can earn during this promotion.

Thanks for stopping by today!


 Product List  
Stamparatus
[146276]
$49.00

Field of Flowers-Kylie’s Training Blog Hop

Hello! Welcome to Kylie Bertucci’s Demonstrator Training Blog Hop for June. I’m part of a group of Stampin’ Up! demonstrators from around the world that participate in Kylie’s program for building our businesses. Please be sure to click on the names in the list at the end of this post to hop around and view the beautiful cards posted by so many talented stampers.

Today’s fun-fold card features a sweet stamp set, Field of Flowers, from the new annual catalog. It immediately said spring and summer to me and who could resist the cute little dragonflies!

Here is how I made the card.

  • Card base – Cut piece of Magenta Madness cardstock at 4 1/4″ x 11″. Score at 3″ and 8 3/4″, fold along score lines and use bone folder to sharply crease the folds.
  • Use the Magenta Madness papers from the 2020-2022 InColor Designer Series Paper pack and cut one of each of the papers at 3″ x 4″ and one each of the papers at 2″ x 4″. Adhere one set to the outside flaps and the other set on the inside flaps.
  • Cut piece of Whisper White cardstock at 3″ x 4 3/8″. Stamp grass image with Granny Apple Green ink along bottom of the piece. Stamp the large flowers with Magenta Madness. Stamp the smaller flower image with Mango Melody ink. Stamp greeting and two dragonflies with Coastal Cabana ink. Add a bit of shimmer to the dragonflies with Wink of Stella.
  • Cut piece of Mango Melody cardstock with the next-to-largest die in the Stitched Rectangles die set.
  • Cut piece of Magenta Madness 1/4″ ribbon and tie in bow around Mango Melody piece. Adhere stamped piece to Mango Melody piece. Adhere to flap on left side of card front. Only apply adhesive to one half of the stamped piece in order for the card to open.
  • Cut piece of Whisper White cardstock at 4″ x 5 1/4″. Stamp leaf image with Granny Apple Ink. Stamp flowers with Magenta Madness ink. Stamp greeting with Coastal Cabana ink. Adhere to inside of card.

I love this bright, cheerful color combination – it made me smile as I was making the card and I hope you like it!

Thanks for stopping by today!


 Product List  

Tropical Oasis Fun Fold Card

Hello! Today’s card features the Tropical Oasis Suite and the fun fold was inspired by a recent blog post from Patty Bennett. This is such a fun suite and I especially love the bright and cheery Designer Series Papers.

Here is how I made the card.

  • Cut piece of Daffodil Delight cardstock at 4 1/4″ x 5 1/2″. Cut piece of DSP at 5 1/4″ x 11 3/4″. Score at 1 3/4″, 4 3/4″ and 7 3/4″ and fold accordion style. You can either adhere the smaller front flap to the larger one or leave it open.
  • Cut Grapefruit Grove label with next-to-largest die in the Stitched Nested Label die set.
  • Cut Daffodil Delight pineapple base with coordinating die from the In the Tropics set. Cut Old Olive leaf with die from set. Adhere pineapple base to bottom of label. The leaf has some partial cut outs. Pop them open and lightly curl them so they stand out. Adhere bottom part of leaf making sure that top part extends over top of label .
  • Die cut “aloha” from scrap piece of Real Red cardstock. Adhere to pineapple base with either a Fine Tip Glue Pen or a liquid adhesive.
  • Partially adhere the label piece to the front flap, leaving part of the right side unattached in order to be able to open the card.
  • Cut another label from Whisper White cardstock. Stamp the birthday greeting from the Timeless Tropical stamp set with Real Red ink. Adhere to the inside of the card, making sure that you place it close the fold so that it doesn’t stick out when the front flap is folded over.
  • Adhere folded DSP piece to the card base. You can keep the remaining flaps open or glue them shut. If you keep the back of the flaps open you can decorate them with die cuts or stamp additional greetings on pieces of Whisper White cardstock.

I’m happy that the stamp set and dies will be carrying over to the new 2020-2021 Annual Catalog, however please note that they will no longer be sold as a bundle at the 10% discount. The coordinating products such as the DSP, embossing folder, trinkets, etc. will be retiring and will only continue to be available while supplies last.

Click here for a list of retiring products from the 2019-2020 Annual Catalog.

Click here for a list of retiring products from the 2020 Mini Catalog.

Thanks for stopping by today!

 Product List