Whimsey & Wonder

Hello! These are the last two Christmas cards I will be featuring this year. I have many more, but ran out of time to get them posted! These two cards feature the Whimsey & Wonder Suite and these are the ones I sent out to my customers. As soon as I laid eyes on this suite in the July-December 2021 Mini Catalog, it called out my name! I just loved the non-traditional, but beautiful colors in the Designer Series Paper. This suite was very popular, but will not be returning next year. The only product still available on the retired list is the Whimsical Trees stamp set, so if you have been thinking about purchasing it, now is the time!

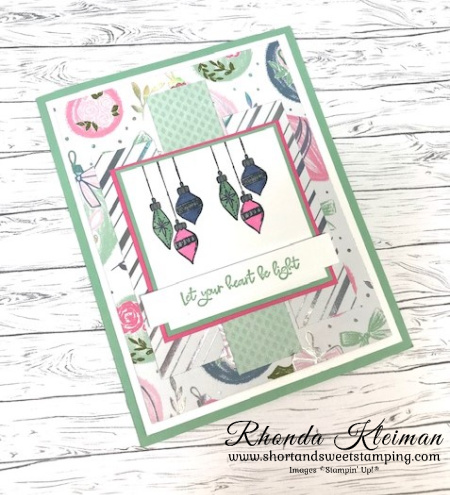
Here is how I made the Christmas ornament card. This layout was featured in a recent YouTube video by Lisa Curcio.

  • Card base – cut a piece of Mint Macaron cardstock at 5 1/2″ x 8 1/2″, score at 4 1/4″, fold and crease with a bone folder.
  • Cut a piece of Basic White cardstock at 4″ x 5 1/4″ and adhere to card front.
  • Cut a piece of the Christmas ornament paper from the Whimsey & Wonder Specialty Designer Series Paper at 3 3/4″ x 5″ and adhere to Basic White cardstock.
  • Cut two strips at 1″ x 3 1/2″ and one strip at 1″ x 4 1/2″ from two different contrasting pieces of DSP. Adhere as shown.
  • Cut a piece of Polished Pink cardstock at 2 3/4″ square and a piece of Mint Macaron cardstock at 2 5/” square and adhere pieces together.
  • Cut a 2 1/2″ square of Basic White and stamp the ornament image from the Whimsical Trees stamp set with Tuxedo Black Memento ink two times, with one of the images a bit higher up to the top of the piece. Color with Stampin’ Blends. I used dark and light Smokey Slate, Dark Mint Macaron, Light Polished Pink and Light Misty Moonlight. Adhere to the Mint Macaron square.
  • Cut a scrap piece of Basic White at 1/2″ x 3″. Stamp greeting with Mint Macaron ink. Adhere with Mini Stampin’ Dimensionals.

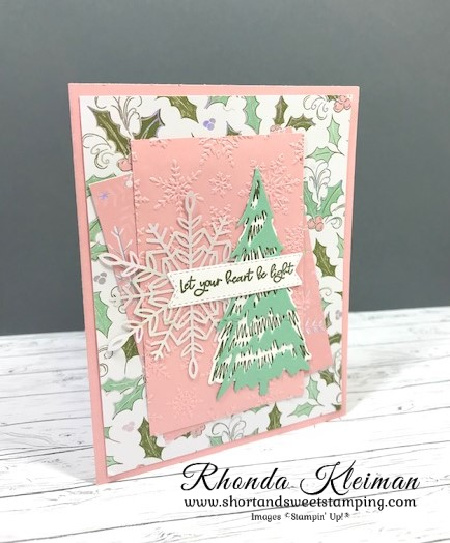
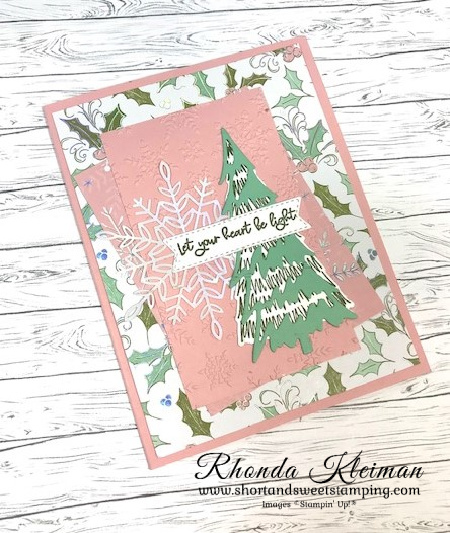
Here is how I made the card with the tree.

  • Card base – cut a piece of Blushing Bride cardstock at 5 1/2″ x 8 1/2″, score at 4 1/4″, fold and crease with a bone folder.
  • Cut a piece of the paper with the holly leaves from the Whimsey & Wonder DSP at 4″ x 5 1/4″ and adhere to card front.
  • Cut a piece of the Blushing Bride and silver snowflake paper at 3″ x 4″.
  • Cut a piece of Blushing Bride cardstock at 2 5/8″ x 4 1/4″. I embossed this piece with the retired Winter Snow embossing folder. You can substitute the Wintry 3D folder in the current annual catalog.
  • Adhere the DSP to the card front at an angle and adhere the embossed piece over the DSP straight up and down.
  • Adhere a Wonderful Snowflake to the left side of the embossed piece .
  • Cut a piece of Basic White cardstock at 2 1/4″ x 3 1/2″. Stamp the large tree image with Mossy Meadow ink and cut out with the coordinating die from the Christmas Tree dies.
  • Cut a piece of Mint Macaron cardstock at 2″ x 3 3/4″ and cut out with the die from the Christmas Trees dies. Adhere to stamped tree. Adhere tree to right side of embossed piece, partially overlapping the snowflake.
  • Stamp greeting with Mossy Meadow ink on scrap piece of Basic White cardstock and cut out with the label die that has the flagged ends from the Tasteful Labels die set. Adhere to card front.

Wishing you a Blessed Christmas!

Thanks for stopping by today!

The sales period for the July-December Mini Catalog will be coming to a close on January 3rd. Here are links to the Retiring Products List and the Carryover List. A number of products have been discounted from 10%-50% so be sure to check out those items. As of today, many items are no longer available. Note that any items on the Carryover list with an asterisk next to them indicates that they will not be orderable again until the July-December 2022 Mini Catalog is released.

RETIRED PRODUCTS LIST

CARRYOVER LIST

January-June 2022 Mini Catalog and Sale-A-Bration Brochure Coming Soon!

The mini catalog and Sale-A-Bration promotion begin on January 4th! If you purchased from me this year you will be receiving your catalog and brochure in the mail any day now. If you are not a customer and don’t have a Stampin’ Up! demonstrator and would like a catalog I’d be happy to send one to you. As always, the new catalog is chock-full of beautiful and fun new products!

Place an online order between $50 and $149 and use this host code for December. You will receive a free gift from me the following month.  If your order is $150 or more DO NOT use the host code. You will qualify for Stampin’ Rewards.

Product List
Paper Snips
[103579]
$10.00

Holly Jolly Christmas Season

Hello! Today I have another card made with products from the Painted Christmas Suite. I also used the Merry Melody 3D embossing folder, which is my favorite holiday embossing folder from the July-December 2021 Mini Catalog.

Here is how I made the card.

  • Card base – cut a piece of Real Red cardstock at 5 1/2″ x 8 1/2″, score at 4 1/4″, fold and crease with a bone folder.
  • Cut a piece of the Garden Green and white Painted Christmas Designer Series at 4 1/8″ x 5 3/8″ and adhere to card base.
  • Cut a piece of Basic White cardstock at 4″ x 5 1/4″ and run through the Stampin’ Cut & Emboss Machine with the Merry Melody 3D Embossing Folder. Adhere to card base.
  • Cut a piece of DSP at 3 1/2″ x 4 1/4″ from the print with the small berries and pine leaves and run through die cutting machine with the largest label from the Seasonal Labels Dies. Adhere to the Merry Melody embossed piece.
  • Run a scrap piece of Real Red cardstock through the die cutting machine with the berries die from the Poinsettia dies.
  • For the Garden Green leaves, emboss a piece of the cardstock with the Evergreen Forest 3D Embossing Folder and then die cut two leaves from the Seasonal Labels dies. I found this idea somewhere online but don’t remember where. It adds some nice additional texture to the card.
  • For the greeting, die cut a scrap piece of Basic White cardstock with a label from the Seasonal Labels dies. Stamp greeting from the Christmas to Remember stamp set onto the label with Real Red ink.
  • Cut a length of Real Red Sheer Ribbon.
  • To finish assembling the card front, adhere one leave to the upper left of the DSP label with a few glue dots. Adhere the other leave to the opposite side, staggering the height so that it appears shorter than the first leaf. Adhere the red berries in between the leaves with a few small dots of liquid glue.
  • Make a loop with the ribbon. Lay the ribbon down at an angle and adhere in the center of the ribbon with a small piece of Scotch Tape. Make a loop, bringing the ribbon back to the opposite side, once again adhering it in the center with another piece of tape. Bring the ribbon back to the opposite side and tape again. Trim ends of ribbon.
  • Adhere greeting over the ribbon with Stampin’ Dimensionals.

Thanks for stopping by today!

The sales period for the July-December Mini Catalog will be coming to a close on January 3rd. Here are links to the Retiring Products List and the Carryover List. A number of products have been discounted from 10%-50% so be sure to check out those items. As of today, many items are no longer available. Note that any items on the Carryover list with an asterisk next to them indicates that they will not be orderable again until the July-December 2022 Mini Catalog is released.

RETIRED PRODUCTS LIST

CARRYOVER LIST

Get a jump start on making your Valentine’s Day cards with the January Paper Pumpkin Kisses & Hugs Kit. The kit contains supplies to make ten cards, two each of five different designs and also includes envelopes. The heart-shaped cards measure 4 1/2″ x 4 1/4″. A photopolymer stamp set and a Gray Granite Stampin’ Spot are included in the kit. Coordinating colors are Blushing Bride, Flirty Flamingo, Gray Granite and Very Vanilla. An add-on set of Mini Treat Boxes will be available for purchase starting on January 25th. It includes 20 boxes and heart tags. To subscribe to Paper Pumpkin, click here to visit my website.

Place an online order between $50 and $149 and use this host code for December. You will receive a free gift from me the following month.  If your order is $150 or more DO NOT use the host code. You will qualify for Stampin’ Rewards.

Product List

Christmas Season – Two Different Versions

Hello! I’ve been making many holiday cards in the last few weeks but got so busy with my holiday cardmaking classes that I haven’t have time to do any blog posts recently, so I will be posting some of those cards during this week. Today I have two cards with the same easy layout. Both cards use products from the Painted Christmas Suite. One uses the Painted Christmas Designer Series Paper and the other uses the Peaceful Place Specialty Designer Series Paper.

Here is how I made this card.

  • Card base – cut a piece of Cherry Cobbler cardstock at 5 1/2″ x 8 1/2″, score at 4 1/4″, fold and crease with a bone folder.
  • Cut a piece of Basic White cardstock at 4″ x 5 1/4″. Cut three different strips of paper from the Painted Christmas DSP at 1 5/8″ x 3 3/4″ and adhere to the cardstock.
  • Stamp two of the smaller pine cones from the Christmas Season stamp set. This is a two step stamp, so first stamp the base with Crumb Cake ink, stamping off before stamping onto the cardstock. Stamp the accent stamp over the base with Early Espresso ink. Stamp the leaf with Pear Pizzaz ink. Run through die cutting machine using the coordinating dies from the Seasonal Labels die set.
  • Cut piece of Basic White cardstock at 1 1/2″ x 5″ and run through die cutting machine with label die from Seasonal Labels. Stamp greeting from the Christmas to Remember stamp set on label with Cherry Cobbler ink.
  • Arrange pine cones and leaves on left side of card. Adhere one pine cone and the leaves under the label. Adhere label. Adhere the other pine cone over the left edge of the label.
  • Add a Mint Macaron Genial Gem to the label for a bit of bling.

Here is how I made the second card using the Peaceful Place Specialty DSP.

  • Cutting dimensions for this card base and DSP are the same as the first card. Card base is Smoky Slate cardstock, mat for DSP is Cherry Cobbler.
  • The two pieces of DSP I used both have tree images. I used two strips of the paper with the white background on either side of the mat and for the middle piece I used the paper with the large trees with the silver metallic in the background. I cut those strips so that they showed the tops of the trees.
  • Cut strip of Basic White cardstock at 1/2″ x 4 1/4″. Die cut with the label die from the Harvest Dies set. You can also use the Lovely Labels Pick a Punch, selecting the squared end. Stamp greeting from the Christmas to Remember stamp set with Cherry Cobbler ink.
  • Die cut two sets of the holly leaves from the Seasonal Labels Dies using one of the sheets from the Silver Foil Specialty Pack. Arrange leaves on card base. Adhere greeting with Mini Stampin’ Dimensionals. Add clear rhinestones on each end of the label.

This layout is super easy and versatile, and is a great way to use your Designer Series Papers!

Thanks for stopping by today!

The sales period for the July-December Mini Catalog will be coming to a close on January 3rd. Here are links to the Retiring Products List and the Carryover List. A number of products have been discounted from 10%-50% so be sure to check out those items. As of today, many items are no longer available. Note that any items on the Carryover list with an asterisk next to them indicates that they will not be orderable again until the July-December 2022 Mini Catalog is released.

RETIRED PRODUCTS LIST

CARRYOVER LIST

Get a jump start on making your Valentine’s Day cards with the January Paper Pumpkin Kisses & Hugs Kit. The kit contains supplies to make ten cards, two each of five different designs and also includes envelopes. The heart-shaped cards measure 4 1/2″ x 4 1/4″. A photopolymer stamp set and a Gray Granite Stampin’ Spot are included in the kit. Coordinating colors are Blushing Bride, Flirty Flamingo, Gray Granite and Very Vanilla. An add-on set of Mini Treat Boxes will be available for purchase starting on January 25th. It includes 20 boxes and heart tags. To subscribe to Paper Pumpkin, click here to visit my website.

Place an online order between $50 and $149 and use this host code for December. You will receive a free gift from me the following month.  If your order is $150 or more DO NOT use the host code. You will qualify for Stampin’ Rewards.

Product List
Harvest Dies
[156504]
$38.00

Pretty Pumpkins-Kylie’s International Blog Highlights

Hello! Today I’m participating in Kylie Bertucci’s International Blog Highlights. Readers get to vote on their top five favorites in the gallery and the top 10 winners will get to participate in an International Blog Hop later this month. The theme is “thank you”. This is the thank you card I sent out to my customers in October and it uses products from the Pretty Pumpkin Bundle and the Harvest Meadow Suite.

Here is how I made the card.

  • Card base – Cut a piece of Calypso Coral cardstock at 5 1/2″ x 8 1/2″, score at 4 1/4″, fold and crease with a bone folder.
  • Cut a piece of Calpyso Coral paper from the Harvest Meadow Designer Series Paper at 4″ x 5 1/4″ and adhere to card front.
  • Cut a piece of Basic White cardstock at 3 3/4″ x 5 1/4″ and run through the Stampin’ Cut & Emboss Machine with the largest Stitched Rectangle Die.
  • Stamp greeting from the Pretty Pumpkins stamp set with Crumb Cake ink.
  • Cut piece of Crumb Cake cardstock at 1 3/4″ x 5″. Cut out with the thin wildflower die from the Harvest Dies.
  • Cut piece of Be Dazzling Specialty Paper at 2″ x 2 1/2″. Cut a piece of an adhesive sheet to the same size and adhere. Cut out with the small pumpkin die from the Detailed Pumpkin Dies. Note: The Be Dazzling Specialty Paper was a Sale-A-Bration item and is no longer available. You can substitute any other metallic paper in its place.
  • Cut a piece of the Crumb Cake paper that looks like willows from the Harvest Meadow Designer Series Paper at 2 1/4″ x 4″. Cut a piece of an adhesive sheet to the same size and adhere . Cut out with the large filigree pumpkin die from the Detailed Pumpkin Dies.
  • Die cut a leaf from a scrap piece of a Gold Foil sheet.
  • Before adhering the Crumb Cake wildflower piece, trim the bottom of the stems to fit the Basic White cardstock piece. Adhere with Multipurpose Liquid Glue.
  • Peel backing off the adhesive sheet on the filigree pumpkin and adhere to Basic White cardstock piece. Adhere the gold leaf under the pumpkin stem with liquid glue.
  • Peel backing off the adhesive sheet on the small pumpkin and adhere, overlapping the bottom of the wildflower piece and filigree pumpkin.

I’d be so appreciative if you would vote for my card! Click on the vote image below. Once you are in the gallery, click on the heart at the top right hand side of the picture as the hearts appear.

Thanks for stopping by today!

Stampin’ Up! is offering the Start With Savings promotion, an excellent opportunity to join from November 4-30. You can choose to join either as a “happy discount shopper” or build a business. Instead of the standard $99 USD Starter Kit—which is already a steal of a deal— you can get a completely custom Starter Kit for only $75 USD. What an absolutely unbeatable bargain for a box with a value of $125 USD. In addition, SHIPPING IS FREE!  You can select any items from the Annual Catalog or the current Mini Catalog.  If you’ve been thinking about purchasing a new Stampin’ Cut & Emboss Machine or the Mini Stampin’ Cut & Emboss Machine you can even add those to your kit! The benefits speak for themselves. You get personal discounts of 20%-25%, early access to new catalogs and products, exclusive access to events, and the opportunity to earn additional income and other rewards. You are under no obligation to commit to making this a business, you are not required to host workshops or parties, and you can drop at anytime without penalties!  Stampin’ Up! has never had such an amazing deal!  For further information and to join, click here.  I’d love to have you as a team member!

Place an online order between $50 and $149 and use this host code for November. You will receive a free gift from me the following month.  If your order is $150 or more DO NOT use the host code. You will qualify for Stampin’ Rewards.

Product List
Harvest Dies
[156504]
$38.00

Pretty Pumpkins Fun Fold Card

Hello! Today’s project is a fun fold card using the Pretty Pumpkins bundle. The stamp set has great images and sentiments and the coordinating dies are beautiful. It isn’t often that we get Designer Series Papers to match the browns in the Stampin’ Up! color range, so while the colors in the Blackberry Beauty Specialty DSP are predominantly purples, I was excited to see that a few sides of the papers have some wonderful designs in Early Espresso and Cinnamon Cider.

Here is how I made the card.

  • Main card base – Cut a piece of Early Espresso cardstock at 4 1/4″ x 8 1/2″, score at 3″, fold and crease with bone folder. 
  • Smaller card base – Cut a piece of Cinnamon Cider cardstock at 3″ x 8″, score at 4″, fold and crease with bone folder.
  • Cut one piece of the Blackberry Beauty DSP at 4″ x 5 1/4″ and one at 2 3/4″ x 4″. Adhere the smaller piece of DSP to front fold and the larger piece to the inside.
  • Cut a piece of Pumpkin Pie cardstock at 2 1/4″ x 2 1/2″. Cut an adhesive sheet to the size of the cardstock.  Run through die cutting machine using the pumpkin die from the Detailed Pumpkins dies.
  • Cut piece of Very Vanilla cardstock at 2 1/2″ x 3″. Stamp large pumpkin line image with Tuxedo Black Memento ink. Color with a variety of Stampin’ Blends.  I used Stampin’ Blends and colored the stems with light Cinnamon Cider and light and dark Old Olive for the leaves.  For the smallest pumpkin I used dark Pale Papaya and light Pumpkin Pie, for the medium pumpkin I used dark Pumpkin Pie and light Cajun Craze, and for the largest pumpkin I used light and Dark Cajun Craze.  You can also color the image with Stampin’ Write Markers, colored pencils, or use ink pads with blender pens. Run through die cutting machine with coordinating die from the Detailed Pumpkins dies.
  • Cut two pieces of Very Vanilla cardstock at 2 7/8″ x 3 7/8″. Stamp greeting from Pretty Pumpkins stamp set with Early Espresso ink in upper right corner of one the pieces.  Adhere die cut Pumpkin Pie pumpkin and then adhere the colored pumpkin piece, overlapping the die cut pumpkin.  You can adhere with or without Stampin’ Dimensionals.  Adhere to front flap of the smaller Cinnamon Cider card base.
  • Stamp the small pumpkin vine and leaf image with Memento ink on the other piece of the 2 7/8” x 3 7/8” Very Vanilla cardstock and color the leaves with the Old Olive and Cinnamon Cider Stampin’ Blends.  Adhere to inside of the smaller card base.
  • Adhere smaller card to larger card, making sure that the card opening faces to the left.  Adhere a Brushed Metallic Adhesive-Backed Dot to the card front.

Thanks for stopping by today!

The Gifts Galore Paper Pumpkin Kit is available now through November 10. With classic Christmas sentiments, bright and festive colors, a sweet snowman, a tree with all the trimmings, or a playful pile of presents, you’ll have everything you need to make eye-catching treat packages that are sure to spread Christmas cheer. Each Gifts Galore box contains enough supplies to create nine treat packages—three each of three designs—and nine food-safe bags that are adorably styled for easy Christmas gifting. Coordinating colors: Evening Evergreen, Flirty Flamingo, Old Olive, Pool Party, Poppy Parade. There’s plenty of joy to share with Gifts Galore! Visit my Paper Pumpkin website to subscribe to this kit.

Place an online order between $50 and $149 and use this host code for October. You will receive a free gift from me the following month.  If your order is $150 or more DO NOT use the host code. You will qualify for Stampin’ Rewards.

Product List
Paper Snips
[103579]
$10.00

World Cardmaking Day-Blackberry Beauty Card

Hello! Today is World Cardmaking Day! This event was started by the now defunct Card Maker magazine as a way to promote cardmaking and stamping and as a way to jumpstart cardmaking for the holiday season. This event always occurs on the first Saturday of October. I wasn’t able to plan my own event this year, however, I am sharing a card we made in my quarterly club last week. Take some time today to make a card and send a card to spread sunshine and let someone know that you care about them and are thinking of them. To see what others are doing and see some projects that are being posted around the internet, enter hashtag #wcmd2021.

This card features products from the Blackberry Beauty and Harvest Beauty suites and is a quick and easy card to make. Here is how to make the card.

  • Card base – Cut piece of Blackberry Bliss cardstock at 5 1/2″ x 8 1/2″, score at 4 1/4″, fold and crease with a bone folder.
  • Cut piece of Crumb Cardstock at 4″ x 5 1/4″.
  • Cut three different pieces of Blackberry Beauty Designer Series Paper into 1 5/8″ x 4″ strips. Adhere to Crumb Cake piece.
  • Using the Harvest Dies, run the coneflower through the Stampin’ Cut & Emboss Machine with scrap piece of Rich Razzleberry cardstock. Run the stalks through the machine with the Be Dazzling Specialty Paper. This paper is now retired, as it was one of the free Sale-A-Bration items in the promotion that has now ended. Adhere both pieces to the DSP piece with liquid glue. Trim the ends of the stems down to the edge of the bottom of the piece.
  • Adhere piece to card base.
  • Cut a piece of Crumb Cake cardstock at 1″ x 4 1/2″. Stamp greeting from the Beauty of Tomorrow stamp set with Blackberry Bliss ink. Run through die cutting machine with the long label die from the Harvest Dies. Adhere to card front with Stampin’ Dimensionals.
  • Cut piece of Very Vanilla cardstock at 4″ x 5 1/4″. Stamp the bird with Blackberry Bliss ink in one of the corners of the piece and adhere to inside of card.

Thanks for stopping by today!

Place an online order between $50 and $149 and use this host code for October. You will receive a free gift from me the following month.  If your order is $150 or more DO NOT use the host code. You will qualify for Stampin’ Rewards.

Product List
Harvest Dies
[156504]
$38.00
Paper Snips
[103579]
$10.00

Nature’s Harvest with Blending Brush Background

Hello! Today’s card features products from the beautiful new Harvest Meadow Suite in the July-December 2021 Mini Catalog. It uses the Nature’s Harvest stamp set, Harvest Dies and Harvest Meadow Designer Series Paper. This is another one of the cards we made in my class on using blending brushes last week. It is an easy card to put together.

Here is how I made the card.

  • Card base – cut a piece of Calypso Coral cardstock at 4 1/4″ x 11″, score at 5 1/2″, fold and crease with a bone folder.
  • Cut two pieces of paper from the Harvest Meadow DSP pack. Cut the Calypso Coral piece at 2 1/2″ x 5 1/4″ and the Soft Succulent piece at 1 1/2″ x 5 1/4″ and adhere both pieces to card front.
  • Cut a piece of Soft Succulent cardstock at 3 3/4″ x 4 3/4″ and run through your die cutting machine with the 3rd largest Stitched Rectangle die.
  • Cut a piece of Very Vanilla cardstock at 3″ x 4 1/2″ and run through your die cutting machine with the 4th largest Stitched Rectangle die.
  • To do the blended ink background, first apply Bumblebee ink with a blending brush to the top third of the piece. Gradually build the color to the depth you like, a little bit at a time. Next, apply Calypso Coral ink, making this section more narrow than the Bumblebee section. Since Calypso Coral is the main color on the card I wanted to use it as more of an accent in the background piece. Last, apply Soft Succulent ink to the bottom third of the piece, again building up the color to the depth you like.
  • Stamp the coneflower image from the Nature’s Harvest stamp set on the background piece with Tuxedo Black Memento ink.
  • Stamp greeting on scrap piece of Very Vanilla cardstock with the Memento ink and cut out with the small label die from the Harvest Dies set.
  • Wrap a piece of linen thread three times around bottom portion of the blended background piece and secure on the back with a piece of tape. Adhere the greeting over the wrapped thread with Mini Stampin’ Dimensionals.
  • Adhere blended background piece to the Soft Succulent cardstock piece.
  • Adhere the entire piece to the card front with Stampin’ Dimensionals.

Thanks for stopping by today!

Place an online order between $50 and $149 and use this host code for August. You will receive a free gift from me the following month.  If your order is $150 or more DO NOT use the host code. You will qualify for Stampin’ Rewards.

Join Stampin’ Up! now through September 30th. You get to select $125 worth of products for only $99 and will also get a FREE bundle from the Holiday Catalog! The kit ships for free. I’d love to have you join my team. Become a happy discount shopper or build a business – the choice is yours! Click here for the benefits of joining Stampin’ Up!

Here is a list of bundles you can select from.

Experience everything the autumn season has to offer with the Haunts & Harvest Paper Pumpkin Kit! This month’s kit includes enough supplies to create 12 treat boxes—4 each of 3 designs. That means you can take your pick of apple, pumpkins, or jack-o-lantern treat boxes! Plus, the Paper Pumpkin box is designed to easily transform into a vintage wheelbarrow for you to display your harvest! The kit contains enough supplies to create 12 treat packages—4 each of 3 designs. The all-inclusive kit includes printed die-cut boxes, die-cut sheets, adhesive, and more! Finished treat box size: 2-1/2″ x 2″ (6.4 x 5.1 cm). Coordinating colors are Basic Black, Pale Papaya, Poppy Parade, Pumpkin Pie, Soft Succulent. Subscribe now through September10th. The kit will arrive in your mailbox around the 20th of the month. For further information and to subscribe, click here to visit my Paper Pumpkin website.

Product List
Harvest Dies
[156504]
$38.00
Paper Snips
[103579]
$10.00