

Hello! Today I have another card made with products from the Painted Christmas Suite. I also used the Merry Melody 3D embossing folder, which is my favorite holiday embossing folder from the July-December 2021 Mini Catalog.
Here is how I made the card.
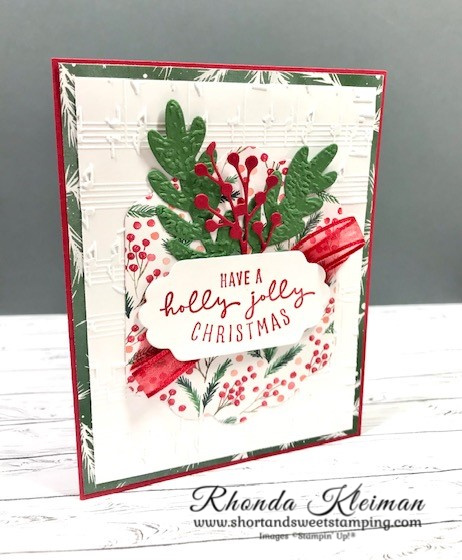
- Card base – cut a piece of Real Red cardstock at 5 1/2″ x 8 1/2″, score at 4 1/4″, fold and crease with a bone folder.
- Cut a piece of the Garden Green and white Painted Christmas Designer Series at 4 1/8″ x 5 3/8″ and adhere to card base.
- Cut a piece of Basic White cardstock at 4″ x 5 1/4″ and run through the Stampin’ Cut & Emboss Machine with the Merry Melody 3D Embossing Folder. Adhere to card base.
- Cut a piece of DSP at 3 1/2″ x 4 1/4″ from the print with the small berries and pine leaves and run through die cutting machine with the largest label from the Seasonal Labels Dies. Adhere to the Merry Melody embossed piece.
- Run a scrap piece of Real Red cardstock through the die cutting machine with the berries die from the Poinsettia dies.
- For the Garden Green leaves, emboss a piece of the cardstock with the Evergreen Forest 3D Embossing Folder and then die cut two leaves from the Seasonal Labels dies. I found this idea somewhere online but don’t remember where. It adds some nice additional texture to the card.

- For the greeting, die cut a scrap piece of Basic White cardstock with a label from the Seasonal Labels dies. Stamp greeting from the Christmas to Remember stamp set onto the label with Real Red ink.
- Cut a length of Real Red Sheer Ribbon.
- To finish assembling the card front, adhere one leave to the upper left of the DSP label with a few glue dots. Adhere the other leave to the opposite side, staggering the height so that it appears shorter than the first leaf. Adhere the red berries in between the leaves with a few small dots of liquid glue.
- Make a loop with the ribbon. Lay the ribbon down at an angle and adhere in the center of the ribbon with a small piece of Scotch Tape. Make a loop, bringing the ribbon back to the opposite side, once again adhering it in the center with another piece of tape. Bring the ribbon back to the opposite side and tape again. Trim ends of ribbon.
- Adhere greeting over the ribbon with Stampin’ Dimensionals.

Thanks for stopping by today!


The sales period for the July-December Mini Catalog will be coming to a close on January 3rd. Here are links to the Retiring Products List and the Carryover List. A number of products have been discounted from 10%-50% so be sure to check out those items. As of today, many items are no longer available. Note that any items on the Carryover list with an asterisk next to them indicates that they will not be orderable again until the July-December 2022 Mini Catalog is released.

Get a jump start on making your Valentine’s Day cards with the January Paper Pumpkin Kisses & Hugs Kit. The kit contains supplies to make ten cards, two each of five different designs and also includes envelopes. The heart-shaped cards measure 4 1/2″ x 4 1/4″. A photopolymer stamp set and a Gray Granite Stampin’ Spot are included in the kit. Coordinating colors are Blushing Bride, Flirty Flamingo, Gray Granite and Very Vanilla. An add-on set of Mini Treat Boxes will be available for purchase starting on January 25th. It includes 20 boxes and heart tags. To subscribe to Paper Pumpkin, click here to visit my website.

Place an online order between $50 and $149 and use this host code for December. You will receive a free gift from me the following month. If your order is $150 or more DO NOT use the host code. You will qualify for Stampin’ Rewards.
Product List  |  | |
 | ||
 |  | |
 |  |  |
 |  |
")

 Designer Series Paper")
 Sheer Ribbon")


