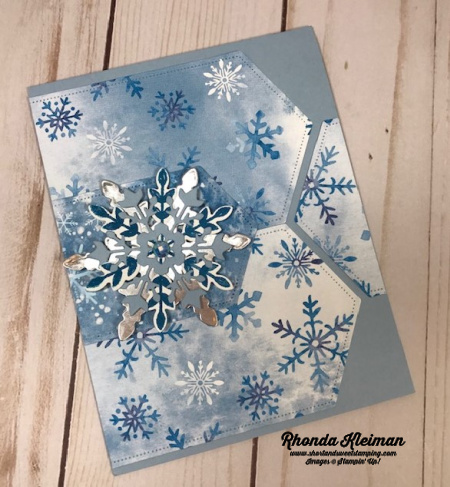
Hello! Today I’m sharing another card I made that uses products from the Snowflake Splendor suite in the holiday catalog. I CASED this card from Kylie Bertucci because it is a unique layout and a great way to showcase our beautiful Designer Series Papers. The Snowflake Splendor DSP uses many of the blues in our color families. I selected Seaside Spray for the card base although this is not one of the colors in the DSP, but blends beautifully with the colors in the paper and gives the card a soft look.

Here is how I made the card.
- Card base – cut a piece of Seaside Spray cardstock at 5 1/2″ x 8 1/2″, score at 4 1/4″, fold and crease with a bone folder
- Cut two pieces of Snowflake Splendor DSP at 3 1/2″ x 5 1/2″. Use the largest die from the Stitched Nested Labels dies and cut out the two labels. Cut a contrasting piece of DSP at 2 3/4″ x 4 1/2″ and cut with the 2 1/4″ x 4″ Stitched Nested Label die, which is the third largest in the set.
- On the two larger labels trim one end on each so that each piece measures 3 7/8″ . Save one of the ends. On the smaller label trim one end so that it measures 2 3/4″.
- Adhere the two large labels with the trimmed ends flush against the left edge of the card, butting the pieces up against one another. Adhere the smaller label over the large labels, centering it with the point in the seam between the larger labels. Using the end of the label piece that you saved, adhere it to the card base, centering in the V-shape where the two labels meet and flush against the right side of the card.

- Next, create the snowflake embellishment. Die cut a snowflake from a scrap piece of Silver Foil. Select one of the larger snowflakes from the So Many Snowflakes dies. Stamp a smaller snowflake image from the Snowflake Wishes stamp set with Misty Moonlight ink on scrap piece of Whisper White cardstock. Die cut with coordinating die. Die cut another snowflake with scrap piece of Seaside Spray cardstock, selecting one of the smaller dies in the set.
- Adhere the three snowflakes together with glue dots placed in the centers of the two smaller snowflakes. Adhere entire snowflake piece to the smaller label with Stampin’ Dimensionals. Adhere a blue gem to center of snowflake.
- Cut piece of Whisper White cardstock at 4″ x 5 1/2″. Stamp greeting of your choice from the stamp set with Misty Moonlight ink. Stamp the little snowflake cluster image with Seaside Spray ink in lower left corner. Adhere to inside of card.

Thanks for stopping by today!

Product List


