Snowflake Wishes

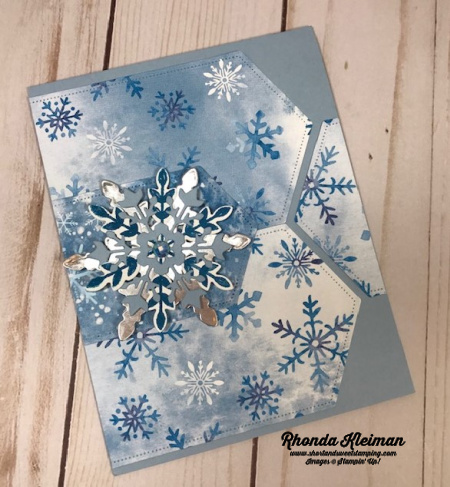
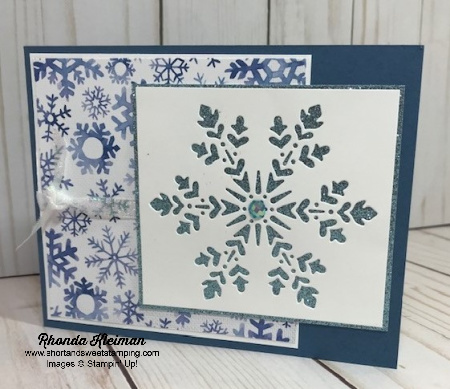
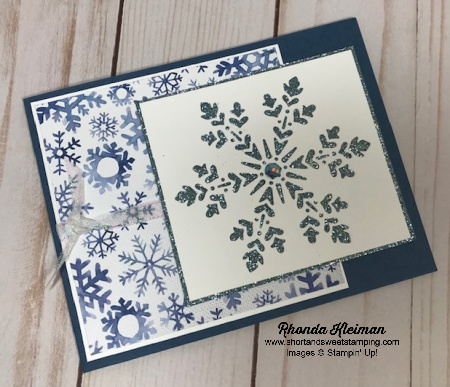
Hello! Today I’m sharing another card I made that uses products from the Snowflake Splendor suite in the holiday catalog. I CASED this card from Kylie Bertucci because it is a unique layout and a great way to showcase our beautiful Designer Series Papers. The Snowflake Splendor DSP uses many of the blues in our color families. I selected Seaside Spray for the card base although this is not one of the colors in the DSP, but blends beautifully with the colors in the paper and gives the card a soft look.

Here is how I made the card.

  • Card base – cut a piece of Seaside Spray cardstock at 5 1/2″ x 8 1/2″, score at 4 1/4″, fold and crease with a bone folder
  • Cut two pieces of Snowflake Splendor DSP at 3 1/2″ x 5 1/2″. Use the largest die from the Stitched Nested Labels dies and cut out the two labels. Cut a contrasting piece of DSP at 2 3/4″ x 4 1/2″ and cut with the 2 1/4″ x 4″ Stitched Nested Label die, which is the third largest in the set.
  • On the two larger labels trim one end on each so that each piece measures 3 7/8″ . Save one of the ends. On the smaller label trim one end so that it measures 2 3/4″.
  • Adhere the two large labels with the trimmed ends flush against the left edge of the card, butting the pieces up against one another. Adhere the smaller label over the large labels, centering it with the point in the seam between the larger labels. Using the end of the label piece that you saved, adhere it to the card base, centering in the V-shape where the two labels meet and flush against the right side of the card.
  • Next, create the snowflake embellishment. Die cut a snowflake from a scrap piece of Silver Foil. Select one of the larger snowflakes from the So Many Snowflakes dies. Stamp a smaller snowflake image from the Snowflake Wishes stamp set with Misty Moonlight ink on scrap piece of Whisper White cardstock. Die cut with coordinating die. Die cut another snowflake with scrap piece of Seaside Spray cardstock, selecting one of the smaller dies in the set.
  • Adhere the three snowflakes together with glue dots placed in the centers of the two smaller snowflakes. Adhere entire snowflake piece to the smaller label with Stampin’ Dimensionals. Adhere a blue gem to center of snowflake.
  • Cut piece of Whisper White cardstock at 4″ x 5 1/2″. Stamp greeting of your choice from the stamp set with Misty Moonlight ink. Stamp the little snowflake cluster image with Seaside Spray ink in lower left corner. Adhere to inside of card.

Thanks for stopping by today!

 Product List  

Poinsettia Petals

Hello! Today’s card features products from the Poinsettia Place Suite in the August-December 2020 Mini Catalog. This is one of the cards I will be including in my upcoming virtual holiday workshops. The products in this suite are so pretty! I also like that the Designer Series Paper uses the Christmas colors we all love, but the designs are not the typical stripes, plaids, checks, trees, etc. that you find in so many papers. The stamps and dies, along with beautiful sentiments and type fonts make for great versatility. Here is how I made the card.

  • Card base – cut piece of Garden Green cardstock at 5 1/2″ x 8 1/2″, score at 4 1/4″ and crease with a bone folder.
  • Cut a piece from one of the papers with white poinsettia images at 4″ x 5 1/4″ and adhere to card base.
  • Cut another piece of Garden Green cardstock at 3″ x 4 1/2″. Cut piece of the Garden Green DSP with the tone-on-tone pine branches at 2 3/4″ x 4 1/4″ and adhere to cardstock. Adhere to center of card front.
  • Die cut one small and one medium poinsettia from scrap piece of Whisper White cardstock. There are two dies for each size of poinsettia, one is open and the other fits inside and has lines for embossing the veins of the flowers. Use both pieces. Adhere the two cut pieces with a Mini Glue Dot. The leaf shapes also have two pieces for each size. Die cut two leaves from scrap piece of Garden Green cardstock and use both dies so that the leaves are embossed. Adhere the leaves to the poinsettia flower with glue dots. Die cut the flower center from a small scrap of Bumblebee cardstock. Adhere with a glue dot. Adhere entire flower to upper corner of the card with liquid glue for better positioning.
  • Stamp greeting with Garden Green ink on scrap piece of Whisper White cardstock. Cut with the banner die from the Tasteful Labels Dies. Adhere to card.
  • For the inside of the card, cut piece of Whisper White cardstock at 4″ x 5 1/4 and stamp greeting with Garden Green ink. I used the Merry Christmas greeting. Stamp one of the leaf images in the bottom left corner. Adhere to card.

This was a quick and easy card to put together.

Thanks for stopping by today!

 Product List  

Snowflake Splendor

Hello! Today’s card features products from the Snowflake Splendor Suite in the August-December 2020 Mini Catalog. The non-traditional colors, paired with all of the beautiful snowflake images, can be used not only for holiday cards but also for general cards with a winter theme.

Here is how I made the card.

  • Card base – cut piece of Misty Moonlight cardstock at 4 1/4″ x 11″, score at 5 1/2″and crease with a bone folder. This is a landscape card.
  • Cut piece of Whisper White cardstock at 4″ x 4″. Cut piece of Snowflake Splendor Designer Series paper at 3 7/8″ x 3 7/8″ and adhere to Whisper White piece.
  • Cut piece of Snowflake Splendor 1/4″ Ribbon at 15″, tie into a knot, or bow if you prefer, around DSP piece and trim ends. Adhere piece to card base.
  • Cut piece of Balmy Blue Glimmer paper at 3 1/4″ x 3 5/8″. Cut piece of Whisper White cardstock at 3 1/8″ x 3 1/2″. Use the largest snowflake die in the So Many Snowflakes Dies set, center it on the cardstock piece and run through the Stampin’ Cut & Emboss Machine.
  • Adhere die cut piece to the gimmer paper with either Tear & Tape or Stampin’ Seal+. Adhere piece to the DSP piece. Add a large Blue Adhesive-Backed Gem to the center of the snowflake.
  • Cut piece of Whisper White cardstock at 4″ x 5 1/4″. Select one of the greetings from the Snowflake Wishes stamp set and stamp with Night of Navy ink. Stamp one of the smaller snowflake images in opposite corners with Misty Moonlight ink. Adhere to inside of card.

Thanks for stopping by today!

Celebrate with curvy stamps, dies, and more! Designed for a variety of special occasions, the Quite Curvy Variety Bundle includes everything you need to create one-of-a-kind crafts. Don’t let stress steal your spirit—get ahead and order this exclusive bundle for a festive and frenzy-free season!  You can also purchase the Quite Curvy Bundle or the Curvy Christmas Stamp Set separately.  The Quite Curvy Bundle will be in the upcoming January-June 2021 Mini Catalog.  The Quite Curvy Variety Bundle, Curvy Christmas stamp set and the Classic Christmas 6×6 Designer Series Papers will only be available now through January 4th.

Quite Curvy Photopolymer Stamp Set – 154430  $17.00USD
Curvy Dies – 154319  $29.00USD
Quite Curvy Bundle – 156228   $41.25USD
Curvy Christmas Photopolymer Stamp Set – 155364  $21.00USD
Classic Christmas 6×6 Designer Series Paper – 155969  $11.50USD
Quite Curvy Variety Bundle – 158396  $70.50USD

 Product List  

Festive Post for Halloween

Hello and Happy Halloween! Today’s card features the Festive Post stamp set. This is a versatile set because it has images for Halloween, Christmas and Valentines Day and they can be punched out with either the Rectangular Postage Stamp punch or other punches and dies you might have in your collection. Here is how I made the card.

  • Card base – cut piece of Basic Black cardstock at 5 1/2″ x 8 1/2″, score at 4 1/4″ and crease with a bone folder.
  • Cut piece of Cajun Craze cardstock at 4 1/8″ x 5 3/8″.
  • Select two different pieces of Magic in the Night Designer Series Paper. Cut one piece at 2 1/2″ x 5 1/4″ and another at 1 1/2″ x 5 1/4″. Adhere both pieces to the Cajun Craze piece.
  • Cut three pieces of Whisper White cardstock at 1 1/4″ x 1 7/8″. Stamp the three images from the Festive Post stamp set. Stamp the October 31 image with Tuxedo Black Memento ink. Stamp the brooms with Cajun Craze ink. Stamp the greeting with Blackberry Bliss ink. Stamp the small spider from the Hallows Night Magic stamp set under the greeting.
  • Punch three of the Rectangular Postage Stamps from scrap pieces of Basic Black cardstock. Adhere to the stamped images.
  • Wrap a piece of Metallic Mesh Ribbon twice around the Cajun Craze/DSP piece and tape on the back. Adhere this piece to the card front. Use Tear and Tape or Stampin’ Seal+ to adhere the postage stamp pieces to the card front so that they stick well to the ribbon
  • Adhere five rhinestone basic jewels all around the card for some extra bling.
  • Cut piece of Whisper White cardstock at 4″ x 5 1/4″ and stamp a greeting from the Hallows Night Magic stamp set with Tuxedo Black Memento ink. Stamp large and small spider images from the set with Blackberry Bliss ink. Adhere to inside of card.

Thanks for stopping by today!

 Product List  
November 5-7

Hallows Night Magic – Another Card Idea

Hello! Here’s another card I created with the Hallows Night Magic Bundle. It was fun and easy to put it together. Here is how I made the card.

  • Card base – cut piece of Basic Black cardstock at 5 1/2″ x 8 1/2″, score at 4 1/4″ and crease with a bone folder.
  • Cut piece of Whisper White cardstock at 3 1/4″ x 5″.
  • Select three different papers from the Magic in this Night Designer Series Paper and cut at 1 1/2″ x 3″. Adhere to Whisper White cardstock and adhere piece to card front.
  • Stamp label image from the Hallows Night Magic stamp set on scrap piece of Whisper White cardstock with Tuxedo Black Memento ink. Color the flowers with Pumpkin Pie and Cajun Craze Stampin’ Blends and color the leaves with Old Olive Stampin’ Blends. Stamp greeting with black ink. Run through die cutting machine with the smaller label die from the Halloween Magic dies.
  • Die cut larger label from scrap piece of Basic Black cardstock and adhere to stamped label piece.
  • Cut piece of Glittered Organdy Ribbon at 6″, trim ends at an angle and adhere across the center of the card front. I used Scotch Tape to hold it down in the center. Adhere label over the ribbon.
  • Cut piece of Whisper White cardstock at 4″ x 5 1/4″. Stamp greeting with black ink. Cut strip of Basic Black cardstock at 1 1/2″ x 4 3/4″ and run it through the die cutting machine using the filigree edge die. Adhere to bottom of the cardstock. Adhere piece to inside of card.

Thanks for stopping by today!

There are just a few days left for the 15% discount on Designer Series Paper!

 Product List  
 

Hallows Night Magic

Today’s card features products from the Magic in this Night suite. When I saw this suite in the August-December 2020 mini catalog I knew right away that I would purchase some of the products because as much as I enjoy the more traditional Halloween stamps and papers, the ones this year are more sophisticated or elegant and it is a nice change of pace! I decided to showcase the die cut labels by making a gatefold card. It is one of the cards we made in my stamping club this month.

Here is how I made the card.

  • Card base – cut piece of Basic Black cardstock at 5 1/2″ x 8 1/2″. Score at 2 1/8″ on both ends, fold and crease sharply with a bone folder.
  • Cut four strips of Magic in the Night Designer Series Paper at 1 7/8″ x 5 1/4″. Adhere two of the strips to the front flaps and the remaining two strips to the inside flaps.
  • Stamp “Happy Halloween” greeting from the Hallows Night Magic stamp set with Cajun Craze ink on scrap piece of Whisper White cardstock. Run through die cutting machine with the smaller label die from the Halloween Magic dies.
  • Cut piece of Black Glitter paper with the larger die from the Halloween Magic dies. Adhere the stamped greeting to this piece with either Tear and Tape or Stampin’ Seal+. Adhere entire label piece to the left flap on the card front. Make sure that you only apply glue to the left part of the label so that the card can be opened!
  • From the sheet of Magic in the Night DSP with the bats, cut out both the large and small bats with the coordinating die from the Halloween Magic dies. Both shapes are included on the one die. Adhere bats to label.
  • Cut piece of Whisper White cardstock at 4″ x 5 1/4″. Stamp another greeting from the Hallows Night Magic stamp set with Cajun Craze ink. Stamp small bat images with Memento Tuxedo Black ink in opposite corners. Adhere to inside of card.
  • Cut length of Metallic Mesh ribbon, tie into a bow and adhere to corner of label with a glue dot.

Thanks for stopping by today!

 Product List  

Gather Together Fall Card

Hello! Today’s card features the Gathered Together bundle in the August-December Mini Catalog. I was so happy to see that this bundle, which was in the 2019 holiday catalog, was brought back as a returning favorite! I went back to a card I created last year for Kylie Bertucci’s monthly blog hop because I love the layout. I changed up this year’s card by using the Gilded Autumn Specialty Designer Series Paper; one of the dies from the Autumn Essentials Dies, a new set in the Mini Catalog; and Cinnamon Cider cardstock, which is one of the new InColors. You can see my original card in this blog post.

I recently participated in a group of 82 Stampin’ Up! demonstrators from around the world that contributed amazing projects to a MEGA tutorial bundle using autumn-themed products from the 2020 August-December Mini Catalog and decided to make this card for the tutorial.   These projects are exclusive and will not be publicly posted online. Each project includes full color photos, step-by-step instructions, measurements in both metric and imperial, and supply lists.  There are three ways to get this awesome tutorial bundle:

  • If you placed an order with me from January through August you should have received it from me for FREE in a separate message I sent out recently.
  • If you place an order with me from September until the end of December 2020 either in my online store or by having me place an order for you, you will receive it for FREE once the order has been placed.
  • If you’d like to purchase the tutorial it is available for $21.  Please contact me at rhondastamps@verizon.net and I will send you an invoice for payment.

Since I’m unable to post a picture of the card in the tutorial I made another card and changed up the paper and some of the colors.

Here is how I made the card:

  • Card base: Cajun Craze cardstock cut at 4 1/2″ x 11″, score at 5 1/2″, fold and crease with a bone folder.
  • Cut a piece of the Gilded Autumn Specialty Designer Series Paper at 4″ x 5 1/4″ and adhere to card base.
  • Emboss a piece of Copper Foil with the Hammered Metal 3D Embossing Folder and then die cut using largest circle in the Layering Circles Dies. Adhere to card.
  • Stamp large leaf image from the Gathered Leaves stamp set on scrap pieces of Cinnamon Cider and Cajun Craze cardstock with Versamark ink.  Sprinkle gold embossing powder over each leaf and heat emboss. Use the largest leaf in the Gathered Leaves Dies to cut the embossed leaves.
  • Use the next-to largest and smallest leaf dies in the Gathered Leaves Dies to cut one Crushed Curry and One Cajun Craze leaf in each size.
  • Accent the veins in the leaves by adding touches of Early Espresso ink on the Cajun Craze leaves and Soft Suede ink on the Crushed Curry leaves with sponge daubers. 
  • Add some glimmer by spritzing some Champagne Mist Shimmer Paint over the leaves.  Add a few drops of the paint into a Stampin’ Spritzer and then fill the spritzer with 70% Rubbing Alcohol and shake to mix it together before spritzing.  Let dry before adding to card.
  • Die cut one each of the long, curved leaf dies from the Autumn Essentials Dies from scrap piece of Cinnamon Cider cardstock.
  • Start building the collage.  First, adhere the long Cinnamon Cider leaves leaves as pictured.  Use multipurpose liquid glue on the stems but keep the leaves free of glue to give a bit of dimension at the top of the card. Next, adhere the large Cajun Craze leaf.  This serves as the base for adding the rest of the leaves. 
  • Adhere the smaller Cajun Craze and Crushed Curry leaves, overlapping them, to the right side of the large Cajun Craze leaf.  Adhere the larger Cajun Craze and Crushed Curry leaves on the left side, again overlapping them.
  • Adhere the large Cinnamon Cider leaf with Stampin’ Dimensionals on top of the collage.  Cut a length of Braided Linen Trim and tie in a small bow. Adhere with a Mini Glue Dot.
  • For inside of card cut piece of Very Vanilla cardstock at 4″ x 5 1/4″. Stamp sentiment with Cajun Craze ink. Stamp wheat sheaf image in lower left corner with Cinnamon Cider ink.

Thanks for stopping by today!

There are just a few days remaining to take advantage of this great offer to join Stampin’ Up! You pay $99 for the starter kit and get to pick out $125 in products (and you can opt to select the new Stampin’ Cut and Emboss Machine!). In addition, you will also receive the Queen Anne’s Lace and So Much Love stamp sets for free, plus cardstock pieces to make 16 cards, 16 envelopes, and a pack of Basic Rhinestone Jewels.

 Product List