


Hello! Welcome to Kylie Bertucci’s Demonstrator Training Blog Hop for July. I’m part of a group of Stampin’ Up! demonstrators from around the world that participate in Kylie’s program for building our businesses. The theme for this year is thank you cards that we make as a way to show appreciation to our customers and teams. Please be sure to click on the names in the list at the end of this post to hop around and view the beautiful projects created by so many talented stampers.
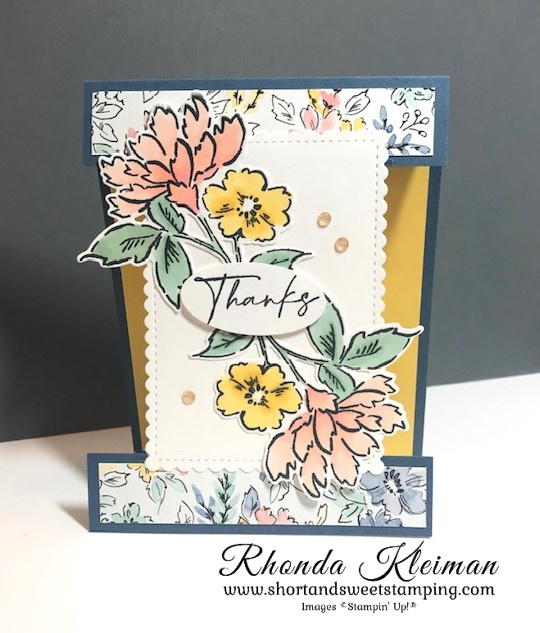
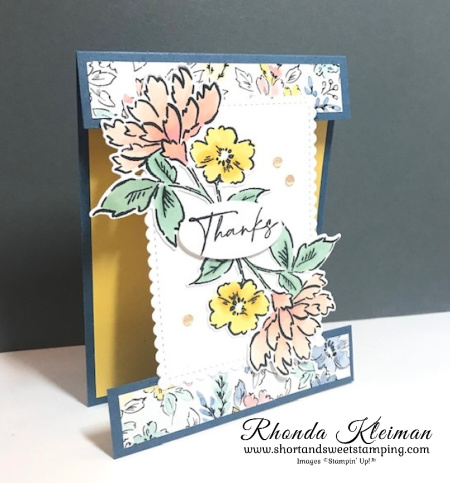
Today’s card is a fun fold that features the Hand-Penned Suite. It is one of four cards we will be making in one of my classes this week. The Hand-Penned Designer Series Paper is so soft and pretty and I love the color palette.
Here is how I made the card.
- Card base – cut piece of Misty Moonlight cardstock at 4 1/4″ x 11″, score at 5 1/2″, fold and crease with a bone folder. Cut the card front 1″ from the fold line. Cut a 1″ x 4 1/4″ strip from the Misty Moonlight piece that was cut off.
- Cut two strips of DSP at 3/4″ x 4″ and adhere to the 1″ Misty Moonlight strips. Cut a piece of Daffodil Delight cardstock at 4″ x 5 1/4″ and adhere to card base.
- Cut a piece of Basic White cardstock with the largest die from the Stitched So Sweetly die set.
- Stamp two of the floral images from the Hand-Penned Petals stamp set with Tuxedo Black Memento ink on piece of Basic White cardstock. Color the flowers with Stampin’ Blends. I used Mint Macaron dark and light blends for the leaves, Daffodil Delight dark and light blends for the small flower and for the large flower I used Petal Pink dark and light blends and Flirty Flamingo light blend. When finished coloring, cut both flowers out with the coordinating die from the Penned Flowers Dies.
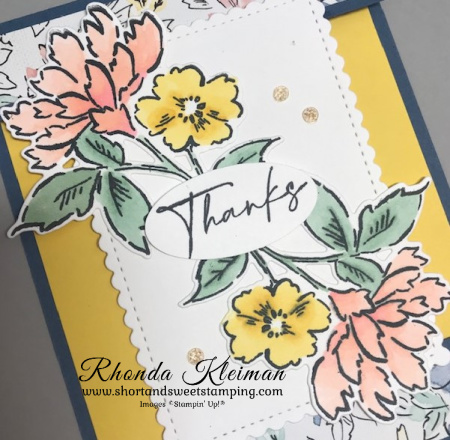
- Adhere flowers to the Basic White scalloped piece with liquid glue. Place one flower in one direction and the other flower in the opposite direction, making sure not to put glue on the parts of the flowers that will hang off the edges of the Basic White piece. Leave a space in between the flowers in order to add the greeting.
- Stamp the greeting with Tuxedo Black ink on scrap piece of Basic White cardstock and punch out with the Oval Punch or other punch or die that will fit the space. Adhere with Stampin’ Dimensionals.
- Adhere top of art piece to bottom edge of the 1″ folded card base. Adhere the other 1″ strip to the bottom of the piece.
- Embellish card with three Pale Papaya Genial Gems.
Thanks for stopping by today!


Place an online order between $50 and $149 and use this host code for June. You will receive a free gift from me the following month. If your order is $150 or more DO NOT use the host code. You will qualify for Stampin’ Rewards.
Product List  | ||
 |  | |
 | ||
 | ||
 |  |  |
 |  |  |
")

 Designer Series Paper")


Very, very pretty card, Rhonda! Fun folds are always the perfect thank you card.
Thank you, Mary Ann!
Such a soft and feminine card Rhonda! Thank you for taking part in our Demonstrator Training Program Blog Hop this month.
Thank you, Kylie!
Nice card, Rhonda. I like the fun-fold in portrait! I’ll have to try it!
Thank you, Theresa!
Fun card Rhonda! Hand penned is perfect with this fun fold. I love how you grouped the flowers around the sentiment. Thx for sharing your specific directions, I’m inspired?
Thank you for your kind words, Lesley! I
am usually inspired by other stampers so am happy to be an inspiration to you. :-)Great card Rhonda, love the bright colour combo x
Thank you, Mo!
Lovely card. Thank you for sharing
Thank you, Sandie!
Lovely card! Great fun-fold!!!?
Thanks, Christy!