Earthen Elegance Step Card

Hello!

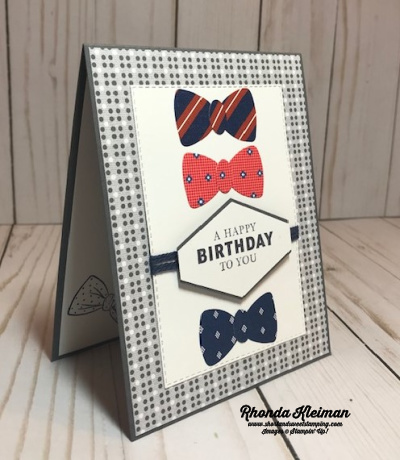
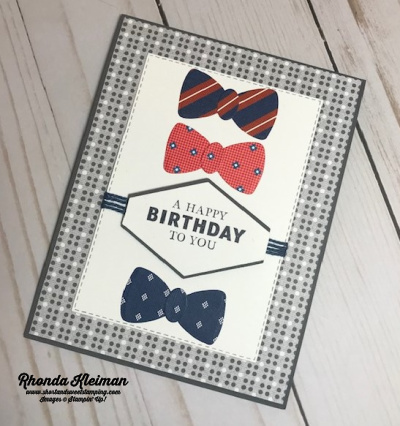
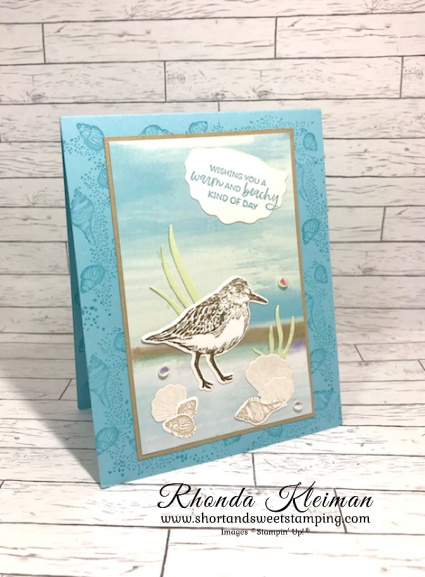
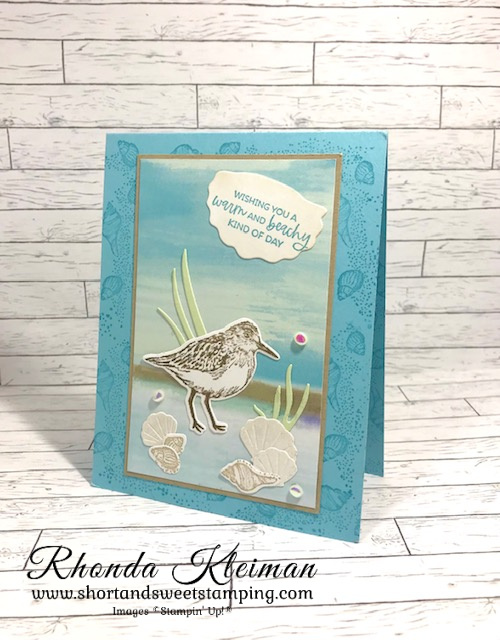
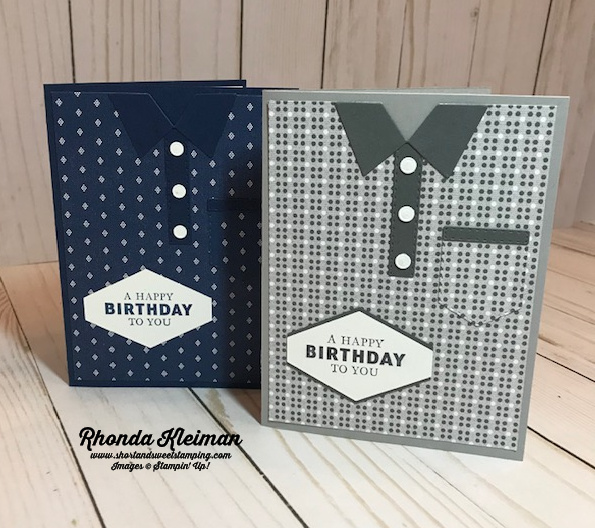
Today’s card is one that we made at my monthly in-person class this past Saturday and it showcases the awesome Earthen Elegance Suite. Of all of the suites in the new annual catalog this is the one that immediately got my attention. The earth tones are rich and the textures in the images are so realistic. This is a great suite for making masculine cards as well. The fun fold is a step card that I learned how to make at a recent Creative Retreat held by Kylie Bertucci and Lisa Curcio and while it might look complicated, is actually very easy to make.

Here is how I made the card.

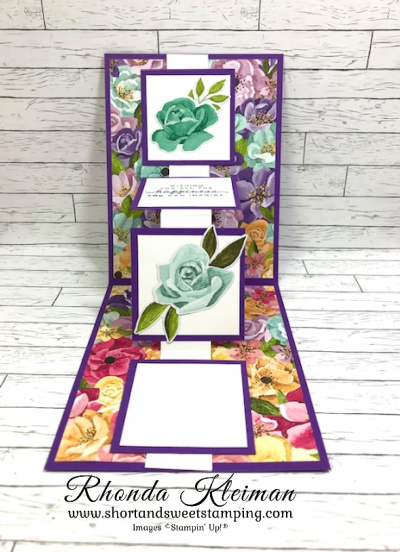
  • Card base – cut a piece of Copper Clay cardstock at 5 1/2″ x 5 1/2″ and score at 3/4″, 1 1/2″ and 3 1/2″. Crease sharply with a bone folder.
  • Steps – For the large step cut a piece of Copper Clay cardstock at 3″ x 8 1/2″ and score at 4 1/4″ and 8″. For the small step cut a piece of the cardstock at 2″ x 7″ and score at 3 1/2″ and 6 1/2″. Fold both of the steps in half on the score line and crease with a bone folder. Lightly crease the 1/2″ score lines.
  • For the steps cut one piece of Basic White cardstock at 2/7/8″ x 4 1/8″ and one piece at1 7/8″ x 3 3/8″. Adhere to fronts of step pieces. Cut one piece of the Earthen Elegance DSP at 2 3/4″ x 4″ and one piece at 1 3/4″ x 3 1/4″. Adhere to Basic White pieces.
  • On scrap pieces of Basic White cardstock, use the Earthen Textures stamp set to stamp large vase and branch image with Pecan Pie ink and stamp the basket with Pretty Peacock ink. Run through die cutting machine with coordinating Earthen Textures dies.
  • Cut a piece of Pretty Peacock cardstock at 3″ x 4 1/2″ and run through die cutting machine with the large leaf die. Cut a piece of Pretty Pecan cardstock at 1 1/2″ x 4″ and run through die cutting machine with the fern die.
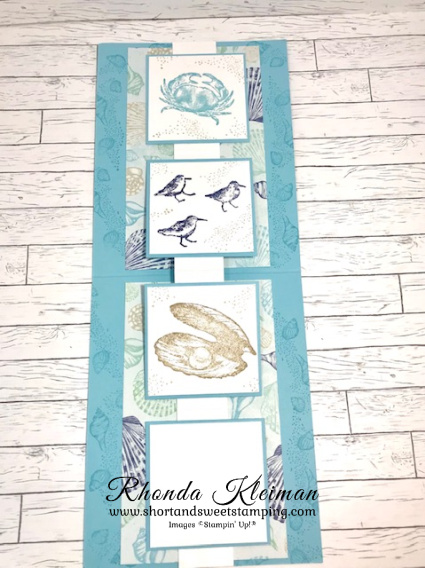
  • Adhere the large and small steps to the bottom front of the card base fold, leaving a small margin on both sides. Adhere the backs of the large and small steps to the back of the card, aligning the bottom of each to the bottom of the back fold.
  • Cut 7″ piece of Natural Wavy Trim, adhere one end at the back of the long vase and wrap it around three times, adhering the remaining end at the back. Adhere large vase to large step, cut off the stem from the large Pretty Peacock leaf and adhere with mini glue dots under the top of the vase. Adhere basket to small step and adhere the fern and branch pieces.
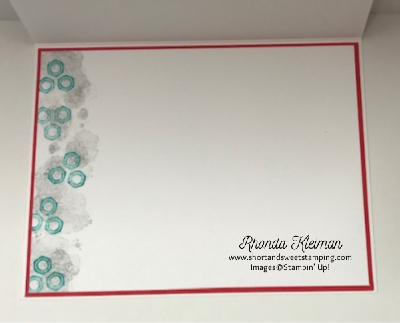
  • Cut piece of Basic White cardstock at 1 7/8″ x 5 3/8″ for the inside greeting. I used the Biggest Wish stamp set, as the greetings fit perfectly on this narrow strip. I stamped “Happy” (block letters) with Pretty Peacock ink at the left side of the strip and then stamped “Birthday” (cursive letters) with Pecan Pie ink, staggering it to the bottom center. Adhere to card.
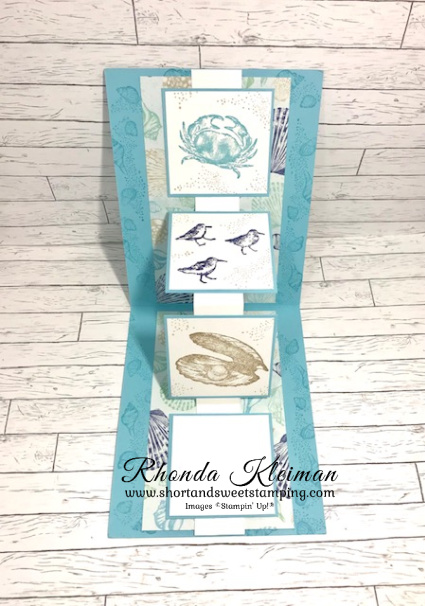
  • Add several Pretty Peacock gems from the Tinsel Gems 4-Pack to the large step.

Thanks for stopping by today!

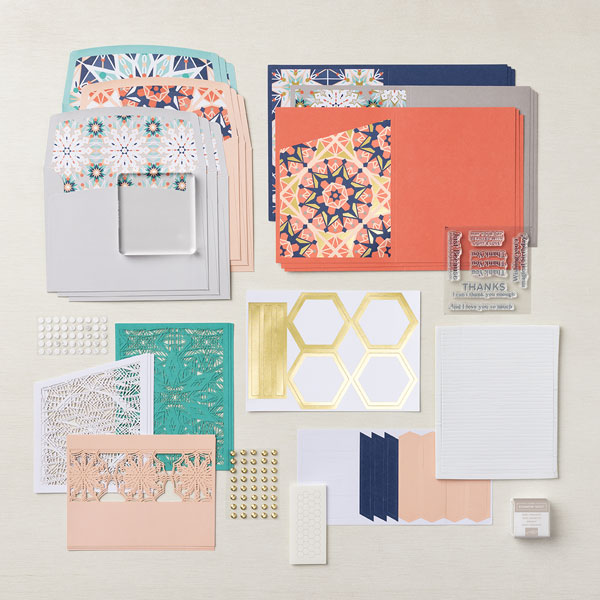
The Welcome Inn Paper Pumpkin Kit perfectly coordinates with the Countryside Inn Suite Collection (item number 161474) from the 2023–2024 Annual Catalog! You can use the stamps and paper from both the suite and kit to create cards that are stylish and refined. Create these elegant hospitality cards using the suite’s Countryside Inn 12″ x 12″ (30.5 x 30.5 cm) Designer Series Paper and the kit’s beautiful floral cards. You can purchase a set of coordinating add-on dies that include a vase, flower and leaf, while supplies last. Item number 163192, Price $6.00. Click here to purchase the kit on my Paper Pumpkin website.

The kit includes all supplies needed to create nine cards, three each of three different designs; coordinating stamp set; Night of Navy Stampin’ Spot; embellishments; floral details and precut vases. Coordinating Stampin’ Up! colors: Balmy Blue, Boho Blue, Calypso Coral, Daffodil Delight, Early Espresso, Misty Moonlight, Night of Navy, Old Olive.

Place an online order between $50 and $149 and use this host code for May. You will receive a free gift from me the following month.  If your order is $150 or more DO NOT use the host code. You will qualify for Stampin’ Rewards.

Product List

By the Bay Fun Fold Card

Hello!

Today’s card is another one I made with the By the Bay Suite. It features the W Fun Fold, which looks difficult, but is really easy to make.

Here is how I made the card.

  • Card base – cut a piece of Balmy Blue cardstock at 4 1/4″ x 11″, score at 5 1/2″, fold and crease with a bone folder
  • Stamp the sea shell and sand image from the Seaside Bay stamp set with Balmy Blue ink around all four sides of the card front so that it looks like a frame.
  • Cut a piece of Crumb Cake cardstock at 3 1/8″ x 4 7/8″. Cut a piece of By the Bay Specialty Designer Series Paper at 3″ x 4 3/4″. I chose one of the papers with a scene. Adhere to Crumb Cake piece and adhere to card front.
  • Stamp large bird image with Soft Suede ink on a scrap piece of Basic White cardstock. Stamp the sea shell and sand image with Sahara Sand ink on the scrap piece. Run through die cutting machine with the coordinating dies from the Seaside Bay Dies.
  • Cut a small piece of Pearlescent Specialty Paper and run through die cutting machine with the double small shell die and one large shell die. Cut a small piece of Soft Sea Foam cardstock and run through die cutting machine with one large and one small grass dies.
  • Arrange die cut pieces on the DSP and adhere.
  • Run the large shell through die cutting machine with a piece of Basic White cardstock. Cut shell in half. Stamp greeting from Paradise Palms stamp set with Balmy Blue ink on the shell and adhere to DSP. Embellish card front with several Flat Adhesive-Backed Pearls.

Here is how to make the inside of the card.

  • Stamp the sea shell and sand image with Balmy Blue ink all around the sides of the Balmy Blue cardstock
  • Cut two pieces of DSP at 3″ x 5 1/4″ and adhere.
  • Cut four pieces of Balmy Blue cardstock at 2 1/4″ each and four pieces of Basic White cardstock at 2″ each. Stamp the large crab image with Balmy Blue ink on the first piece. Stamp the small bird images three times with Night of Navy ink on the second piece. Stamp the oyster shell with Crumb Cake ink on the third piece. Stamp the sand image with Sahara Sand ink around the images on all three pieces. Leave the fourth piece blank to write your note or stamp the greeting of your choice. Adhere white squares to Balmy Blue squares.
  • Cut a piece of Basic White cardstock at 1″ x 11″ and score at 2 3/4″, 5 1/2″ and 8 1/4″. Crease all folds very sharply with a bone folder.
  • Run a thin line of liquid glue at the top of the 11″ strip. Open card and center the strip in the middle. Line up the top of the strip with the top of the card and adhere. Run a thin line of liquid glue at the bottom of the strip. Line up the strip with the bottom of the card and adhere.
  • Adhere the four squares to the strip, running a thin line of liquid glue in the middle of each square. Don’t apply glue to the entire square otherwise the fold won’t work properly.

Last July I posted a W Fun Fold with the Hues of Happiness Suite. Here is the card. To view the blog post, click here.

Thanks for stopping by today!

Colorful Kaleidoscope Added to Kits Collection

This stunning kit has just been added to the Kits Collection.  It includes supplies to create 9 cards, 3 each of 3 different designs, stamp set, acrylic block, dimentionals, Gray Granite Stampin’ Spot, laser cuts, die cuts, gold and pearlescent embellishments.  The colors are Bermuda Bay, Calypso Coral, Gray Granite, Night of Navy and Petal Pink. You can purchase the kit on my online store by clicking here. Item #161804 and cost is $23.00.

Place an online order between $50 and $149 and use this host code for March. You will receive a free gift from me the following month.  If your order is $150 or more DO NOT use the host code. You will qualify for Stampin’ Rewards.

Product List

Rings of Love Card

Hello!

The month of August is flying by so quickly and it means that Sale-A-Bration will be coming to an end on August 31st. I’ve been so busy with in-person classes that I haven’t had time to post all of the cards I’ve made this month, so for the next few days I’ll be posting cards that use Sale-A-Bration products. Today’s card features the Ringed With Nature stamp set from the July-December 2022 Mini Catalog and the Rings of Love Designer Series Paper that you can earn for free with a $50 purchase during Sale-A-Bration. The Ringed With Nature bundle is such a fun bundle work with and the DSP works so beautifully with it. This card is quick and easy to put together.

Here is how I made the card.

  • Card base – cut a piece of Crushed Curry cardstock at 5 1/2″ x 8 1/2″, score at 4 1/4″, fold and crease with a bone folder.
  • Cut a piece of the Rings of Love DSP with the tree branches at 4″ x 5 1/4″ and adhere to card front.
  • Cut a piece of the DSP with the birds at 2 1/2″ x 3″.
  • Cut a piece of Night of Navy cardstock at 3 1/4″ x 4 1/2″ and run through the Stampin’ Cut and Emboss Machine with the the scalloped frame from the Fabulous Frames dies. Adhere frame to card front. Adhere the piece of bird DSP to the inside of the frame. The top and bottom of the DSP will fit into the frame and the sides will slightly overlap the sides of the frame.
  • Run a scrap piece of Basic White cardstsock through the Cut & Emboss Machine with the label die from the Stylish Frames dies. Stamp greeting with Soft Suede ink. I used one of the greetings from the Go To Greetings stamp set. This is such a wonderful set of greetings! I just love the mix of different type fonts, sizes and basic greetings that work for all occasions.
  • For a bit of embellishment, I cut two pieces of the Crumb Cake Bakers Twine from the Essentials Pack at 2 1/2″ and threaded each one through the holes on the sides of the tag, tied double knots and trimmed the ends. Adhere tag to card front with Mini Stampin’ Dimensionals.
  • Cut a piece of Basic White cardstock at 4″ x 5 1/4″. Stamp the stem from the Ringed With Nature stamp set with Soft Suede ink in bottom left corner. Stamp the mushroom caps with Crushed Curry ink on top of the stems. Adhere to inside of card.
Rings of Love DSP

Thanks for stopping by today!

Select free items with every $50 or $100 purchases. There is no limit on the number of times you can get free items. Please note that all SAB products are only available while supplies last. The Pool Party & Soft Sea Foam Cards & Envelopes (item #159940) and the Tree Lot Dies (item #159938) are no longer available.

The Brushed Metallic Cardstock (163103) is no longer available as a free Sale-A-Bration item, however, it is still available for purchase in the annual catalog, Item #153524, $15.00.

Saturday, October 1, 2022 – Save the Date!

Get your Halloween crafting on with the Spooky Treats Paper Pumpkin Kit. This month’s kit includes everything you need to make 18 adorable treat boxes—that’s 6 each of 3 unique designs. This all-inclusive kit includes printed box bases and tops, die-cut paper pieces, adhesives, and an Orchid Oasis Classic Stampin’ Spot. This kit’s stamp set puts the TREAT in trick-or-treat with fun, Halloween-themed sentiments and designs. Embrace the spooky season with ghost, bat, spider, and star images. This kit also includes a special peek-through box top on one of the box designs. Coordinating Stampin’ Up! colors: Basic Black, Gray Granite, Orchid Oasis, Fresh Freesia, Crushed Curry, Pumpkin Pie. For further information and to subscribe to the August kit, visit my Paper Pumpkin website here.

Place an online order between $50 and $149 and use this host code for August. You will receive a free gift from me the following month.  If your order is $150 or more DO NOT use the host code. You will qualify for Stampin’ Rewards.

Product List
Paper Snips
[103579]
$11.00

Let’s Set Sail Meets Oceanfront

Hello!

Today’s card uses the Oceanfront and Let’s Set Sail stamp sets and is a departure for me from my usual floral cards! This is one one of the projects we made in my classes this month.

Here is how I made the card.

  • Card base – cut a piece of Pacific Point cardstock at 4 1/4″ x 11″, score at 5 1/2″, fold and crease with a bone folder.
  • Cut a piece of Tahitian Tide cardstock at 3 1/4″ x 5″ and set aside.
  • Cut a piece of Basic White cardstock at 3″ x 4 3/4″. Stamp the sky image from the Oceanfront stamp set with Mango Melody ink. Stamp the gulls from Let’s Set Sail with Pacific Point ink in upper right corner over the Mango Melody ink. Stamp the sky image withTahitian Tide ink. Next, use the narrow angled stamp for the sand. Use Sahara Sand ink and stamp with the wider point to the left and then stamp a second time underneath it with the narrower point to the left. Use both of the rock images and stamp them at the bottom of the card with Sahara Sand ink. Stamp the sand grains with Crumb Cake ink.
  • To make the sailboat, stamp the base of the boat with Pacific Point ink. Stamp the sails with Calypso Coral ink. Punch out with the sailboat punch. Adhere base of boat with a thin line of liquid glue. Adhere the sails with mini glue dots on either side of the mast.
  • For the greeting, use a scrap piece of Basic White cardstock. Run through the Mini Stampin’ Cut and Emboss Machine with the smallest die with the straight edge top from the Tailor Made Tags. Stamp greeting from Let’s Set Sail with Tahitian Tide ink.
  • Cut two pieces of the Tahitian Tide Bakers Twine from the 2022-2024 In Color Pack at 5 1/2″. Thread through hole in top of tag and tie in a slip knot. Trim ends and adhere tag to card front. Adhere stamped piece to the Tahitian Tide cardstock. Adhere piece to card base with Stampin’ Dimensionals.

Thanks for stopping by today!

Sale-A-Bration! runs through August 31st and is going strong! Select free items with every $50 or $100 purchases. There is no limit on the number of times you can get free items. Please note that all SAB products are only available while supplies last. The Pool Party & Soft Sea Foam Cards & Envelopes (item #159940) are no longer available.

Place an online order between $50 and $149 and use this host code for July. You will receive a free gift from me the following month.  If your order is $150 or more DO NOT use the host code. You will qualify for Stampin’ Rewards.

Product List
Paper Snips
[103579]
$11.00

Handsomely Suited Polo Shirt Cards

Hello! I needed a few masculine birthday cards so I turned to the Well Suited Suite in the mini catalog. I saw a few cute cards made by Tina Zinck and Michelle Strazds on Pinterest that were made to look like polo shirts and CASEd them, making a few changes. I did one in Night of Navy and the other in Smoky Slate. They were a lot of fun and very easy to put together!

Here is how I made the cards.

  • Card base – cut piece of Night of Navy or Smoky Slate cardstock at 5 1/2″ x 8 1/2″, score at 4 1/4″, fold and crease with a bone folder.
  • Cut piece of Well Suited Designer Series Paper at 4″ x 5 1/4″. Cut a “V” in the center. I used the collar die from the Suit and Ties Dies and made the “V” by centering the die at the 2″ mark, slightly below the top of the DSP, traced with a pencil and cut out with Paper Snips.
  • Die cut collar and long strip with either Night of Navy or Basic Gray cardstock. The long strip will be used for the button placket. Trim the strip to 2″ and adhere to DSP below the center of the “V.” Adhere collar piece.
  • Die cut pocket from DSP and die cut the contrasting trip with the small strip die. Adhere to top of pocket. Adhere to DSP base.
  • Die cut Basic White buttons with the button die. There are six buttons on the one die so I used three for each card. Adhere them to the placket. I used the putty tip on the Take Your Pick tool to pick up each button, place them on Mini Glue Dots, and then onto the placket.
  • For the Night of Navy card stamp the birthday greeting from the Handsomely Suited stamp set with Night of Navy ink on scrap piece of Basic White cardstock and punch out with the Tailored Tag punch. Adhere to DSP base. Adhere DSP piece to Night of Navy card base.
  • For the Smoky Slate card stamp the birthday greeting with Basic Gray ink. Punch out with the Tailored Tag Punch. Punch another tag with a scrap piece of Basic Gray cardstock. Cut in half horizontally. Adhere one piece to top of tag and the other piece to the bottom of the tag so that it frames the Basic White tag. Adhere to DSP base and adhere entire piece to Smoky Slate card base.
  • Cut a piece of Basic White cardstock at 4″ x 5 1/4″. Leave blank or stamp a greeting and adhere to inside of card.

Thanks for stopping by today!

Product List
Paper Snips
[103579]
$10.00

Handsomely Suited Birthday Card

Hello! Today I’m sharing a fun card I made with products from the new Well Suited Suite. This is a great suite for making masculine cards for many occasions. The Handsomely Suited stamp set has a nice variety of greetings and type fonts and the Designer Series Paper is fabulous! The fabric designs for the men’s suits, shirts and ties are so realistic. I made this card for my father, who will be celebrating his 99th birthday this Saturday – it is hard to believe!!

Here is how I made the card.

  • Card base – cut a piece of Basic Gray cardstock at 4 1/4″ x 11″, score at 5 1/2″, fold and crease with a bone folder.
  • Cut a piece of Well Suited DSP at 4 1/8″ x 5 3/8″ and adhere to card front.
  • Cut a piece of Basic White cardstock at 3 1/2″ x 4 1/2″ and using the third largest rectangle from the Stitched Rectangles dies, run it through your embossing machine.
  • Select three different pieces of DSP and from each, die cut the bow ties with the large bow tie and small knot dies from the Suit & Ties Dies. Adhere the knots to the bow ties. Adhere two of them to the top part of the rectangle. Adhere one to the bottom of the rectangle, leaving space in between for the greeting.
  • Stamp greeting on scrap piece of Basic White cardstock with Basic Gray ink. Punch out with the Tailored Tag punch. This is one of my all-time favorite Stampin’ Up! punches! To add a touch of contrast, punch another tag from a scrap piece of Basic Gray cardstock. Cut in half horizontally. Adhere one half to the top of the tag and the other half to the bottom of the tag, leaving just a little bit of the gray showing.
  • Wrap a piece of Night of Navy Twine around the blank section between the bow ties four times. Start wrapping from the back of the piece, taping the tail down with Scotch Tape or Tear and Tape. After the fourth wrap, cut twine from the spool and tape again.
  • Adhere piece to card front. Adhere the greeting over the twine with Stampin’ Dimensionals.
  • Cut a piece of Basic White cardstock at 4″ x 5 1/4″ and stamp a greeting with Basic Gray ink. Stamp a bow tie with Night of Navy ink in bottom left corner. Adhere to inside of card.

Thanks for stopping by today!

Product List
Paper Snips
[103579]
$10.00

Geared Up Garage Card Idea

Hello! Today I have a card for you that features one of my favorite stamp sets for making masculine cards – Geared Up Garage. When I attended the Stampin’ Up OnStage convention in November, 2018, the 2019 Occasions Catalog was introduced. We got to do several make and take projects with the product suite and I just loved it! I’m so glad the stamp set and dies are still available in the 2020-2021 Annual Catalog.

I attended the Creativate Summer 2020 Virtual Retreat two weeks ago and Brandy Cox, one of the five Stampin’ Up! demonstrators that organized the event, did a session on color challenges. She selected Poppy Parade, Bermuda Bay and Smoky Slate for her color palette. After the event I started thinking about stamp sets in my collection that would lend themselves to these colors and thought Geared Up Garage would work really well. Here is the card I came up with.

Here is how I made the card.

  • Card base – Cut a piece of Thick Whisper White cardstock at 4 1/4″ x 11″, score at 5 1/2″ , fold and crease with a bone folder.
  • Cut piece of Bermuda Bay cardstock at 4 1/8″ x 5 3/8″ and adhere to card front.
  • Cut piece of Whisper White cardstock at 4″ x 5 1/4″.
  • Stamp car image with Tuxedo Black Memento ink on scrap piece of Poppy Parade cardstock. Cut with coordinating die from the Garage Gears die set.
  • Die cut large gear piece from a piece of Smoky Slate cardstock.
  • Stamp the oil splotch image with Smoky Slate ink all around the piece of Whisper White cardstock and stamp nut image three times, stamping off each time before stamping onto the cardstock. Stamp oil can in bottom right corner. Stamp the nut image three times with Bermuda Bay ink, slightly offsetting them from the previously stamped Smoky Slate images. Stamp greeting in upper left corner with Bermuda Bay ink.
  • Adhere die cut gears to card front with liquid glue. Adhere car image to bottom portion of gears with Stampin’ Dimensionals.
  • For the inside of the card, cut a piece of Poppy Parade cardstsock at 4 1/8″ x 5 3/8″ and adhere to card. Cut a piece of Whisper White cardstock at 4″ x 5 1/4″. Stamp oil splotch image with Smoky Slate ink four times along left side of card, stamping off before stamping onto cardstock. Stamp nut image five times with Bermuda Bay ink. Adhere to Poppy Parade piece.

Bonus Days are back once again! From July 1 through August 3rd, for every $50 you spend (before shipping & tax) you will receive a $5 Bonus Day coupon code that can be used from August 4th – 31st.

  • You must have an email address in order to participate because the codes can only be delivered electronically.
  • If you earn multiple coupons in a single order, all of the codes will be sent in one email. If you earn multiple coupons for multiple orders they will be sent in separate emails for each code earned.
  • There is no limit on the number of coupon codes you can earn during this promotion.

Thanks for stopping by today!

 Product List