Hello! Welcome to Kylie Bertucci’s Demonstrator Training Blog Hop for February. I’m part of a group of Stampin’ Up! demonstrators from around the world that participate in Kylie’s program for building our businesses. The theme for this year is thank you cards that we make as a way to show appreciation to our customers. Please be sure to click on the names in the list at the end of this post to hop around and view the beautiful projects posted by so many talented stampers.
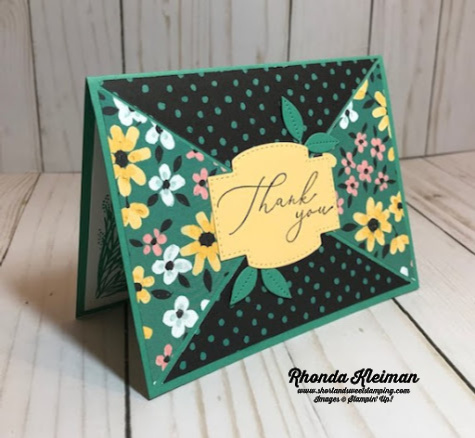
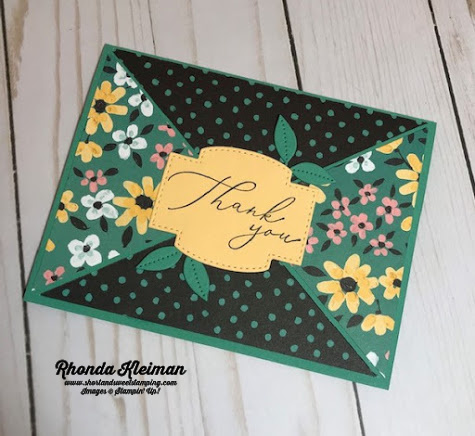
Today’s card showcases the pretty Flower & Field Designer Series Paper, one of the Sale-A-Bration items you can earn for free with a $50 order. This is an easy layout that makes DSP the star of the show.

Here is how I made the card.
- Card base – cut a piece of Just Jade cardstock at 5 1/2″ x 8 1/2″, fold in half and crease with a bone folder.
- Cut a piece of Flower & Field DSP at 4″ x 5 1/4″. Cut in half on the diagonal by lining up opposite corners along the cutting track of the paper trimmer. Once you make the cut, without pulling the two pieces apart, gently turn the piece around so that you are now cutting the two other opposite corners. You have now cut out an “X” and can pull the triangles apart.
- For this card I decided to use both sides of the DSP, however, you can mix and match with other contrasting pieces of DSP. You would just cut another piece of DSP at 4″ x 5 1/4″ and repeat the cutting process for making the “X.”
- Adhere one set of triangles , matching the points in the center of the card front. Adhere the second set of triangles and space them so that some of the card base shows in between.
- Stamp greeting from the Heal Your Heart stamp set, another Sale-A-Bration item, with Tuxedo Black Memento Ink on scrap piece of So Saffron cardstock. Run through your die cutting & embossing machine with one of the labels from the Stitched So Sweetly Dies.
- Die cut two sets of the smallest set of leaves from the Pierced Blooms Dies, a fabulous set of dies in the January-June 2021 Mini Catalog. Adhere the leaves to opposite sides of the label with glue dots. Adhere label to center of card front.
- Cut a piece of Basic White cardstock at 4″ x 5 1/4″. Stamp the smaller image from the Corner Bouquet stamp set with Just Jade ink in the lower left corner and adhere to inside of card. I chose not to stamp a greeting in order to write a personalized note.

Thanks for stopping by today!


The Bouquet of Hope Paper Pumpkin Kit provides enough supplies to create nine cards and coordinating envelopes. This soft, sympathetic kit includes patterned card bases, die-cut floral elements, ribbon, embellishments, and more! The kit’s exclusive Bouquet of Hope Stamp Set features supportive sentiments centered around comfort, care, hope, and love. Such a versatile stamp set can be used throughout the year! To subscribe to Paper Pumpkin, visit my site by clicking here.


Lovely layout showcasing the beautiful DSP! Thank you Rhonda for taking part in our Demonstrator Training Blog Hop this month.
Thanks, Kylie! It is a fun and easy layout.
Love the colors. Stunning!
Thanks, Laurie! Just Jade is one of my favorite In Colors and the DSP I chose really shows it off.
I LOVE this card Rhonda, it is beautiful!!
Thank you,Christi! I appreciate your comment.
Such a great card. You have some lucky customers
Thanks for your kind words, Diane! I have some wonderful customers so it is my pleasure sending them nice cards!
Lovely card Rhonda x
Thank you, Mo!
I love your card and design, Rhonda. I always appreciate the ‘recipe’ for the card – I need to try this one.
Thank you, Mary Ann! It is an easy layout for you to try.
Love your design. Thanks for sharing
Thanks, Sandi!
I love the layout you have used Rhonda! I am inspired to give it a try! 🙂
Thanks, Deb! Definitely give it a try!
Very cute card idea – I like the triangle cuts and then flipping the cardstock to show both beautiful sides.
Thank you, Nancy! This is a great way to showcase DSP.
Wonderful way to highlight this lovely DSP.
Thanks, Angie! Agree that it is a great way to showcase the DSP.